


Architectural Rendering Process: 9 Main Stages For London Showroom Design
Architectural rendering process got rid of the status of magical mystery long ago and became architects’ everyday tool. They use CGI technologies to show a fully finished design in photoreal quality before the actual construction. It makes the project approval much easier since detailed high-end renderings illustrate the design with the utmost accuracy and convey all the necessary information about its advantages.
Small wonder that many architects seek for better understanding of CGI process – to rest assured they get exactly what they desire. Naturally, they wonder what the main steps are, how to calculate the turnaround time and how to describe their needs to get an accurate result.
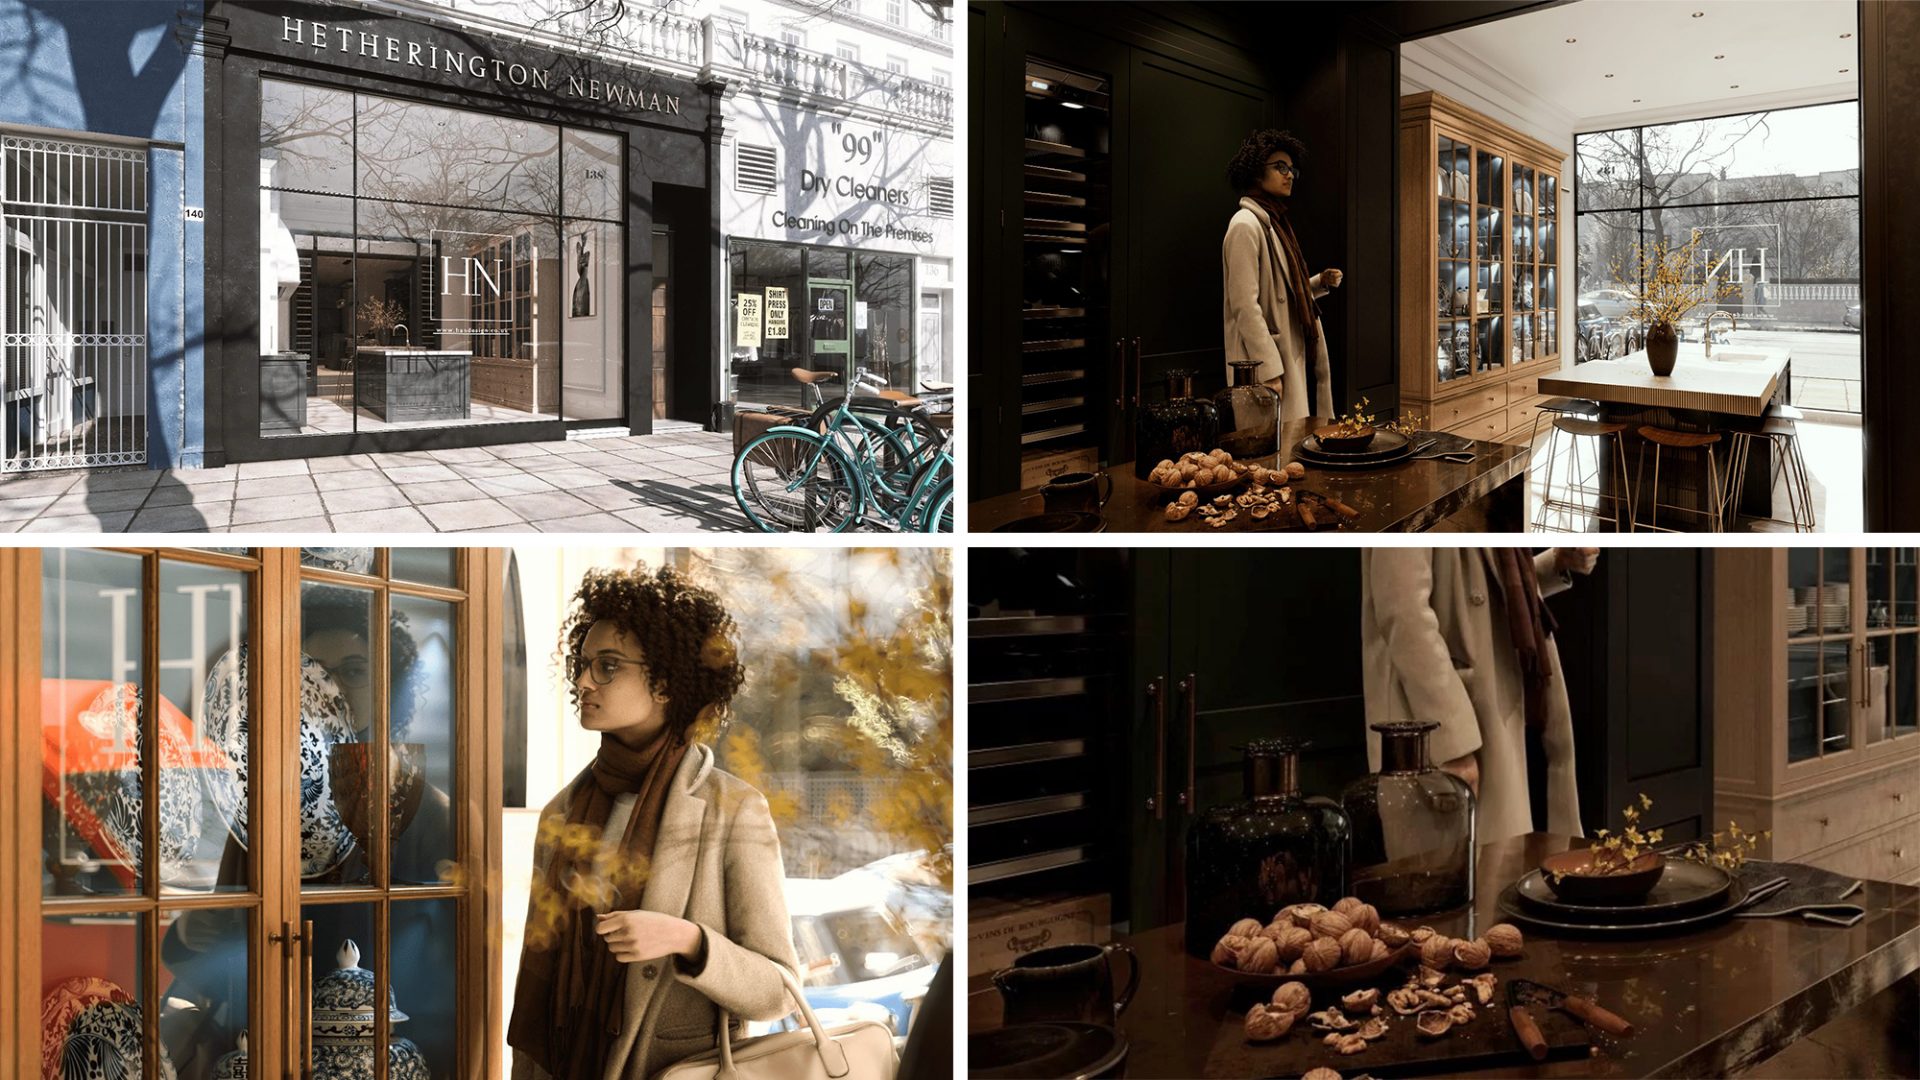
To answer these questions, we have decided to put all cards on table and reveal behind-the-scenes process of architectural 3D rendering in ArchiCGI. To illustrate clearly all stages, we will show the workflow on the example of CG visualizations project for Hetherington Newman company. We will show what the client sent as references, how our 3D artist achieves photorealistic quality and how to establish effective cooperation with an outsource CG rendering studio. You can see the results preview below.
The background is the company needed new London Showroom pictures before the construction process has even started – to advertise showroom opening on the company’s website. Join us as we describe the architectural rendering process and reveal how we work to bring top-notch design visualizations:
[lwptoc hierarchical=”1″ numeration=”decimalnested”]
Technical Assignment
Everything had begun when Hetherington Newman got in touch with our client manager. The latter directed them to register a project in our online CRM platform, where Hetherington Newman specified the character of the project. They needed two images for the showroom, interior, and front of the shop. The client also left us visual references to get a perfect result. The more visual information we get, the smoother and faster the architectural rendering process will be. So Hetherington Newman provided us with photos of newly purchased premises, preliminary drawings, textures samples, and a low-quality 3D architectural model of the room.
Points of View

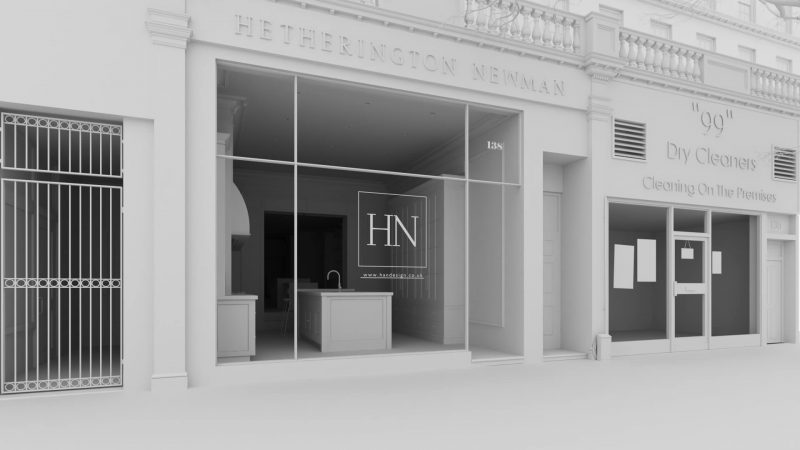
So next, we chose the points of view for the images. This gave us the info about which parts of the environment to recreate and how many 3D models and accessories to use. We chose the point of view in the same way as photographers before taking a picture: the showroom is the main object in the frame, and the image meets the golden ratio and the rule of thirds. But the difference is, we had more opportunities to select the perfect angle. Computer software has no physical limitations, such as gravity. So that we could look from every side to check what “the camera” catches and try a lot of different views to find the best one.
We chose the outside point of view that showcases the signboard and exterior design at a favorable angle. Also, it illustrates how eye-catching is interior seeing through the big shop window. In the same way, the internal point of view allows to see the street and emphasizes the coziness of the room.
Additional Info
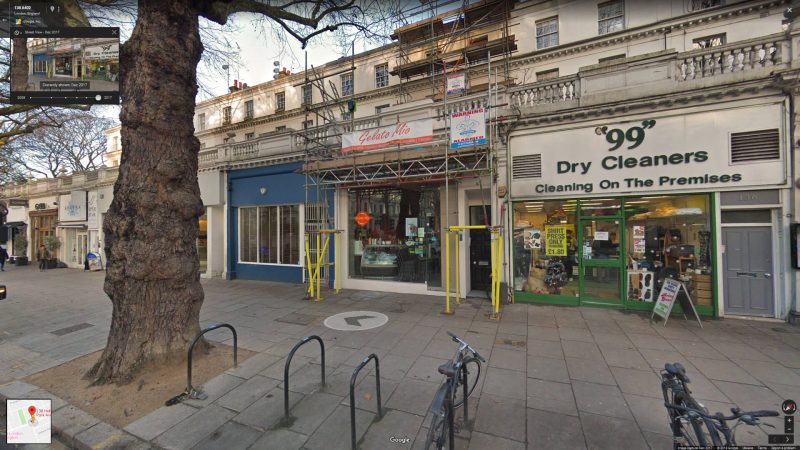
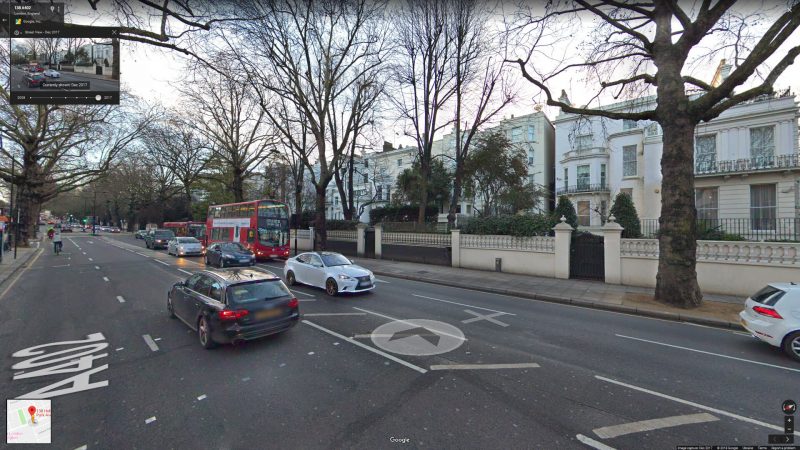
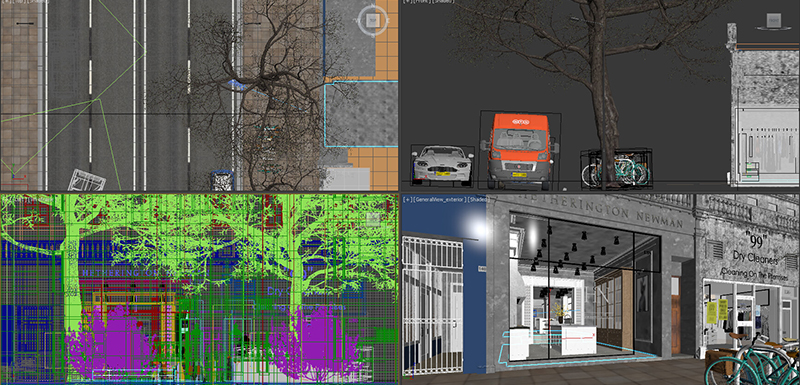
Along with the references, Hetherington Newman sent us the address of the future showroom. This way, our 3D Artists were able to accurately show the environment in the images. And even though we had no possibility to visit the place and take pictures for photomontage, we went the smart way about this stage of the architectural rendering process.
So using Google Maps, we have consulted with satellite imagery and recreated the location from scratch at the next steps. Compare the real look to the rendered one. The whole street was produced to match real buildings’ disposition.
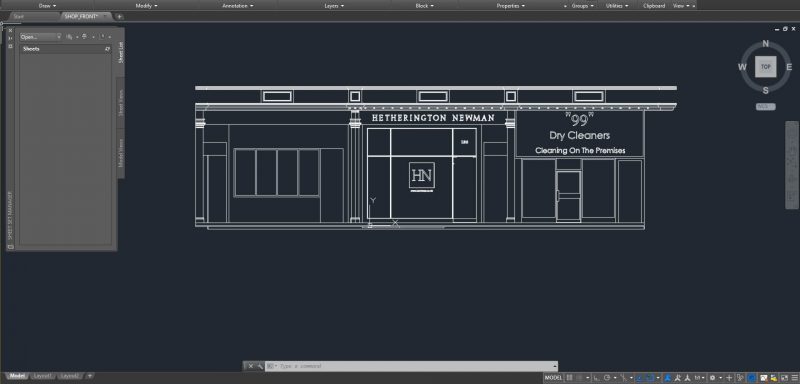
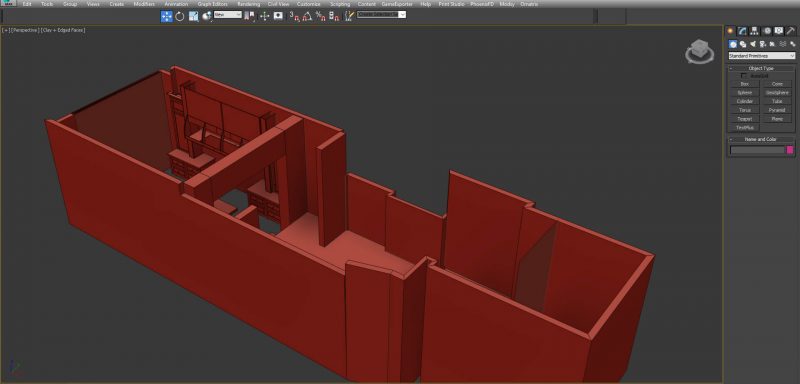
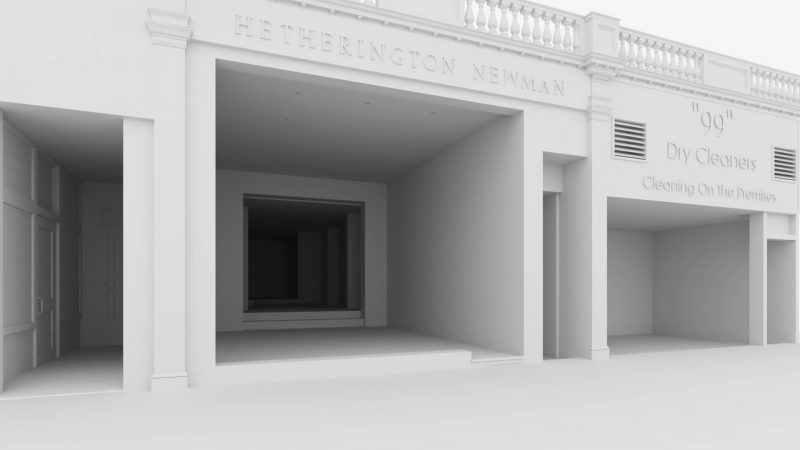
Architectural 3D Modeling
At this stage of the architectural rendering project, it came to modeling. There are tons of options for this, so we had to choose from:
- Spline Modeling,
- Digital Sculpting,
- NURBS modeling,
- Procedural modeling,
- Boolean modeling,
- And the most widely used, Polygonal modeling.
We also used the last, as it works for most tasks of realistic rendering and simply is the fastest. In this way, operating simple geometric shapes, we created the required architectural forms and proportions. First, we worked with basic things such as walls and floors, cabinet furniture, and big objects on the street. Once we had worked out all these, it came to smaller details.
Lighting and Shading
Finally, we came to the long-awaited point of architectural rendering process where we began to work on photorealism. And there is one element that affects realistic quality the most – lighting.
There are many types of it, like three-point lighting, key light, fill light, backlight, front lighting, side lighting… and the list goes on. 3D artists set the types the most appropriate for their main goal – to make the light natural. This task requires great skill since 3D artists worked on shadows cast by big and small objects, and ensured every light source matches real ones. There shall be no excessively dark or light areas, missing shadows, or too much light. We wanted a high-end photoreal image as a result so the lighting had to be perfect.
Accessories and Decorations
Then there was the most creative part. We’ve decorated the project and added a lot of 3D accessories to make it look lively.
Hetherington Newman decided not to order completely new 3D accessories. Creating exclusive models may take some days and the architectural rendering process will take longer to finish. Instead, the client chose accessories from the rich library of 47207 ready to use 3D models ArchiCGI provides. The client picked bar chairs models themselves and entrusted us to select the rest.
Next, we’ve adjusted even pre-ready models so that they complement the desired mood. Also, we’ve added a life-like visitor figure to the interior image to create a realistic ambiance. However, the surroundings still looked bare and textureless. We got to make them indistinguishable from real ones later.
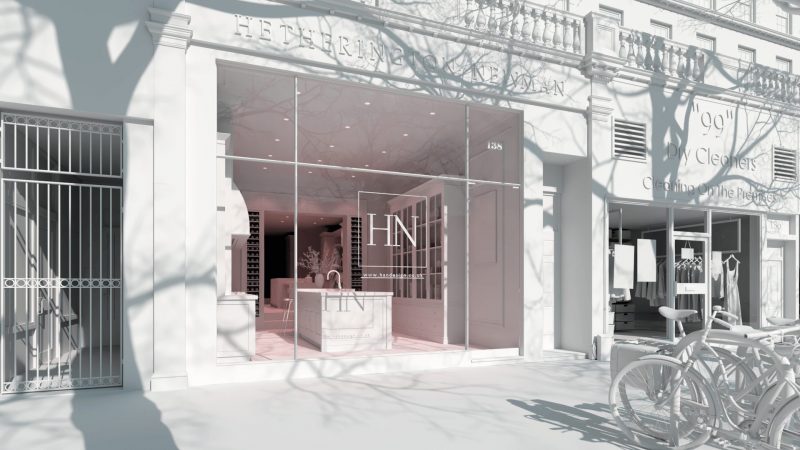
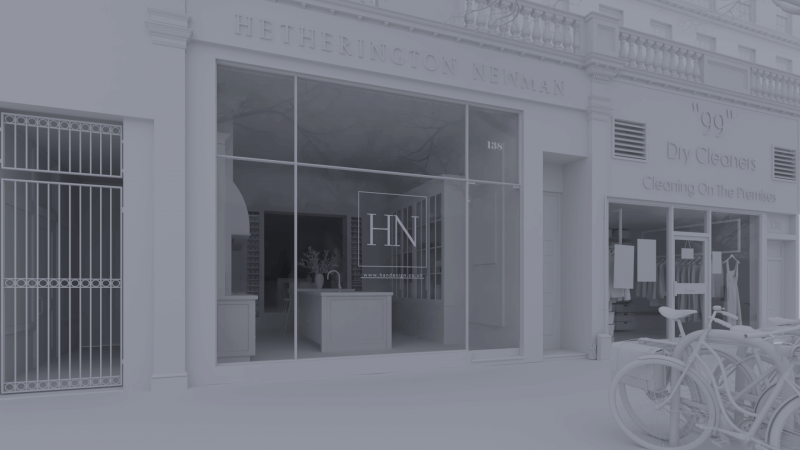
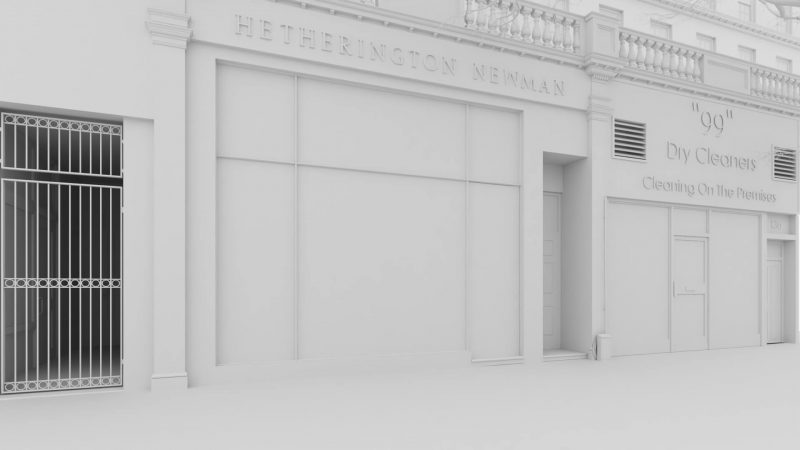
At the end of this step, we double-checked that the added accessories didn’t distort the light or cast unnatural shadows. As the result, we had the first draft in gray material and we could show the screenshots to the client. Hetherington Newman said they were satisfied with the intermediate results, so we continued with the architectural rendering process.
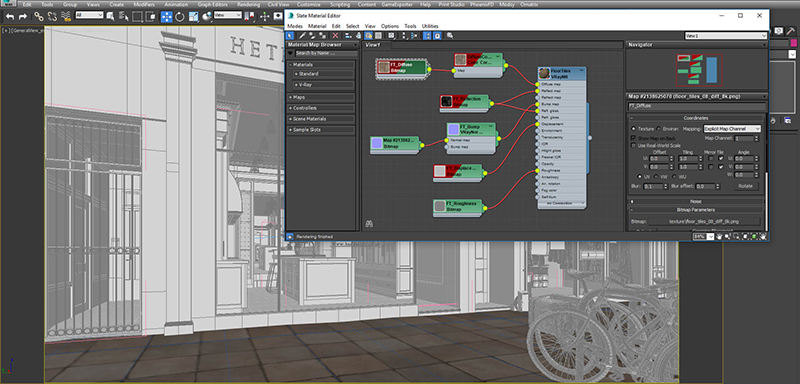
Textures and Materials
It was the time to take care of aesthetic of the images. And what makes all great renders look so beautiful and breathtaking is proper texturing. The main challenge here was to make textures meet all the references. Other than that, the textures needed to be high-quality and eye-catching to grab the viewer’s attention and produce a realistic look.
To achieve the effect, our seasoned 3D artists used professional tools, such as material editor, to handle the textures. Further followed UV unwrapping, the process of fitting textures to objects dimensions with mathematical precision so that they look natural, with all seams invisible and transitions between materials smooth-looking.
Then, we were ready to present FullHD Colored Drafts, and find out if everything meets the expectations. A lot of comments followed from Hetherington Newman. It turned out we displayed some colors incorrectly. Also, we had to replace few models. Since ArchiCGI provides up to 60% of changes for free, it didn’t lead to additional costs from the customer. It was important for us that the client stayed satisfied with the quality so we immediately got down to adjustments to finish the work on time.
Raw Renderings and Masks
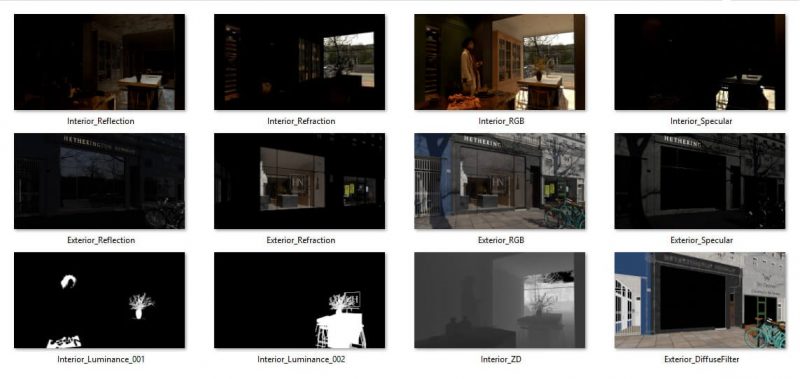
Once we agreed upon everything, it was the time to compute final images of the highest quality. Depending on the resolution, a number of objects in the scene and complexity of materials, the process can take from 1 hour to a few days or even weeks.
Our goal was a very high 4K resolution. So for speeding up we set the depth of field aggressively for the view outside the window so that we did not overload it with details. Voilà! We got hyper-real delightful images, which, however, still had a little room for improvement…
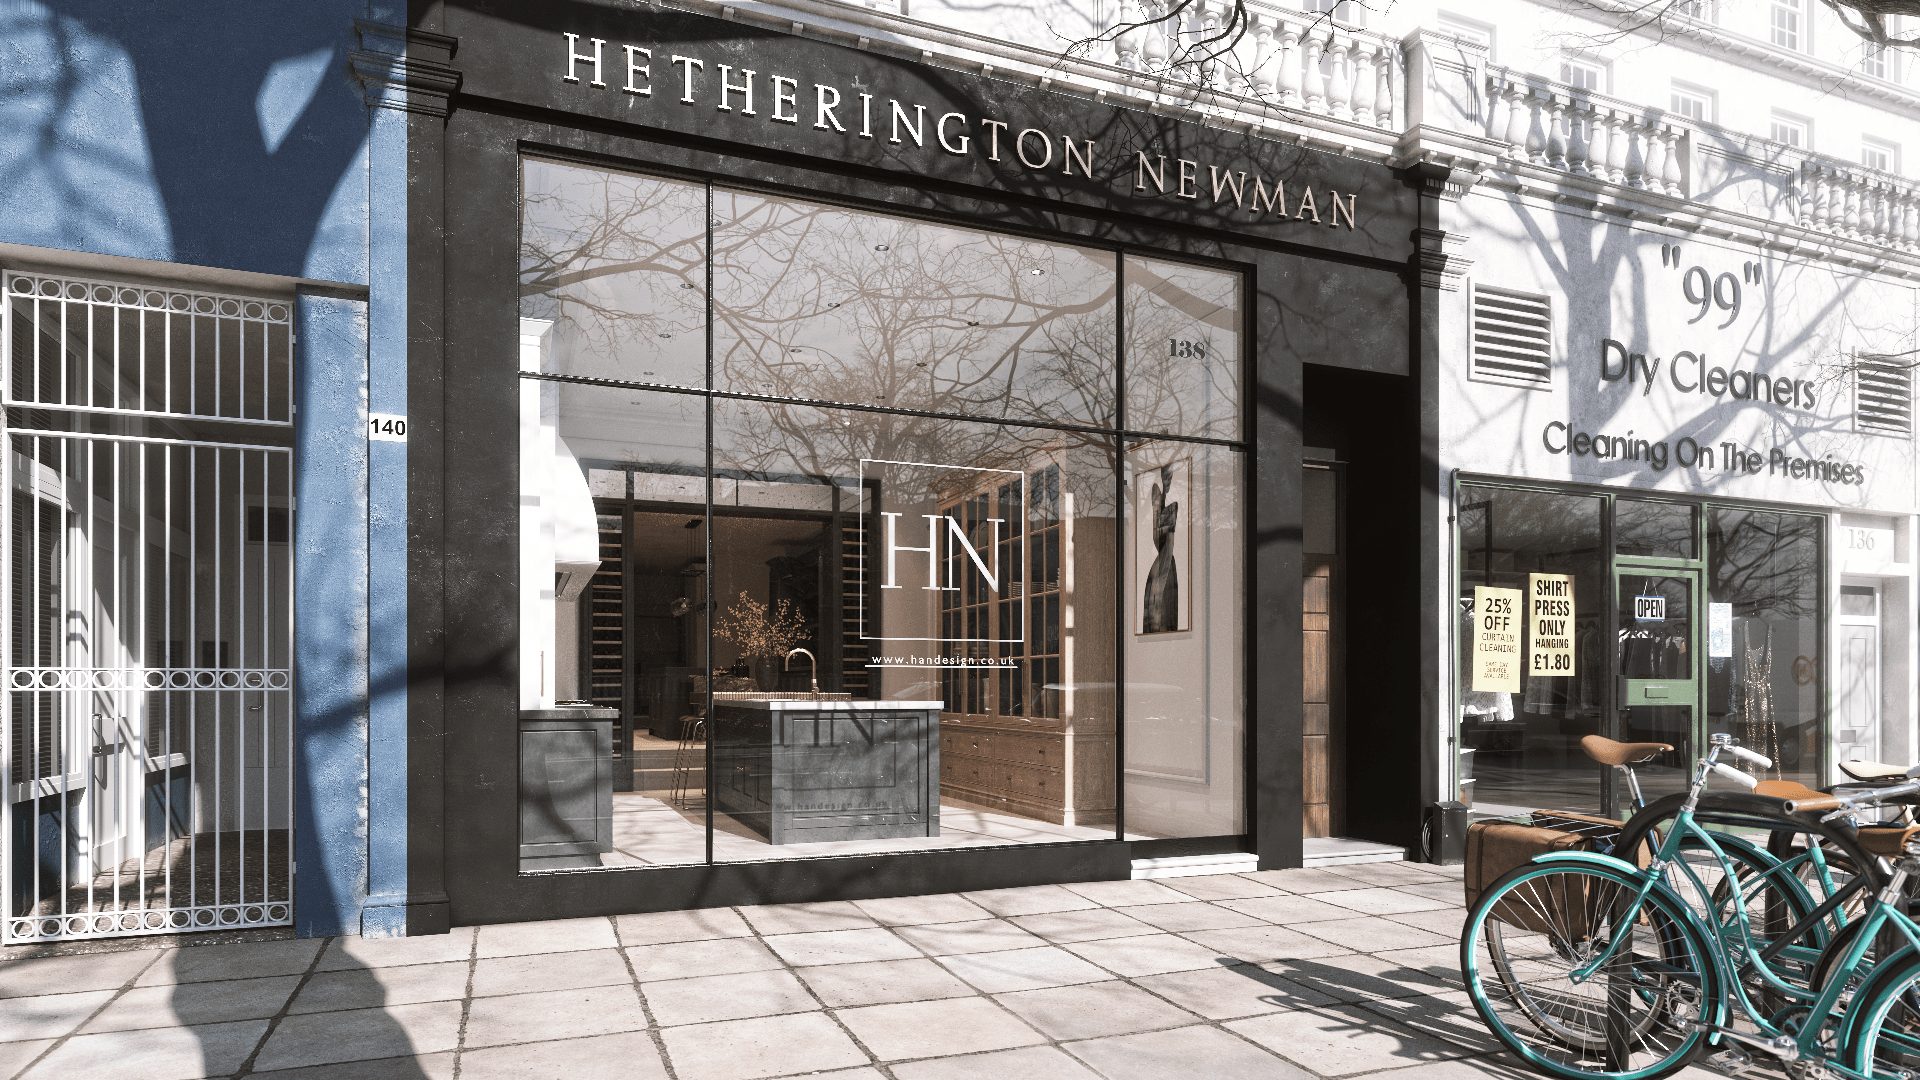
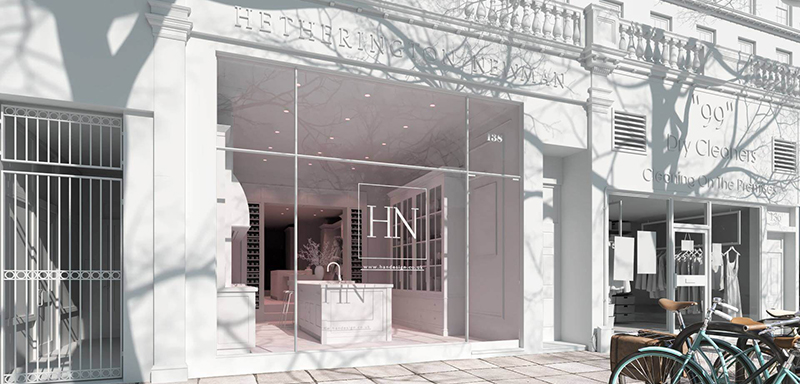
Post Production. Final Results

An elegant shopwindow on the final exterior image.
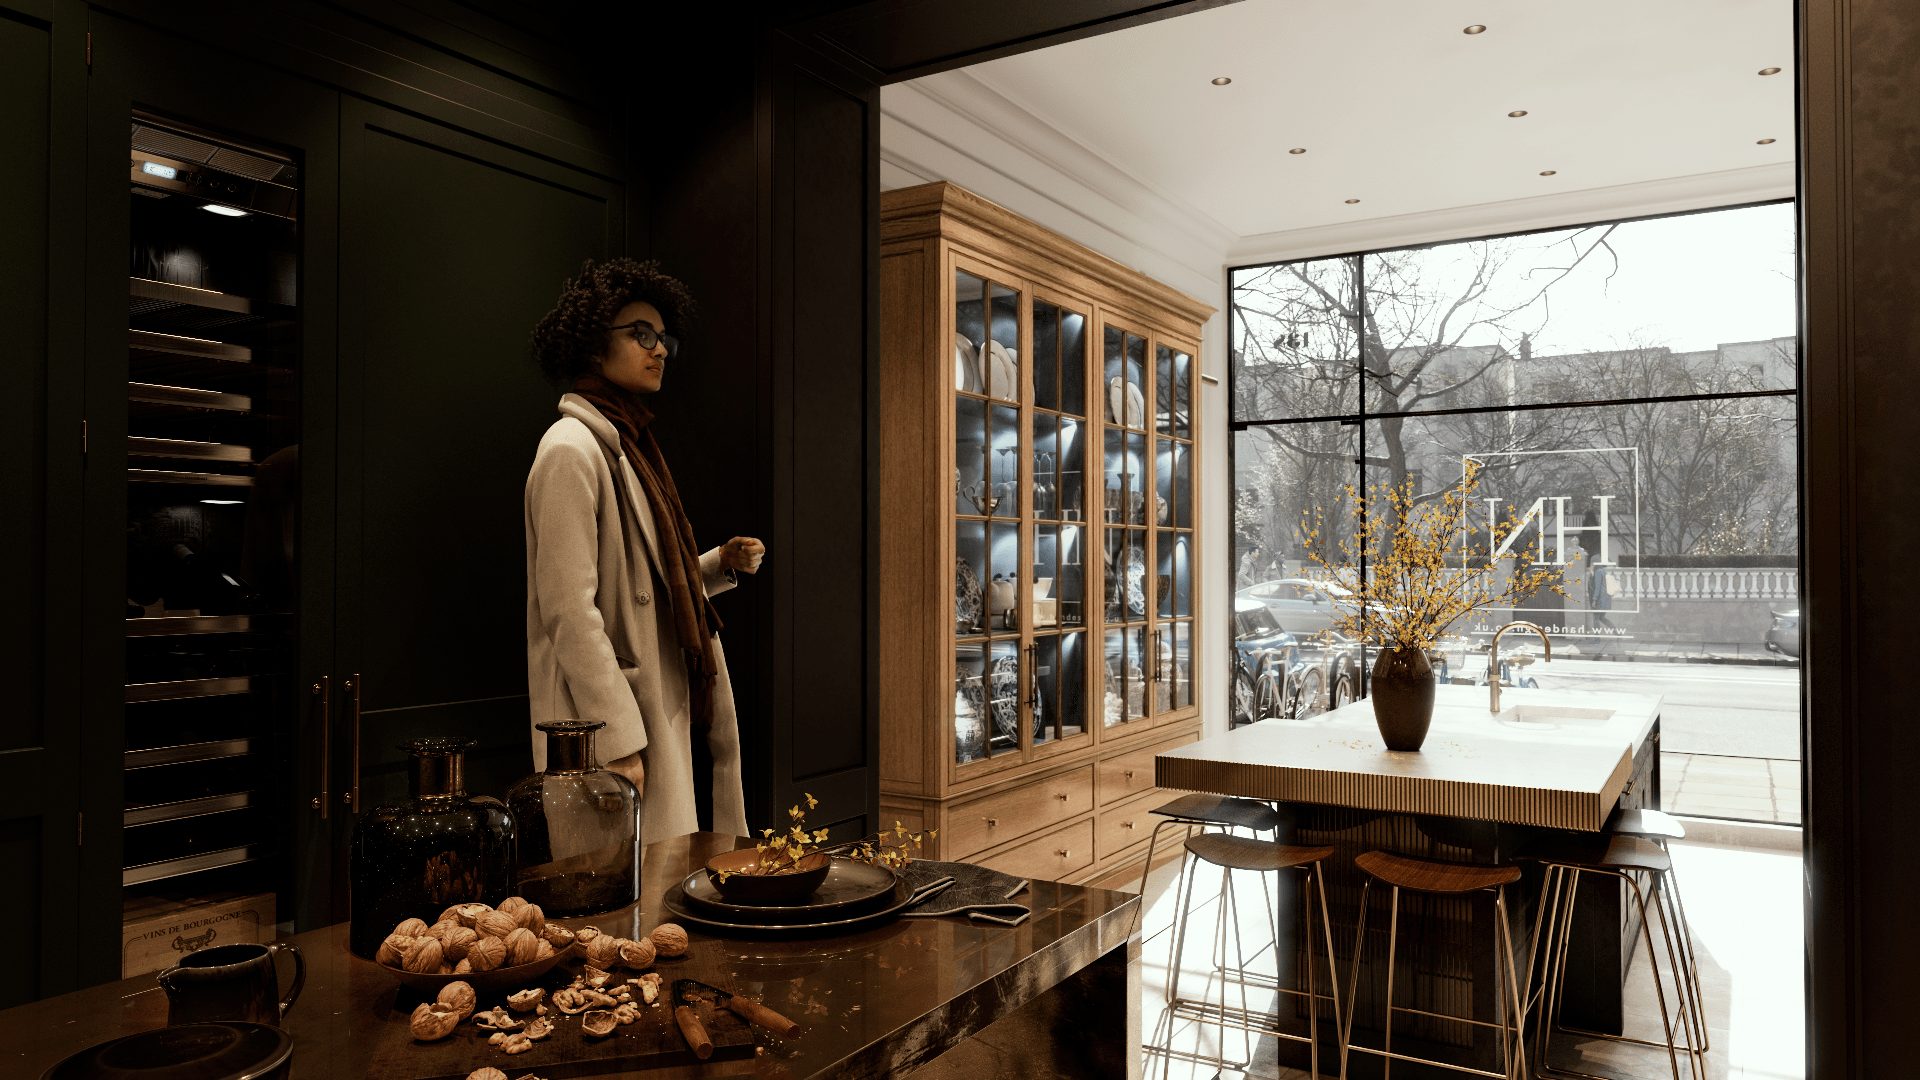
Detailed and atmospheric showroom from the inside.

The closer look at the showroom 3D accessories and decorations.

3D models look indistinguishable from the photographs.
At this stage of the architectural rendering process, our Photoshop Artist has worked on the brightness, contrast, depth, sharpness and special effects. Setting these parameters affects how emotional, professional looking and easy on the eye the pictures are. As Hetherington Newman wanted to use the renderings for the website and social networks, they should be attractive and grab attention immediately. Whew!.. That’s it.
We walked through the whole architectural rendering process. And, concurrently, the daily routine of a 3D visualizer. As you can see, it not only allows getting gorgeous project picturing. As well as that, it gives an architect a lot of opportunities to advertise a design from the very beginning of its creation and satisfy his clients’ needs.
Hetherington Newman company were pleased with the promotion imagery they got from our services, and we have regular cooperation. Their showroom opening in London followed very soon.
Get your project estimated in just 1 hour - fill out this brief!
Do you want to get cutting-edge CG images for your design? Need to give persuasive and engaging project presentation? That’s what photorealistic 3D rendering services can help you with. Contact ArchiCGI to see how your design takes away the breath of your customers!

Irma Prus
Content Writer, Copywriter
Irma writes articles and marketing copy for ArchiCGI. Her dream is that more people discover the power of CGI for architecture. Irma is into neuromarketing, ruby chocolate and Doctor Who series.
Like this project? We’ve got plenty more! Check out these CGI beauties.
Comments
Paul
Helen