


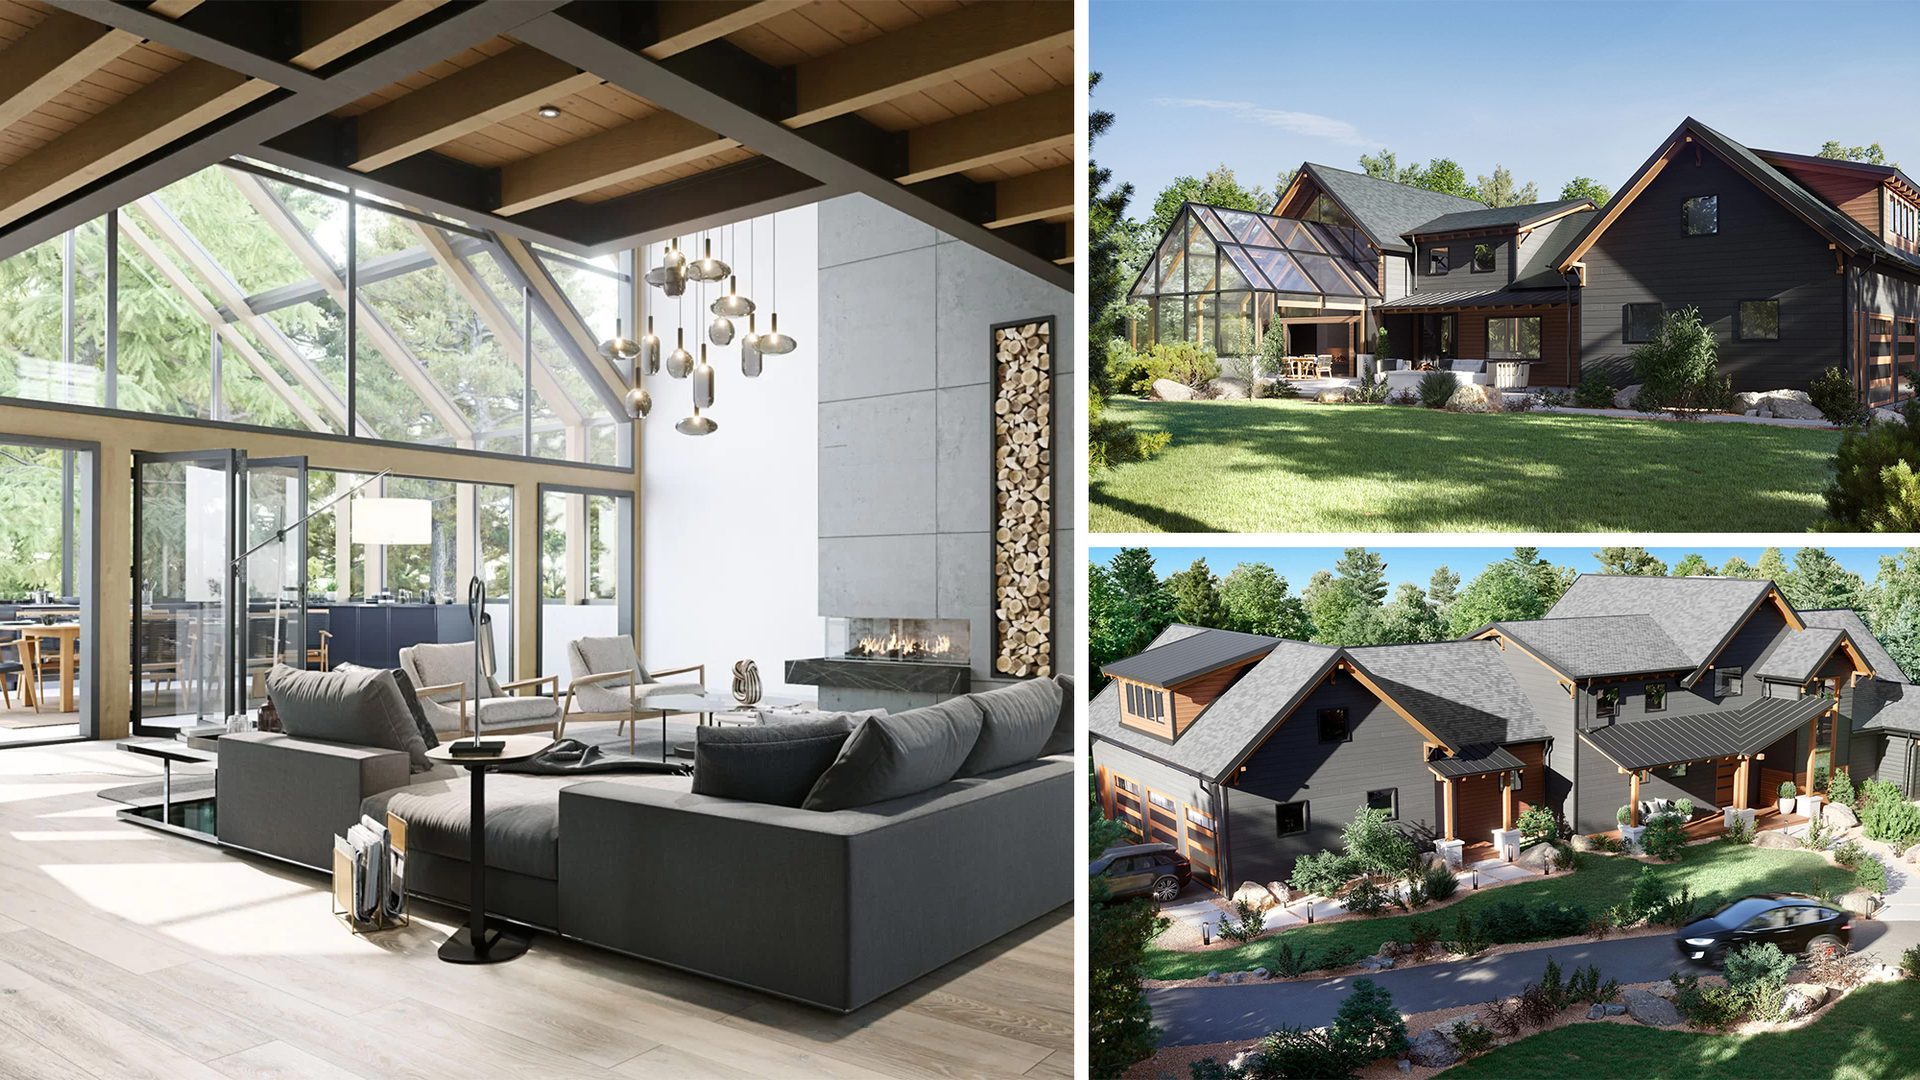
3D House Rendering Services for a Project in Pennsylvania
This 3D house rendering was a fascinating project. That the CG artists understood at the first glance at the assignment. For the building was super elegant and cozy, and its surroundings — idyllic, full of lush greenery, lit by abundant sunlight. A sheer pleasure to work with!
The house rendering services were commissioned by Andrew Wiegand, an amazing designer and architect from Wiegand Inc. He worked on the house extension project and wanted to show his client the result in photorealistic quality. So our task was to create 1 interior and 2 exterior CG views of the house in 4K resolution.
We set to work immediately. To speed things up, two CGI specialists were assigned to the project. Veronika Ukrainets, a senior 3D artist and mentor, got the interior view. The exterior visualizations were given to Andrii Sydorenko, the 3D visualizer on her team.
Now, if you’ve always wondered how high-end 3D renderings are made, you’re in luck. Because you’re about to find out how real-life CGI ninjas create imagery for both interiors and exteriors — and what results they deliver.
Although the 3D artists worked on their tasks in parallel, we’ll separate them for convenient reading. First, we’ll talk about the living room rendering creation, and next — about the exterior CG views. Now without further ado, let’s find out how the 3D renders were created.
Brief
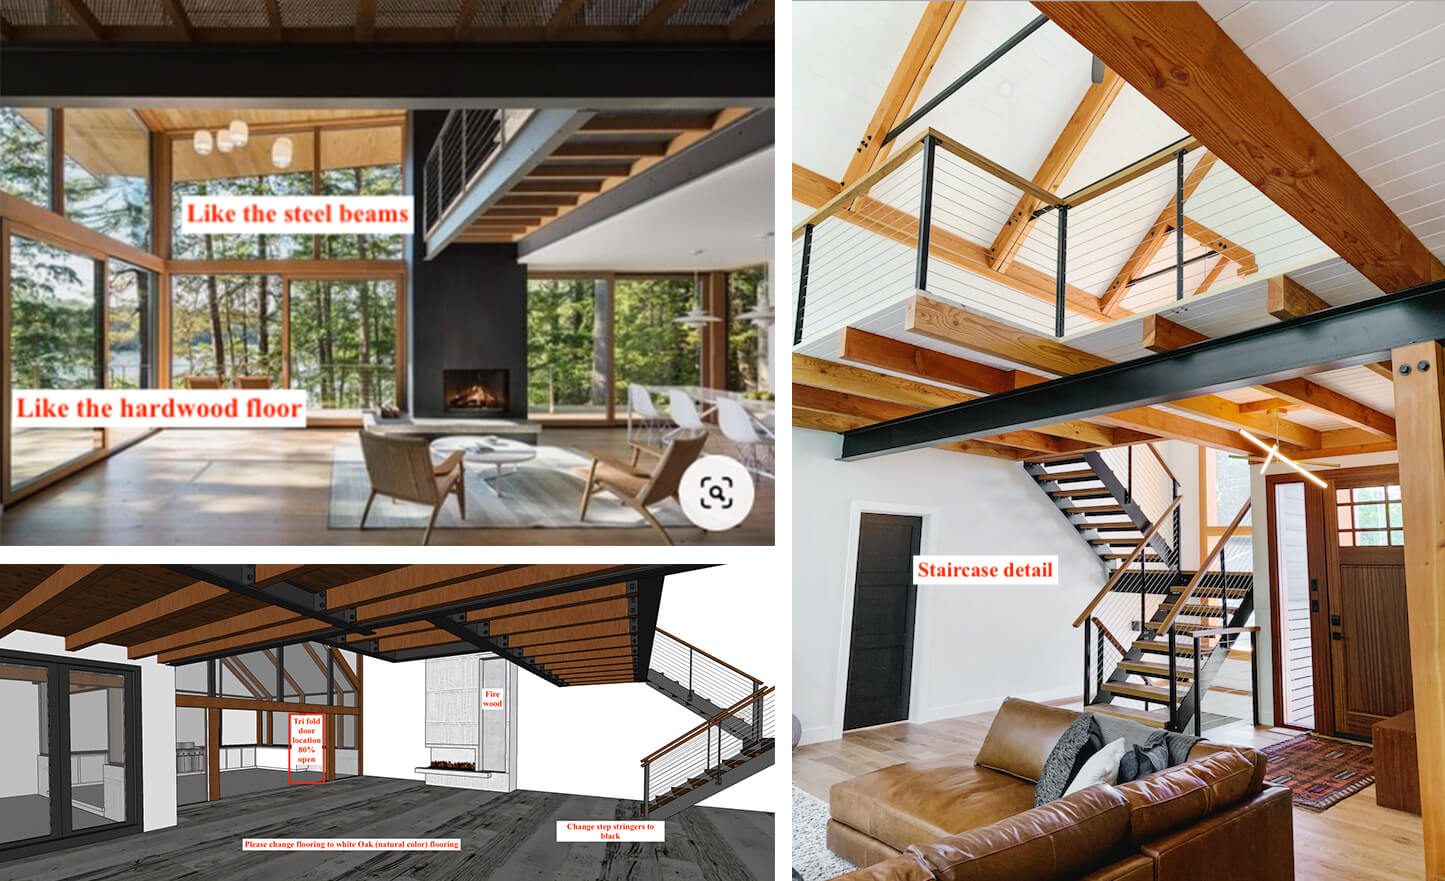
The assignment was crystal clear and contained a lot of useful materials. There were specifications about the furniture layout for the outdoor patio, the inside living room, the indoor glass room, landscape around the house. In addition, the brief included inspiration photos for the surroundings, the back courtyard, the glassroom, exterior finishing colors, and elevation plans. And most importantly, there was a Sketchup 3D model of the house. This was very helpful, as the 3D artists would be able to use it as a base for their photorealistic 3D modeling of the house.
House Interior 3D Rendering

The task was to create a 3D visualization of a living room with a view on the glass roof terrace. So our project manager examined the assignment and asked for some more reference imagery. This would give a more precise understanding of what Andrew had in mind in terms of details and general atmosphere.
In response, Andrew sent us very thorough and detailed explanations. He specified materials and colors for different interior elements, mentioned what he wanted in terms of furniture, and left the choice of specific items to us. He attached the reference pictures to the message and explained what he liked in each. Below are some of the notes Andrew wrote to us on CGI CRM.
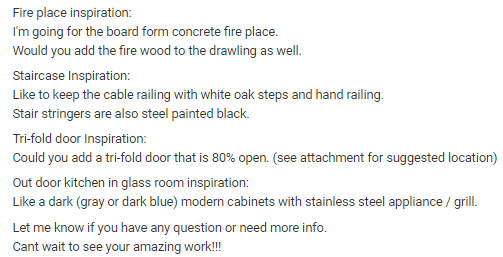
And these are some of the reference imagery he sent.
Building Geometry
A ready 3D model is always of tremendous value to a CGI project. Even though 3D artists don’t use it the way it is. The fact of the matter is, photorealistic imagery requires impeccable geometry. And a 3D model made for other purposes or converted to 3ds Max from a different software program just doesn’t have it.
Why do 3D artists need it then? Because it speeds up the process. A non-photorealistic 3D model can be improved upon, used as the basis for a new high-quality model, or serve as a great reference. In the case of this 3D house rendering project, it was the second scenario. Veronika used the SketchUp model Andrew had sent us for building a new one.
The 3D artist built only the part of the 3D model that would be featured in the interior rendering, plus the first floor. She would have used the latter if Andrew had needed additional views. Once the geometry was ready, Veronika assigned materials to walls, flooring, ceiling, and beams.
Choosing Furniture and Fixtures
Based on Andrew’s comments and references, Veronika selected 3D models of furniture for the living room 3D rendering. She found most of them in our 3D assets library, which contains over 7325 items.
So the architectural visualizer started with the main objects — two small sofas. Veronika tried a few options and then had a new idea. She came across a 3D model of a super chic large sofa and realized it could look even better than two smaller ones. Not to mention it’d make for a beautiful shot.
With the central object in the scene, Veronika determined the camera angle and selected all the other interior elements. She tried different options and left those she liked most and that fit the design. As for the decor, Veronika selected some excellent accessories from the 3D models that Andrew had sent.
Setting Light
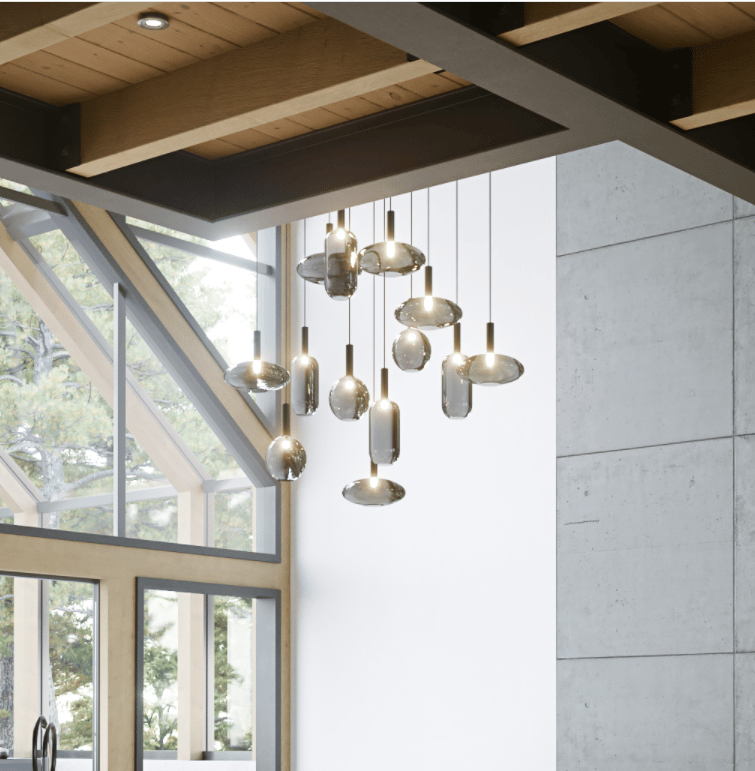
The 3D artists wanted to fill the room in the 3D house rendering with sunlight. For that, she used Corona Sky and Corona Sun. To enhance the effect, Veronika “switched on” the chandelier. That was a subtle job, actually.
First, Veronika had to figure out the ideal intensity and warmth of the chandelier light. It needed to brighten up a somewhat darkish area in the living room, eliminate the shadow on the back of the sofa, yet not interfere with the sunlight. That took a lot of trial and error.
Another tricky thing about the chandelier was choosing the glass transparency. The material was to be just thick enough to make spheres look lit yet not give much glow. Sounds too complicated now? Yet nothing is impossible for a real artist. Veronika nailed the task!
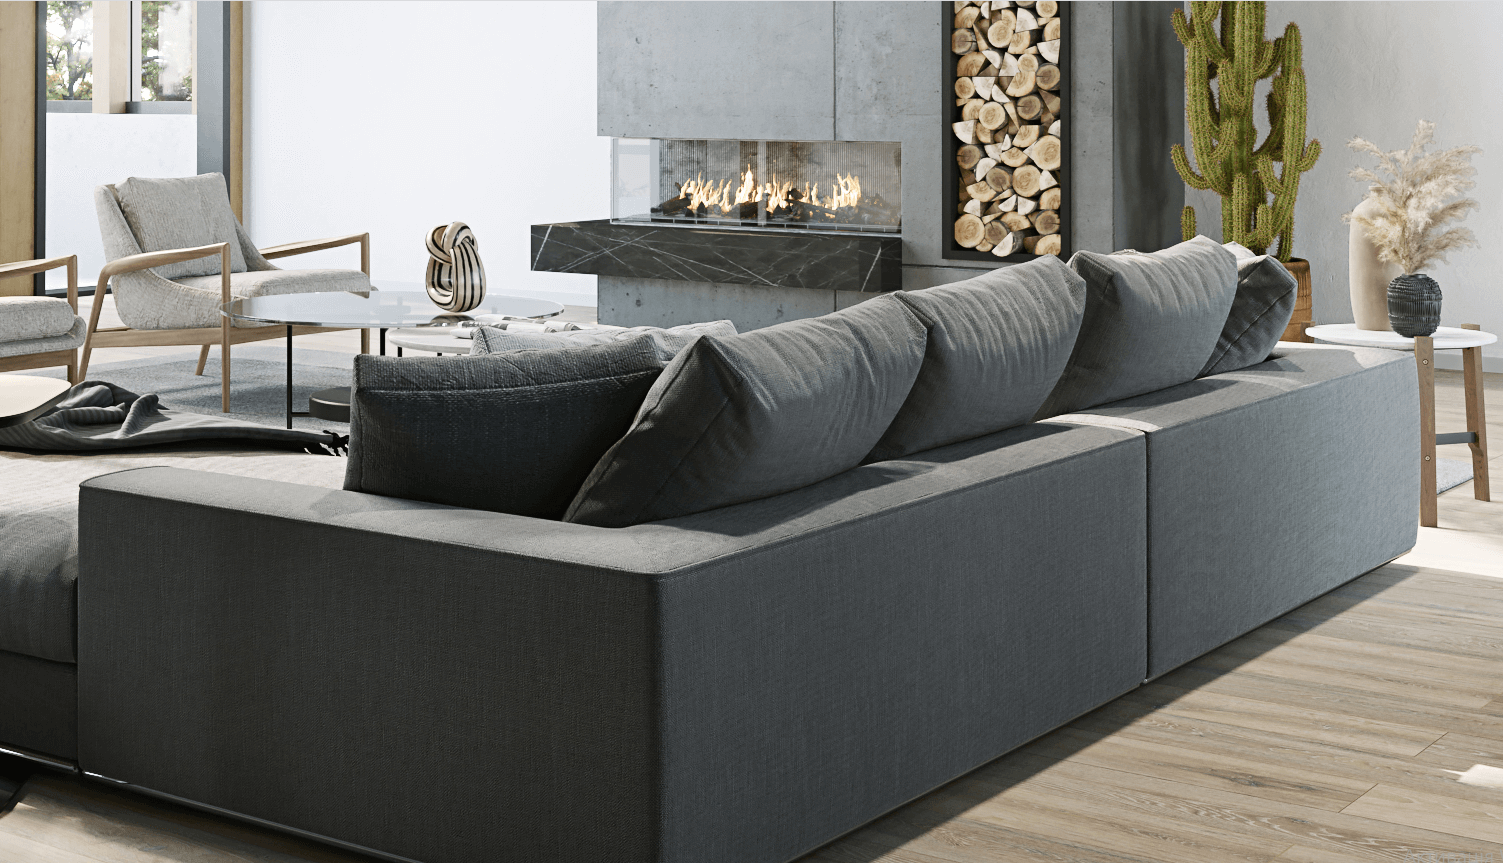
She had another stroke of genius and mixed cold and warm-hued shadows. The former came from the natural light and the latter — from the fireplace. As a result, she got those subtle transitions from cold to warm tones on the surfaces. It added crispness and drama to the scene and gave it more volume. Only an artist could have thought of that!
Materials Setting
There are two unspoken rules in professional 3D rendering art. First, the larger the space, the more attention the materials will get. Second, the more material an object shows, the higher realism it should have.
This 3D interior rendering falls under both rules. And that meant that materials needed to look extraordinary. Let’s see how Veronika made it work.
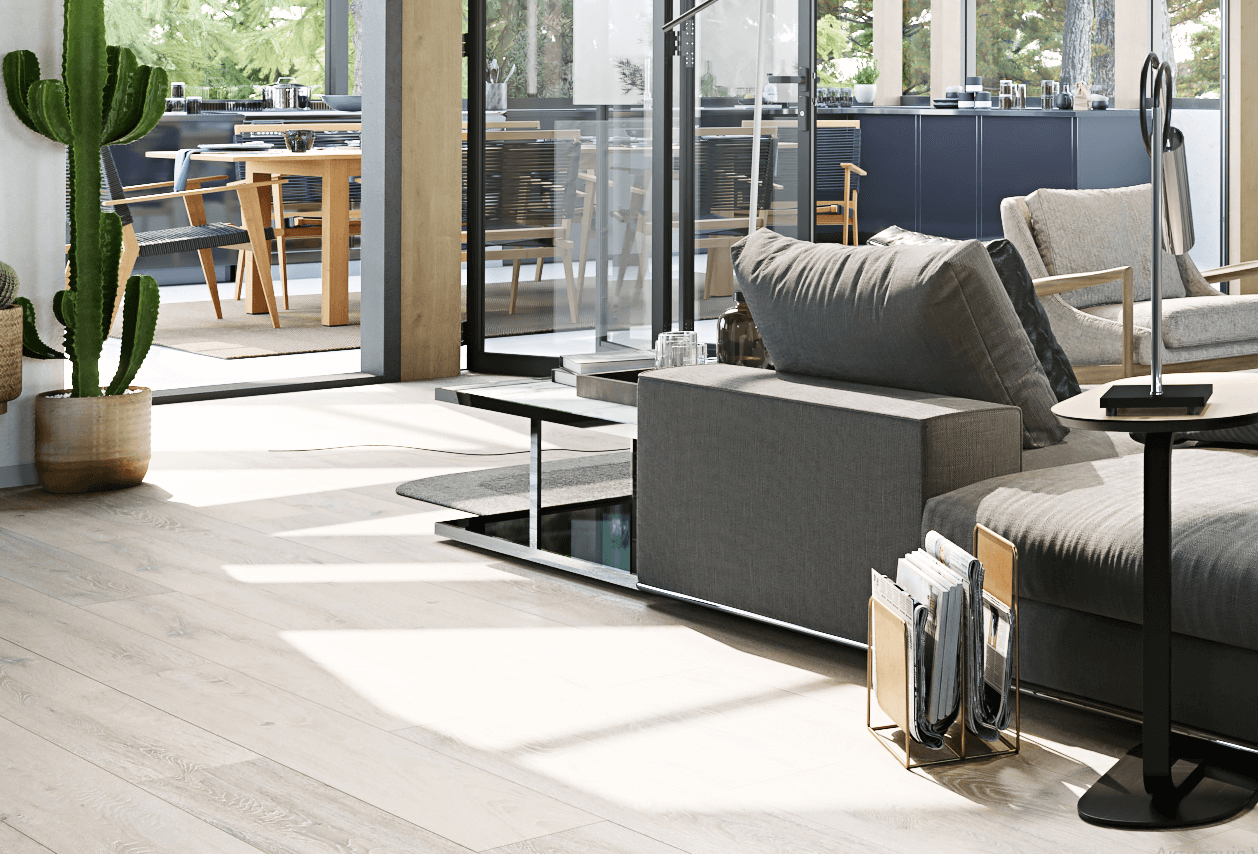
This 3D house rendering shows a lot of exposed floor surface. And it has different hues — just like in real life. Which required a lot of thinking, fine-tuning and would have been impossible without previous experience.
Normally, the floor in the 3D rendering would have been in one tone. But that would look flat and unnatural. To bring some variety to the flooring, the 3D artist added some glossiness to the floor material. Just the right proportion so it doesn’t show, yet allows to get the glare she needed.
This way, the floor doesn’t have a plastic, evenly colored surface. It has transitions: a bright sun spot here, a shadow there, a middle tone, then a bright sunbeam.
Another crucial material to this 3D house rendering was of the sofa upholstery and cushions. The 3D visualizer spent a lot of time fine-tuning the settings until she got this elegantly nonchalant look. The fabric folds are pronounced yet soft and cozy.
Adding Details and Greenery
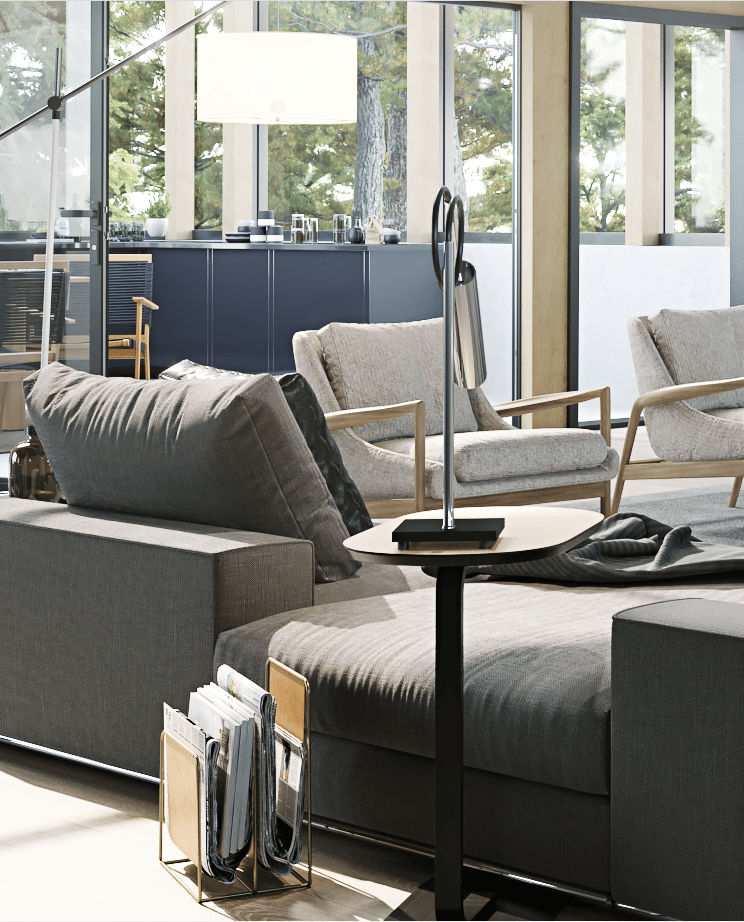
At that stage, it was time to add life to the place through thoughtful details. So the 3D artist spiced the 3D interior rendering services up with some greenery and elegant décor. To enhance the lived-in effect, Veronika arranged a cozy reading nook with a table, lamp, a stand with magazines, and put a soft throw on the sofa.
With the scene ready, the 3D artist pre-rendered it in lower resolution and checked with the project manager and the team. Once Veronika got their approval, she proceeded to post-produce the 3D interior rendering.
Final 3D House Interior Rendering

The 3D house rendering was virtually ready at that point. Yet Veronika decided to do some more polishing and tweaking to achieve maximum photorealism. The 3D artist increased contrast and sharpness, made the light brighter at places, and added some more shadows.
The 3D visualizer also worked a little bit on materials. Namely, she added light spots on the wooden beams and made the gaps between concrete tiles of the fireplace finish more pronounced.
Once the 3D rendering was perfectly ready, Veronika sent it to Andrew. He asked to make a few changes, and then wrote the feedback which made our hearts sing.

We were enthusiastic too! And eager to deliver the result that would make Andrew’s clients happy. So Veronika tweaked the 3D house rendering and sent it again. Andrew approved the image and wrote the following answer.

What can we say — working on this project was a sheer pleasure.
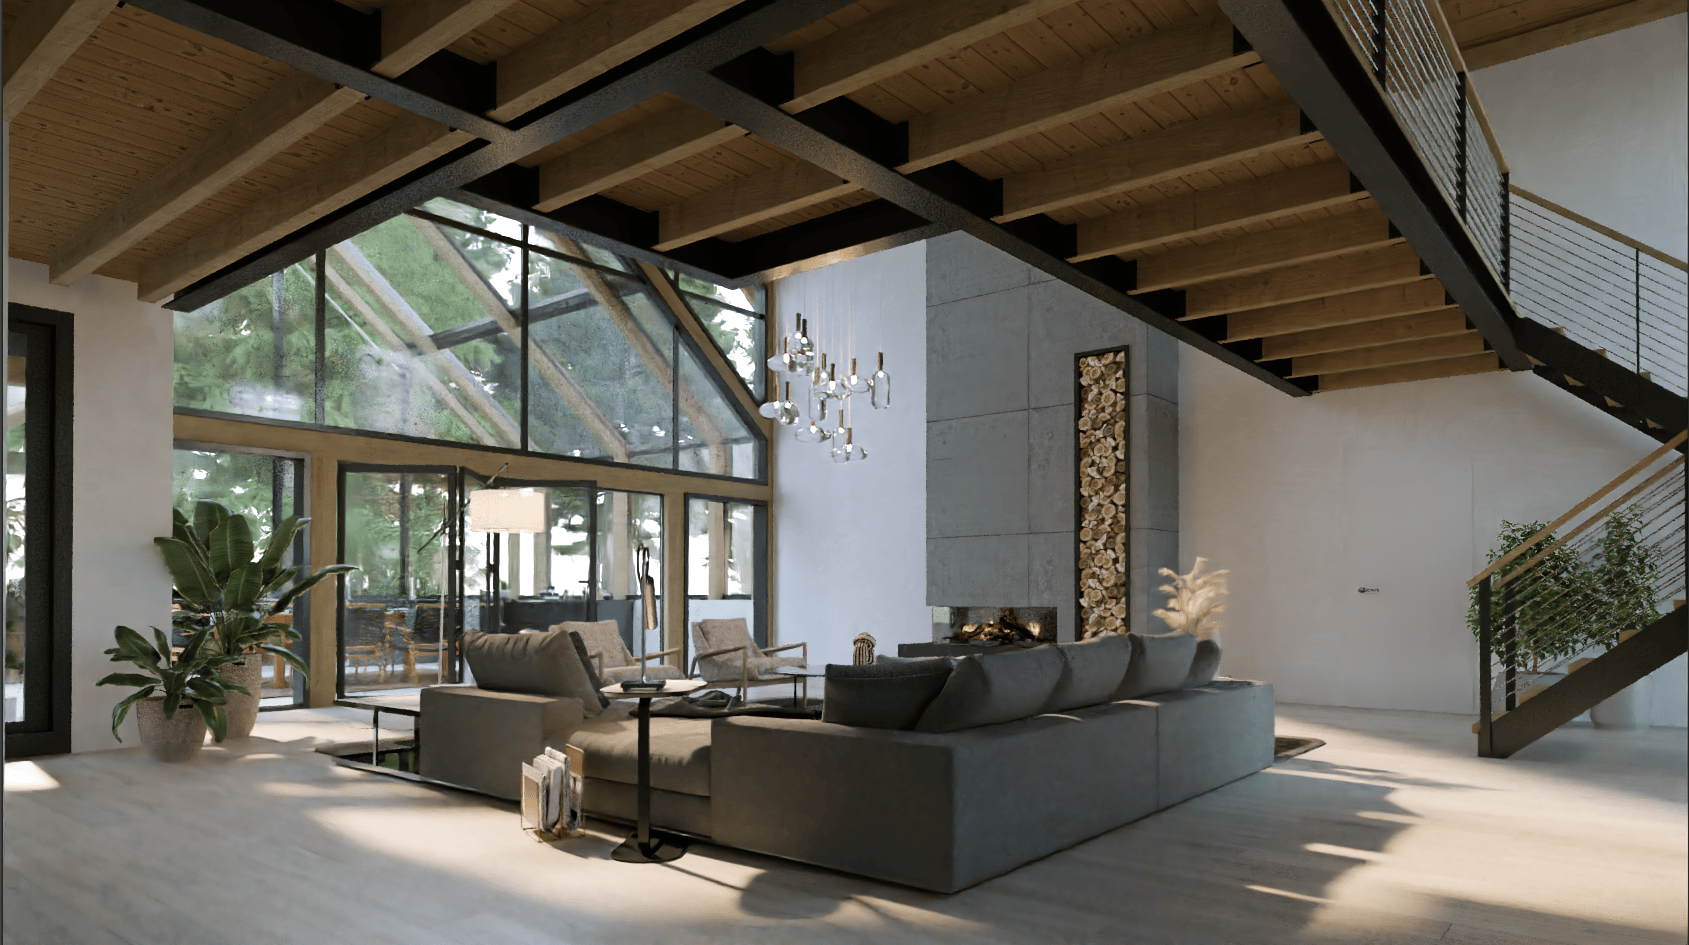
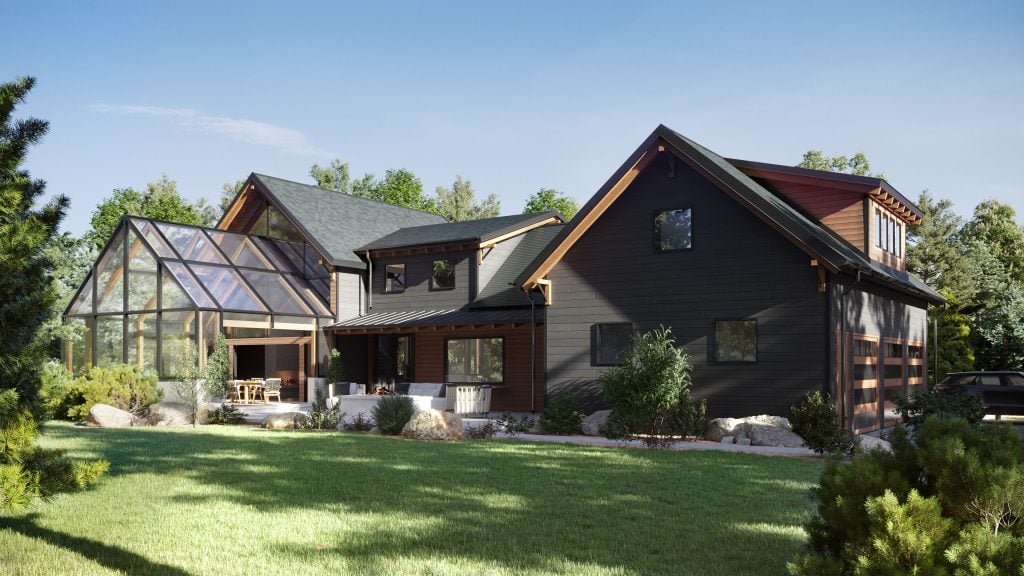
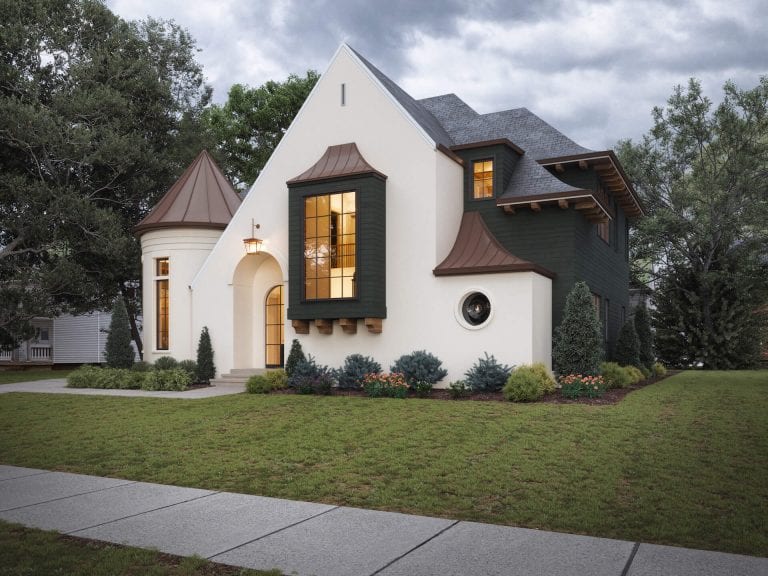
CG House Exterior Rendering
Such an amazing house, don’t you find? And surrounded by incredible landscapes. Living there must feel like a paradise! That’s what we needed to convey: the look, the feel of the renewed design, and its beautiful story.
So Andrii Sydorenko, the 3D artist in charge of these CG house exteriors, started by examining the brief and making a work plan. Once he established the steps to take, he proceeded to work on the renders. Let’s see how the 3D ninja got to the photorealistic images you see above!
Upgrading the House 3D Model
First things first, Andrii needed to test the Sketchup 3D model that had come in the brief. The goal was to understand if the quality of its geometry was sufficient for realistic exterior rendering.
So Andrii opened the 3D house model in the 3ds Max, textured it, rendered it, and looked at the result. He realized that the model needed to be rebuilt. This was great too, as rebuilding is way faster and easier than starting from zero. Plus, the 3D visualizer decided to work only on the parts of the house that would appear in the 3D renderings. This way, he would save time for the surfaces that would actually be seen.
What did remodeling look like? Roughly speaking, Andrii isolated each element, built a new surface over it, and deleted the old one. At this point, he textured the surfaces and set the preliminary lighting.
Building the Environment and Setting the Light
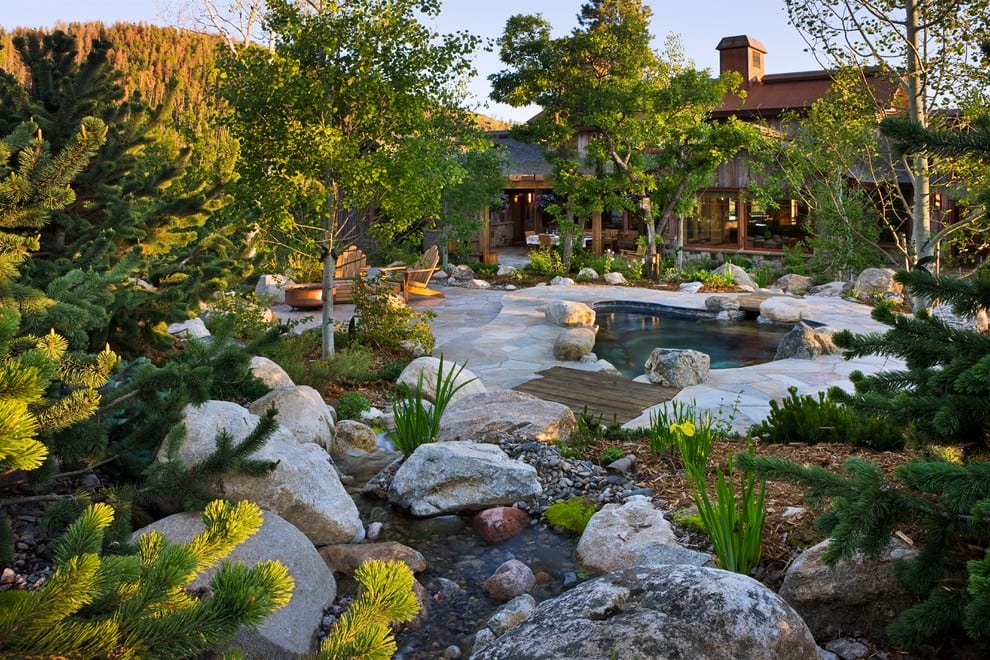
At this stage, Andrii developed the landscape design. The brief contained a reference photo for the mood and main elements like trees and stones, plus the placement of the garden walkways. The rest was up to the 3D artist.
Andrii loved this task. First, he looked for reference imagery on Pinterest. He searched for details like lighting, grass, trees, stones. Then, he made a sketch of the garden and built this look in the 3ds Max.
Then, it was time to set the light. Based on the reference photos he had previously found, Andrii chose a perfect HDRI map showing a bright summer day. He then rotated it till he found the angle that gave beautiful shadows, glares, and illumination that lit the house facade best.
Setting Materials
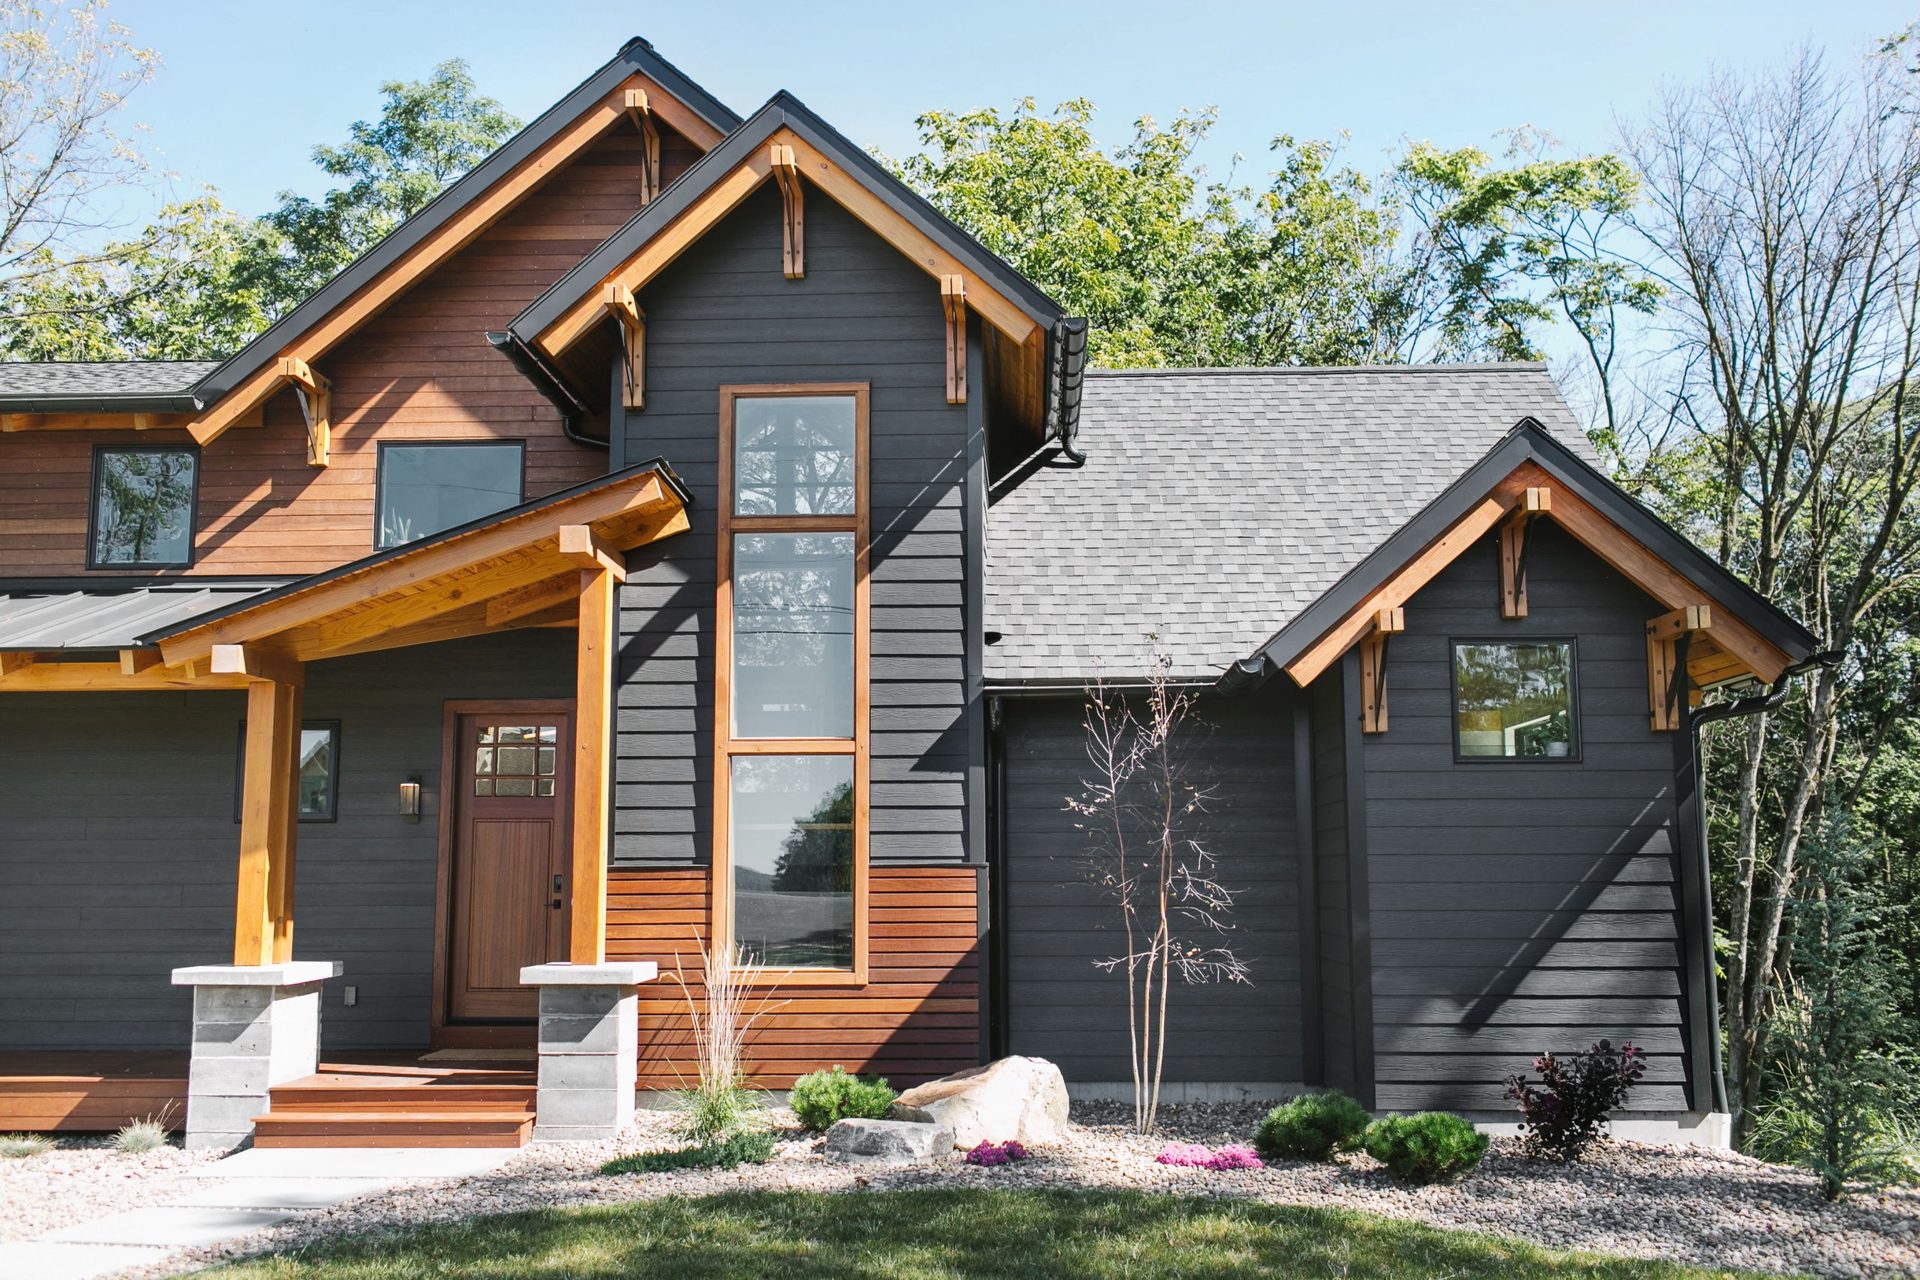
Andrew had sent great references for the exterior finishes — real photos of a similar house. So the 3D artist created materials based on these photos. The main ones were wood and metal. The latter turned out to be quite a challenge because of the complicated roof shape, which had a lot of slopes.
Adding Details
This was when the 3D artist checked the 3D house rendering scene and looked for ways to add more life to it. He started by working on the garden. Andrii tweaked the grass, added more variety to the greenery, and scattered pebbles along the road.
To add visual interest, the 3D visualizer gave the pebbled part of the garden a wavelike shape. Then, he put bushes and big stones in these pebbled areas and planted bollard lights along the tiled path. Voilà! The rendering showed a stylish comfy house with a neat, well-kept garden.
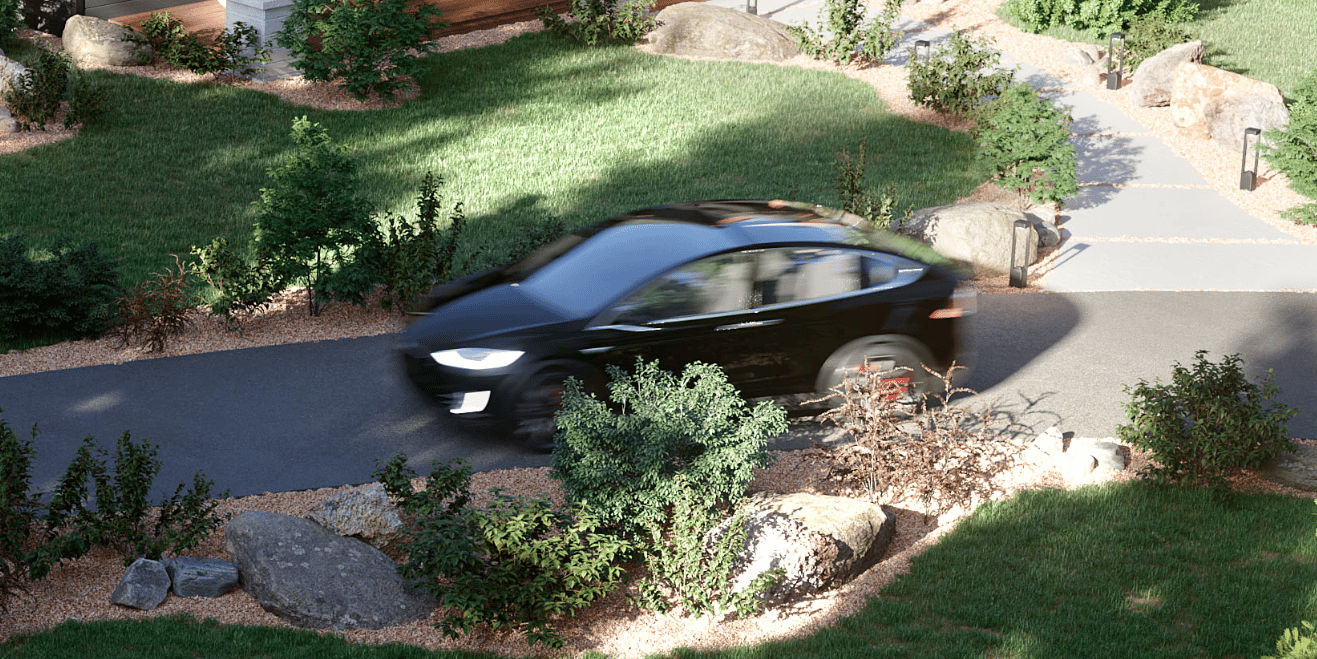
As a final touch, Andrii added movement to the scene. For that purpose, he put 2 cars in the rendering and applied motion blur to one of them. As a result, it seems to be gliding along the road. Now, the image looked like an everyday scene of life in a country house! Just what Andrii wanted.
Final 3D House Rendering
Next, the 3D artist pre-rendered the scene, checked the light and materials, then rendered it in full quality and resolution, tweaked colors in Photoshop, and sent the rendering to Andrew.

We’re so proud of how this project turned out. Not to mention that working with Andrew Wiegand was a sheer pleasure. The CGI team liked his design aesthetics immensely, as well as his professional way of communicating. A sure recipe for success! For when an architect and his CGI team are in love with the concept and get on like a house on fire, magic happens. And the result is a mind-blowing 3D house rendering!
Would you like your visuals to show your project with as much impact and style? Whether you’re based in Pennsylvania or looking for 3D rendering in Philadelphia specifically, contact ArchiCGI 3D rendering company. We’ll bring to life your design in CGI and show its unique story.

Irma Prus
Content Writer, Copywriter
Irma writes articles and marketing copy for ArchiCGI. Her dream is that more people discover the power of CGI for architecture. Irma is into neuromarketing, ruby chocolate and Doctor Who series.
Like this project? We’ve got plenty more! Check out these CGI beauties.


Comments
Vinny
Anthony
Paul
Nancy