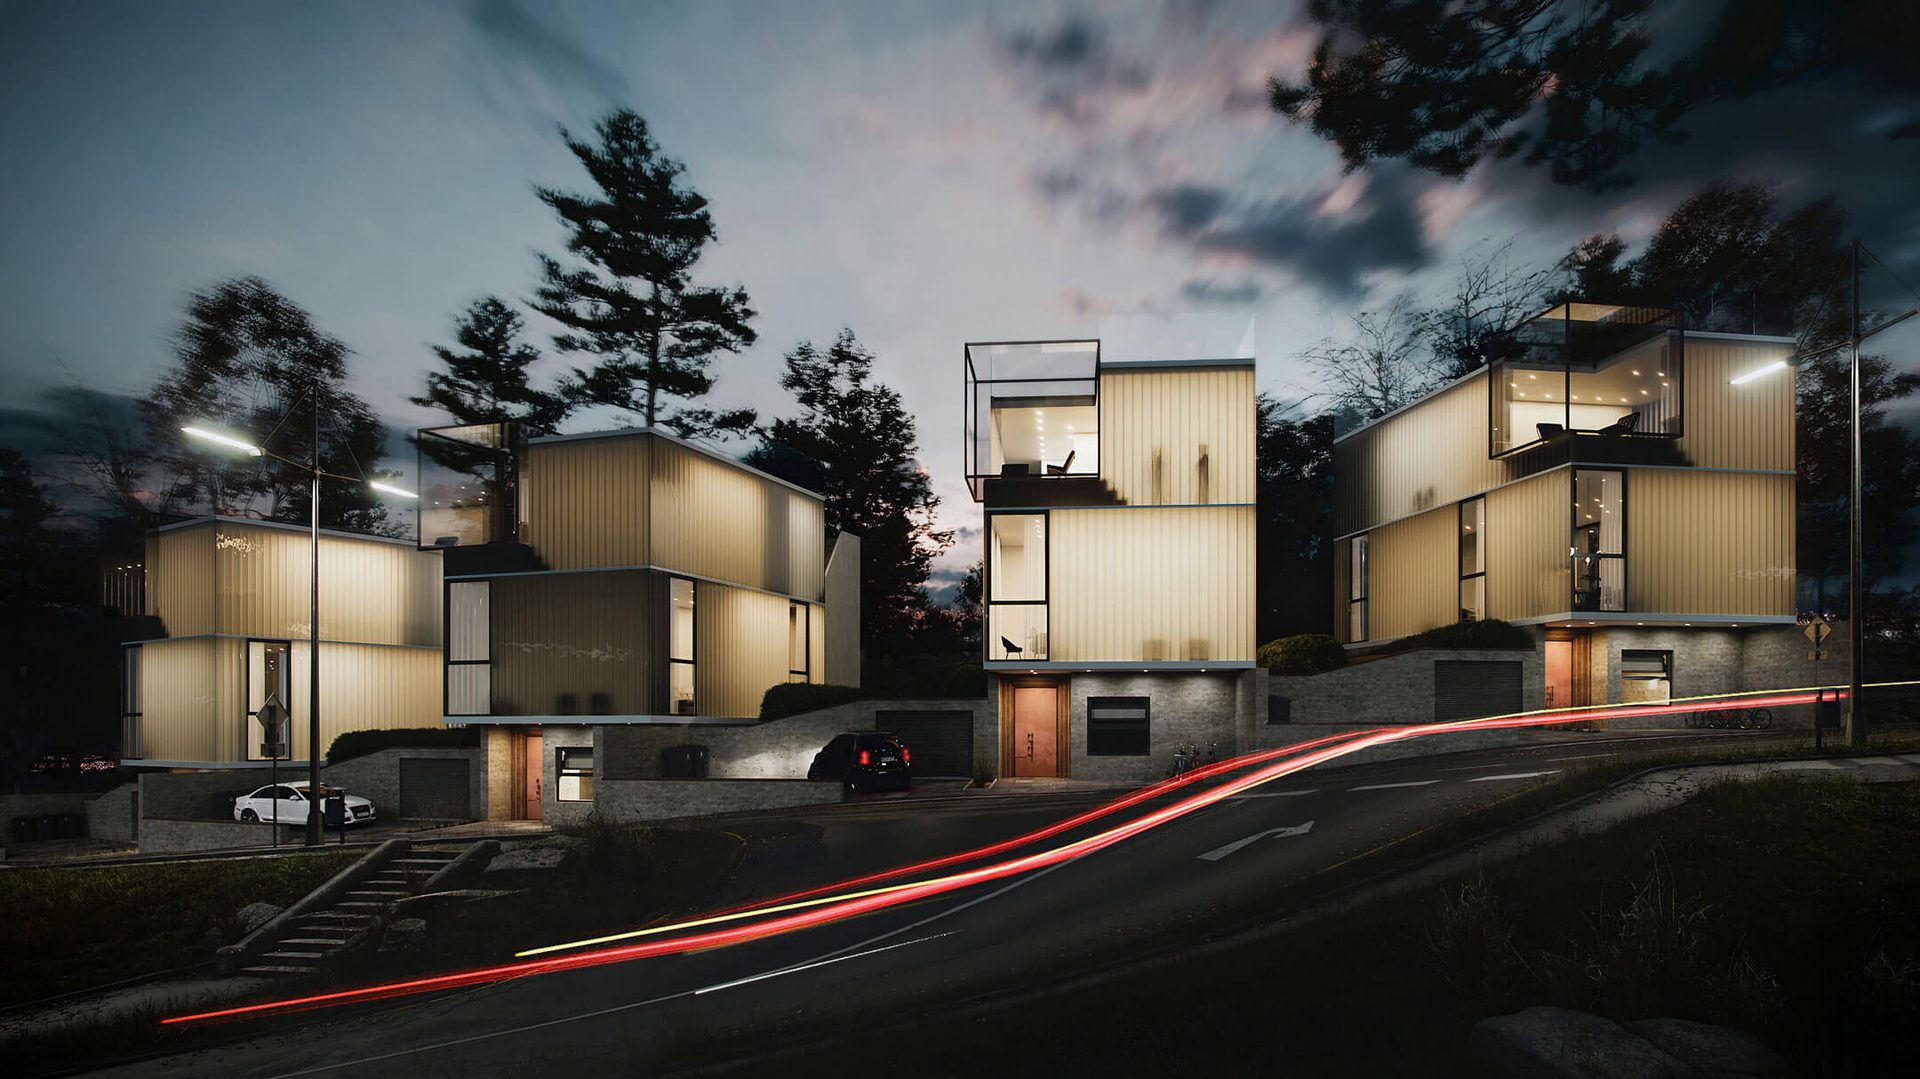
Photorealistic Architectural Renders: Luxembourg Residence CGI
Photorealistic architectural renders can be created entirely in CGI and look as lifelike as actual photos. This makes 3D exterior rendering services just as effective as photomatching or photography-based visualization for presenting architectural concepts — often more so.
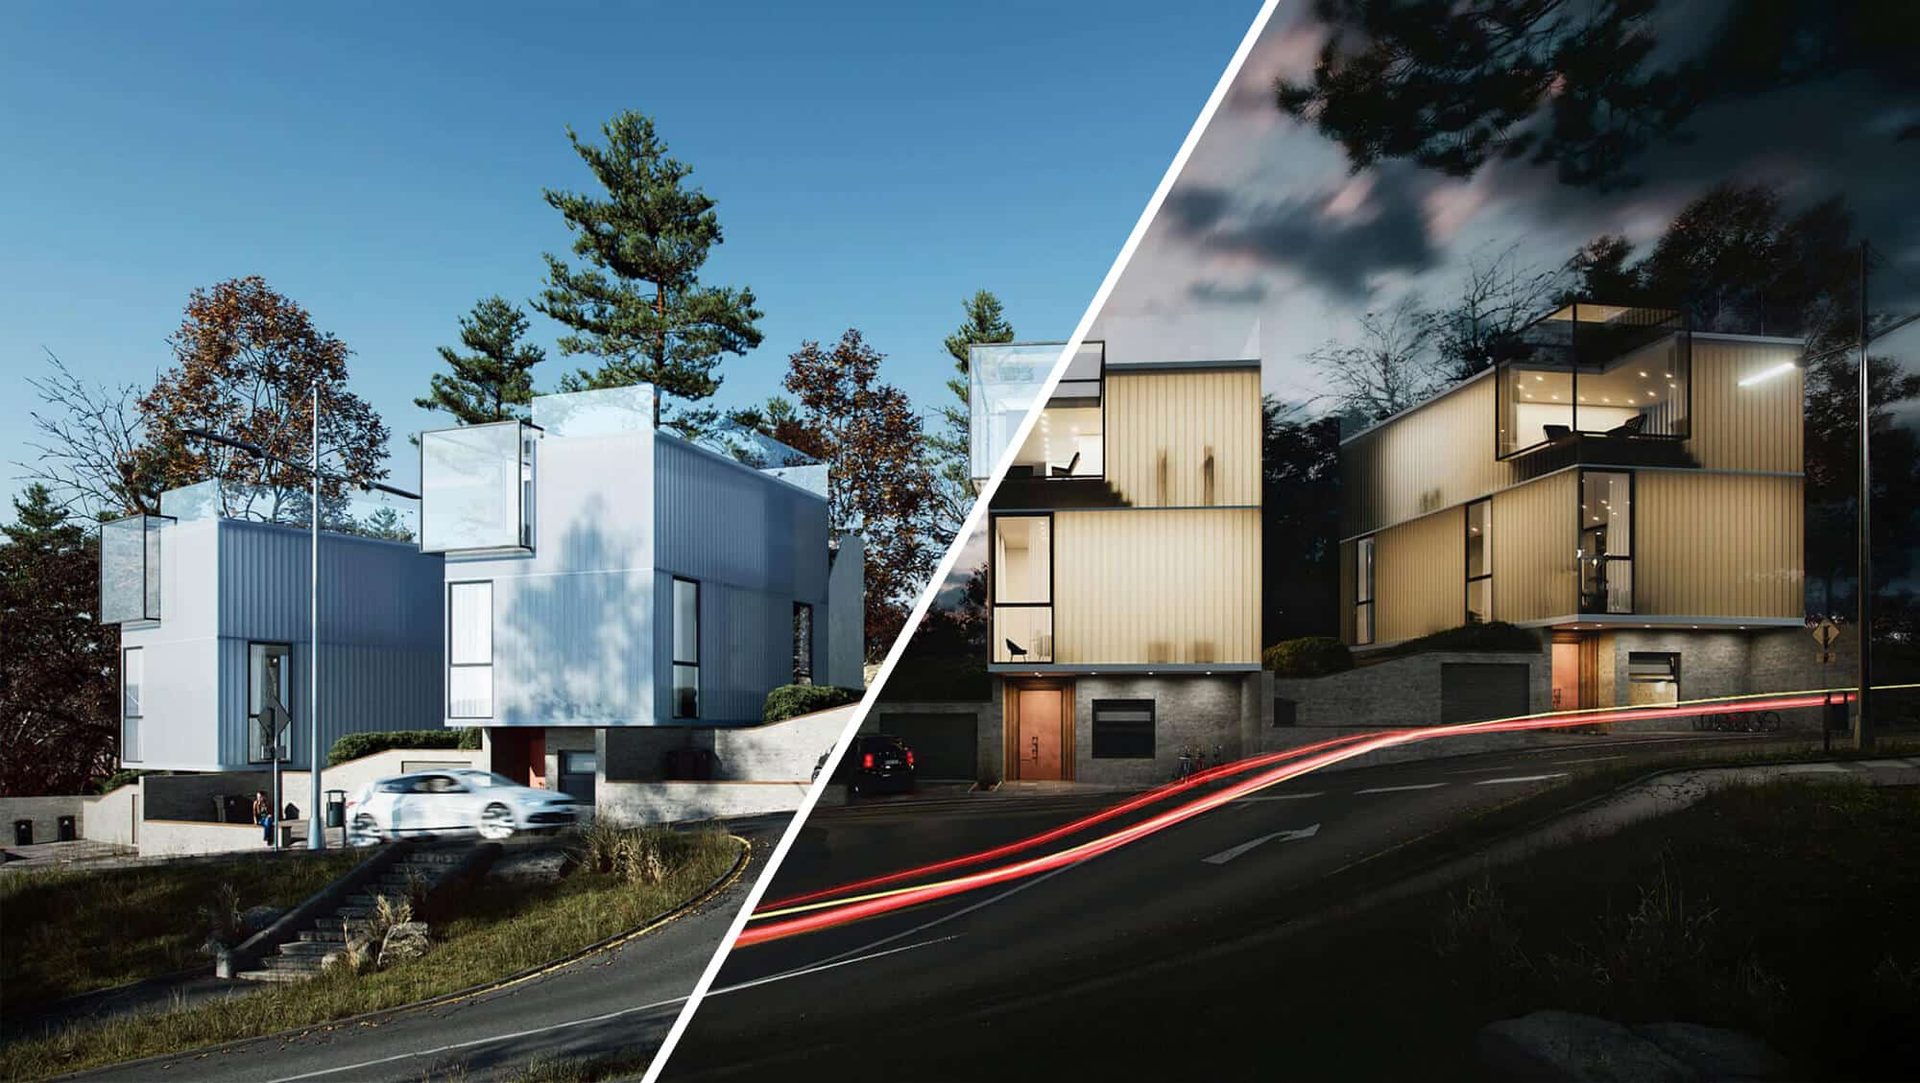
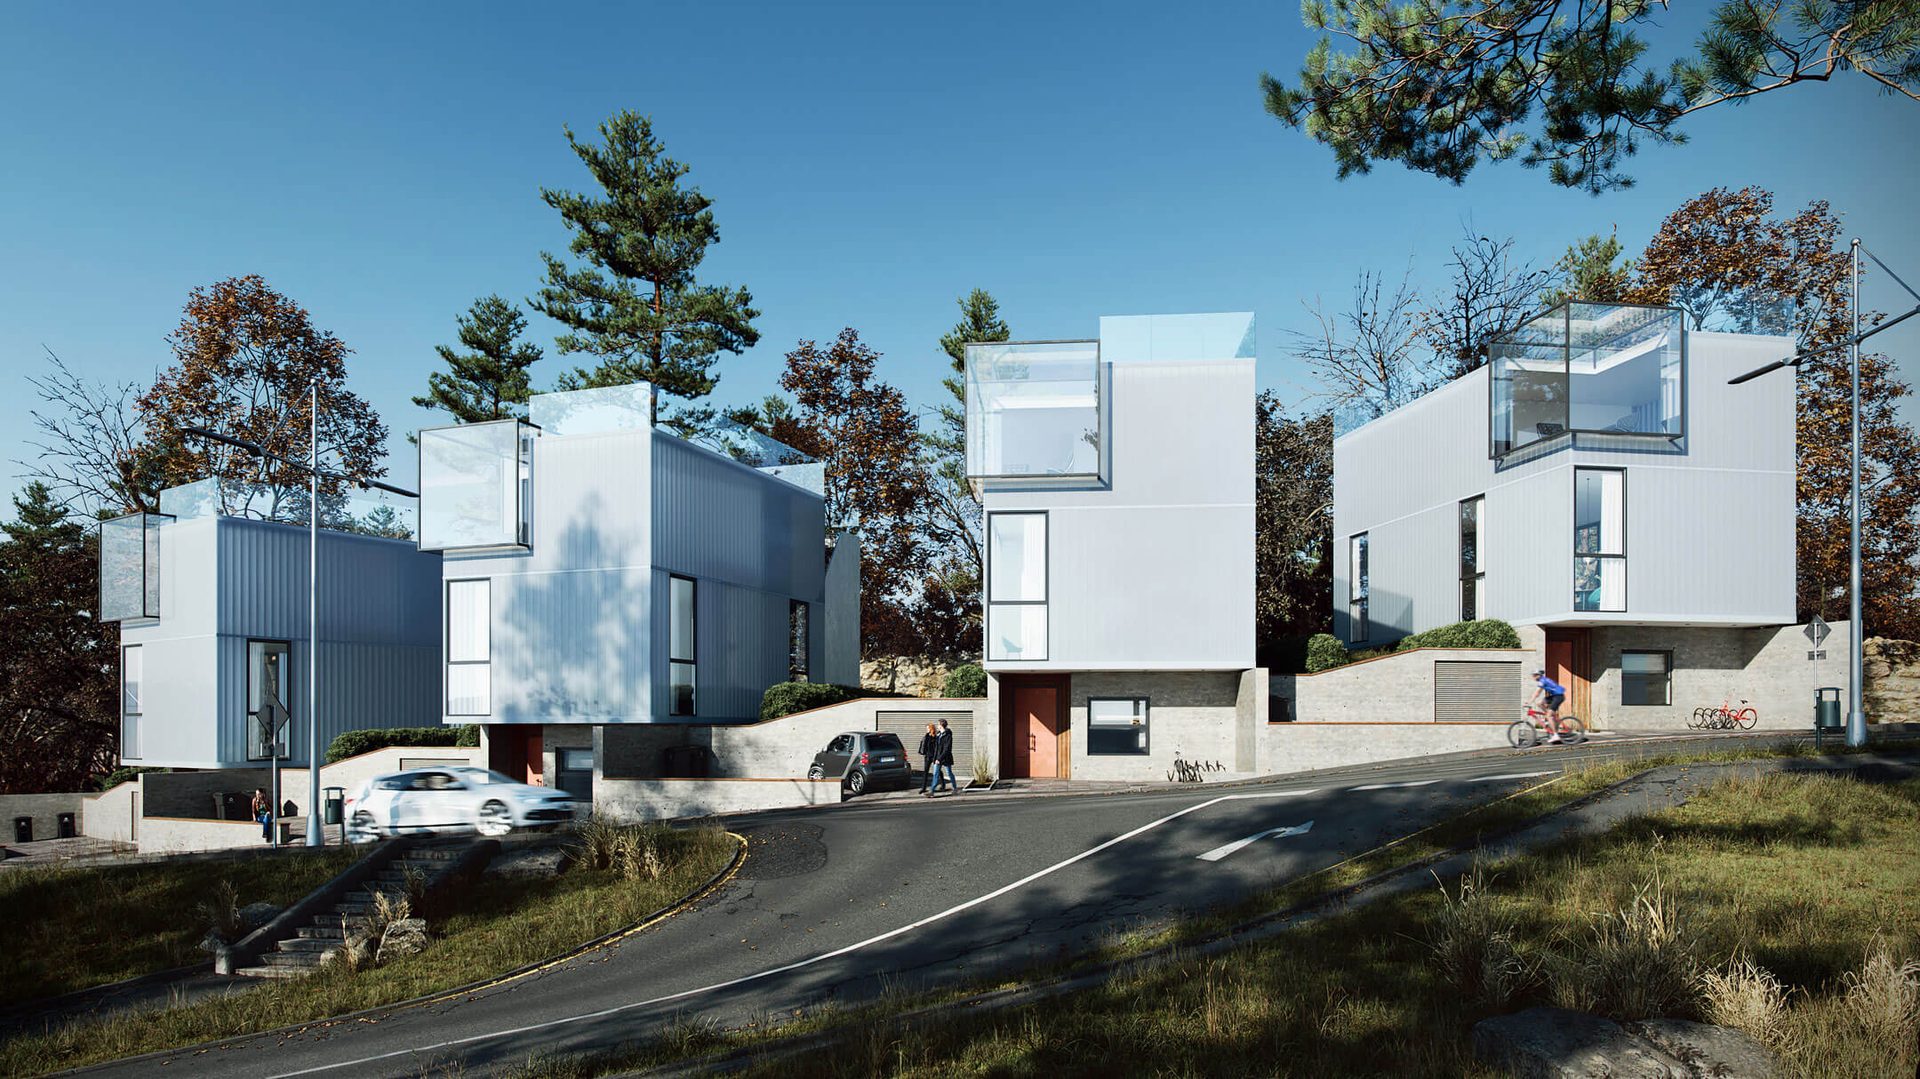
This case study documents a full-CGI project for a residential complex in Luxembourg, created by Senior CGI Artist Vladimir Prichina for an internal ArchiCGI competition. It includes two photorealistic architectural renders: a day view and a night view of the same design. What makes the architecture rendering project notable is the level of technical detail: five distinct types of grass, combined general and artificial lighting, motion blur imitation, and a challenging sloped landscape. These are the elements that separate average photorealistic 3D renderings from professional architectural CGI. Research by Chaos and Architizer shows that photorealistic CGI remains the most valued deliverable in architectural visualization — with still-image renderings leading client preferences.
Below, we walk through the complete workflow behind these photorealistic architectural renders — from concept and material choice to the 12-stage rendering process.
#1. Location and Central Object
Since the renderings were created for a competition, there was no technical assignment. The 3D artist had only a creative challenge and needed to come up with the concept as well. In this instance, the task was to show how full-CGI photorealistic imagery would work for a residential 3D rendering concept.
As for the environment, the houses are located in Luxembourg suburbs. To show the building to the full, the CGI artist placed them on the slope of a hill, at the intersection of two roads. This adds drama and allows showcasing the territory before the house.
The house concept Vladimir created on his own. He drew inspiration from amazing architectural designs on Archdaily, Behance, and Pinterest.
#2. Material Choice
The CGI artist wanted to illustrate how photorealistic architectural renders can show bold innovative concepts, so he decided to experiment with the houses’ material.
As such, he chose a highly unusual solution for residential real estate — cellular polycarbonate. The material is mainly used for public and commercial buildings, and mostly roofs, but some of its properties make it very appealing for living spaces design.
One of the unique benefits of cellular polycarbonate is its energy efficiency. In the daytime, the material lets in sunlight, which helps illuminate the interior. At night, when the artificial light is on, the houses glow from within. This creates great exterior illumination — and a striking visual effect. To fully showcase the atmosphere and lighting across different times of day, the 3D visualizer decided to create both day and night photorealistic architectural renders.
While this project focuses on the exterior, we bring the same photorealism to our interior design rendering services. Some interior elements were briefly visible through the windows — especially in the night render — so it was important to ensure they looked just as refined.
CG Rendering Process Stages
Vladimir started with the night view as the most challenging one. When the photorealistic image was ready, he had all the assets he needed and worked with them. Let’s discover how the new concept was brought to life, starting with the night render.
1) Preliminary Sketching
When working with a specific design and technical assignment, there’s no need for preliminary sketching. But in this case, to create photorealistic renders, Vladimir had to develop the architectural concept as well. So first, he laid out all his ideas on paper, to narrow them down to 3.
He established that all 4 houses would be united by the ground floor. He decided that they would be identical and that the whole complex would be situated on a slope of a hill, so as to reveal the front view in more detail. Every house was to have a separate entrance, a garage, and a rooftop patio.
2) Scaling
At this stage, Vladimir chose one idea out of 3 and adjusted the concept to real construction norms and measurements. He calculated things like the number of floors, steps height, etc. All that data was crucial for working out 3D renders’ composition later.
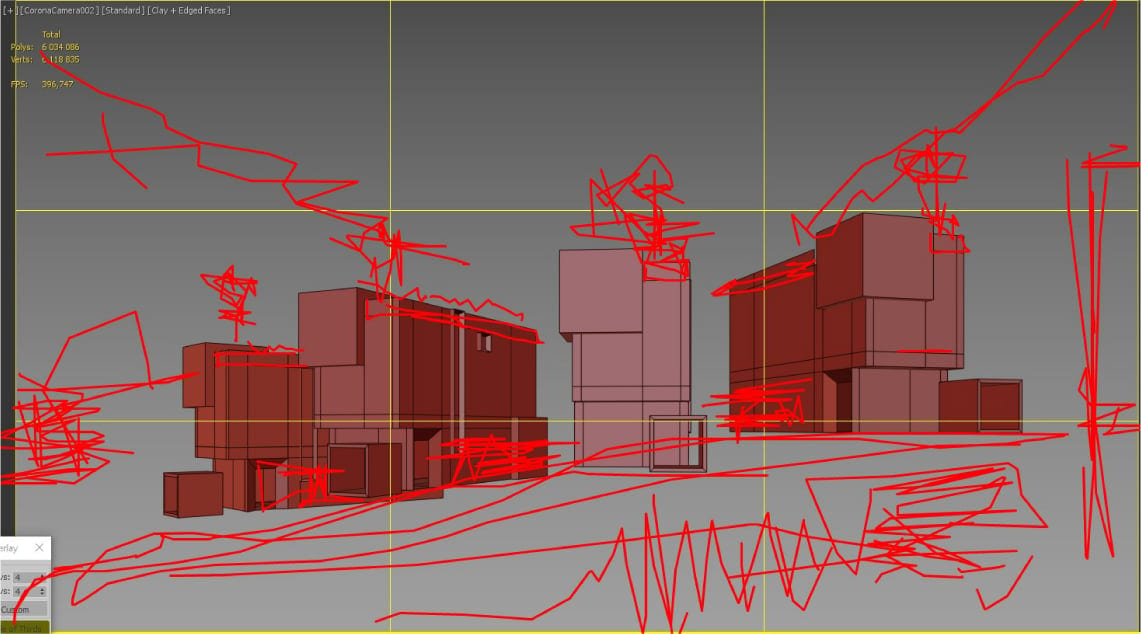
Tool-wise, the CGI artist first drew his ideas on paper, then created a rough model of the building in AutoCAD.
3) Actual Sketching
When the building was scaled, it was time to work out the design details. First, the work was done on paper, then in 3ds Max, and next — in Adobe Photoshop.
So Vladimir started by developing the planning of the inner space on paper. For even though he was creating photorealistic exterior renders, he still needed to know the interior layout. It always influences the exterior design, let alone when the building walls are made from semi-transparent polycarbonate facade.
As a result, the CGI artist established the location of doors, windows, where each room would be placed. As well, he drew the exterior view and thought out the general details of the composition.
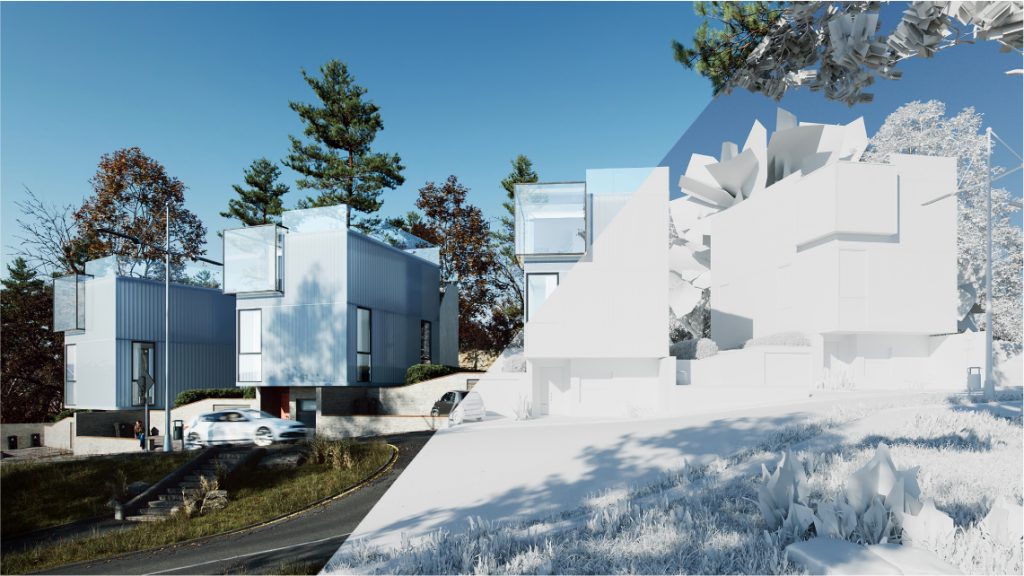
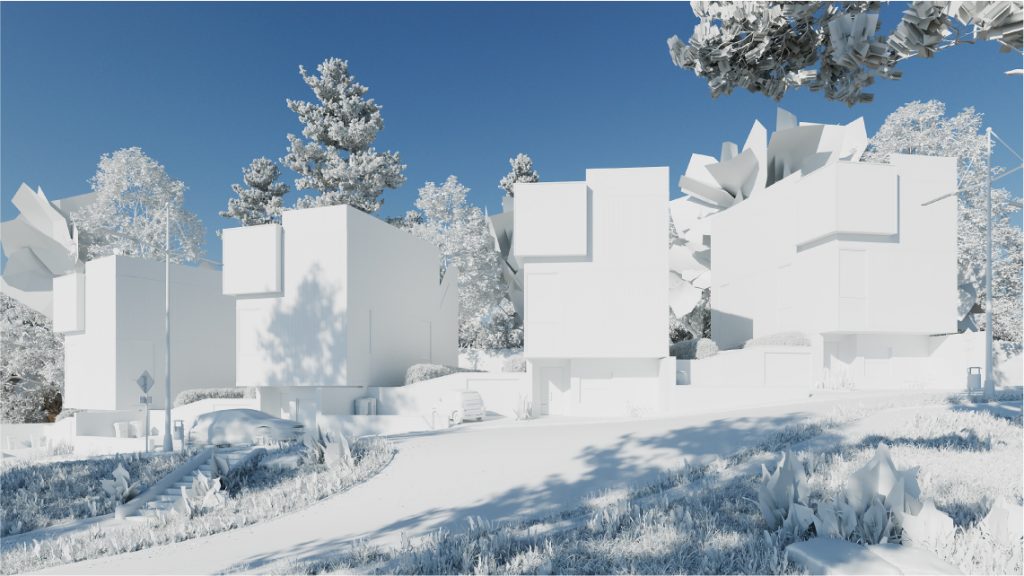
Next, it was time to build the architectural concept in boxes in 3ds max and choose the view. Vladimir made a screenshot of the result, opened it in Adobe Photoshop, and started to work on specifics of the shot composition.
At this point, the 3D artist drew in detail what was to be in the future photorealistic architectural renders. He played with different ideas, added the secondary elements, determined their position. Like where he’d put trees to frame the shot, stone stairs, people figures, etc. As well, the 3D visualizer decided that the night render would have a dynamic sky with moving clouds. Based on this, the CGI artist would later choose the HDRI map.
Once the 3D artist liked what he saw, he could begin working on renders. His next step was to recreate the scene from Photoshop digitally.
4) Building the Scene in 3ds Max
At this stage, Vladimir needed to build the scene geometry. First, he found a perfect HDRI map with a dynamic evening sky. He checked the result with preliminary rendering, and went on to building the landscape.
The general look was established at the sketching stage. So at that point, the task was to adjust all the elements to fit the existing norms and requirements. For instance, Vladimir determined how the roads should be positioned, which of the two would be primary, where the bike path would run. He calculated the width of roads and sidewalks, and placed road markings. The 3D visualizer determined where to position the lawn, where the wild grass would grow, etc. The list goes on and on, and knowing these things by heart is a must for a CGI professional. All this requires a lot of experience and is a must for photorealistic architectural renders.
Another challenge was working with sloping terrain. What difference does it make? It requires significantly more work. Let’s say a 3D artist needs to show the curb. So he finds the 3D model and then needs to apply it. Putting it on a flat surface is easy enough, but when it comes to a hill, the model needs adjusting. As you can see, Vladimir handled this challenge well — the hill looks like in a photo.
5) CG Modeling of a House
The complex consists of 4 identical houses, so there was no need to model each one separately. Instead, the 3D visualizer created one 3D model and then cloned it. He built the geometry, finalizing all the details of exterior and interior design. As well, he put 3D models of people in rooms, so as to get them showing through the walls in the evening lighting.
6) Texturing and Lighting
Here our 3D visualizer faced a challenge. On the one hand, he needed to keep the night dark and natural, yet make so that the objects could be seen. This does not occur in real life. So making it work in architectural renders required skills and additional work.
To keep the night dark and clouds moving, the 3D visualizer kept the HDRI map that suited him perfectly. However, he switched it off as a light source. As such, he chose a dark blue color. This way, he’s got a night render that’s full of atmosphere, and that can be read as easily as a day render. It can’t be called photorealistic, for there’s a fake light, yet it looks natural and serves the purpose.
Next, it was time to work on light balance. The 3D visualizer adjusted each texture, then switched on the light, prerendered, and checked the result. If it didn’t read well, the CGI artist made the texture lighter in color and rendered it again. Once satisfied with the result, he moved on to the next texture. Also, at this stage, he added creative touches to surfaces, like asphalt cracks, for instance.
7) Planting Vegetation
Just like with any other texture, vegetation needed to be added together with lighting. For it should be read easily, and look realistic. Moreover, Vladimir made sure that trees, leaves, grass, etc aren’t all of the same color. It just doesn’t happen in nature. If an image has all the vegetation in the same hue, that exterior 3D architectural visualization isn’t photorealistic. The viewer might not even register this consciously, but he won’t find the image appealing.
Therefore, the 3D visualizer made some trees greener, added yellow to some, and left some without leaves. This both contributed to realism and set a soft pre-autumn atmosphere.
Furthermore, there are 5 types of grass in the scene! For in wild nature, one can rarely encounter areas with one single type of grass, every blade of the same height and color. It’s way more complex, and Vladimir set out to convey that.
The CGI artist chose 3D models of plants based on the references from the location he was aiming at showing. He cloned them, and added randomness too — changed the size, views, colors. This way, he got a beautifully diverse landscape.
8) Motion Blur Imitation
This is another effect taking photorealistic architectural renders to another level. Motion blur makes a cg image look just like a photo! Let’s learn a bit more about it.
The term comes from photography. The shutter is the barrier protecting the digital sensor from light. When the shutter opens, a picture is taken. So the shutter speed is the time that the digital sensor stays open to the light.
Since a photo is not captured instantly, the shutter remains open for a while. During this time, the surroundings don’t stay still. A tree branch may move in a breeze, or a car can be passing by with lights on. And this shows in the photo as a motion blur. For instance, the car will leave a light trail, and the moving branches will appear blurred.
This way, motion blur helps capture the movement. The same technique applies to photorealistic architectural renders. The effect adds dynamic and makes the CG images look like photos. So Vladimir reproduced the motion blur with the car and street lights, the sky, and tree branches.
9) Adding Creative Details
Before rendering, the 3D visualizer started to look for details to support the story of the photorealistic architectural renders and fill them with life. So he added cars and bicycles, placed stone stairs for climbing the hill, added more grass, scattered some leaves at places. These small details matter — they add depth and realism to the scene.
Another important element of the photorealism in the night 3D render is artificial lighting. Just like the landscape can’t be all cookie-cutter trees, outdoor lighting seldom happens to be all in the same color temperature, and intensity. So the 3D visualizer dimmed some lights and tweaked the color of some, so as to achieve the photorealistic look.
10) The Rendering Process
Once both the mechanical and creative work is done, it’s usually time to press “Render” and wait for results. However, there was some more work to do with textures.
The textures can’t be applied to a hilly terrain just as easily as to a flat surface. In order to do that, it’s necessary to use displacement maps.
This approach works, but there is a trade-off: the textures become heavier. And the more objects in the scene need displacement, the heavier it becomes. So much so, that the computer might have troubles processing everything. For the rendering to go smoothly, it was necessary to make these textures lighter, and then start “render”.
11) Night 3D Render Post Production
This task included only some color correction. The 3D visualizer adjusted hues at times, made lighting dimmer or brighter at places, and that was pretty much it.
12) Day View Render
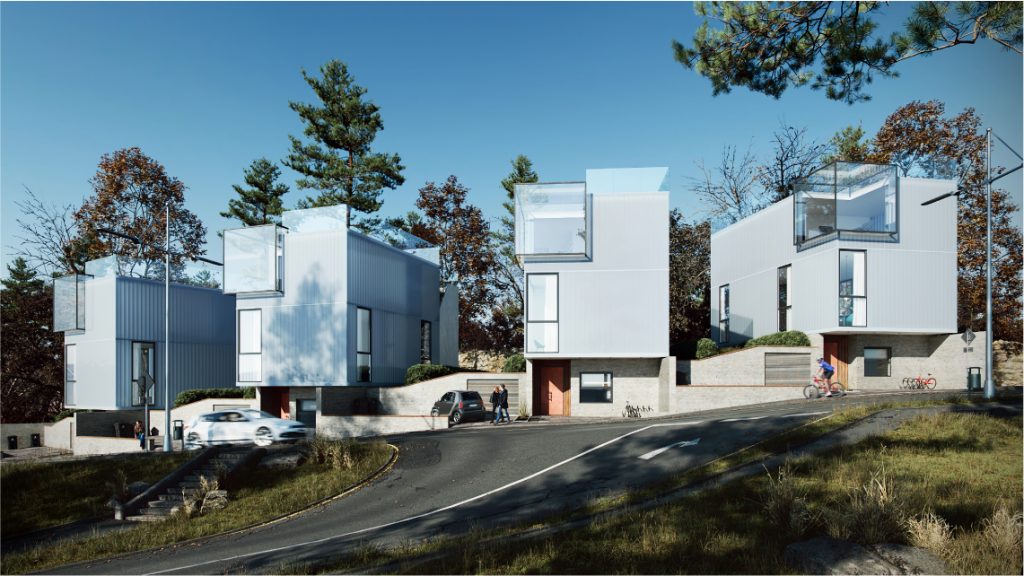
Once the night pic was ready, Vladimir went on to creating the day view. As both photorealistic architectural renders have the same composition, the 3D visualizer basically took the same 3D scene. What he needed to change were lighting and textures.
First, he found the reference for the lighting he wanted to get. Upon which, he switched off and deleted all the light sources in the scene. As the main source of light, he selected the sun, and an HDRI map with a clear blue sky.
The next step was to adjust the textures. As you may remember, the 3D visualizer had to make them lighter in color so they’d be seen in the night render. Now that he was working with the daylight, the CGI artist had to change them back. Then he rendered the scene and went on to post-production. In Photoshop, he did some color correction, contrast, and added people.
Full-CGI photorealistic architectural renders can match the quality of professional photography when created by an experienced 3D visualizer. The techniques outlined above — layered vegetation, motion blur, adjusted lighting temperatures — are what separate professional architectural CGI from generic 3D rendering.

Want to present your architectural project with style? Need your 3D renders to tell the story of your real estate design? Explore our architectural visualization portfolio to see more examples of our work. Then contact our 3D visualization company. ArchiCGI’s team will create professional visuals that match the quality of your project.
Want to learn how much your project costs? See how we evaluate 3D rendering projects

Irma Prus
Content Writer, Copywriter
Irma writes articles and marketing copy for ArchiCGI. Her dream is that more people discover the power of CGI for architecture. Irma is into neuromarketing, ruby chocolate and Doctor Who series.