


CGI for Real Estate Developed by Dagesse Company in Vermont
Jacqueline Dagesse from Dagesse real estate development company reached out to us from a referral of her industry colleague in April of 2021. At that time, the Dagesse team was laying the foundation of a new boutique apartment building in Winooski, Vermont. The project called “City Gardens” would include 30 residential units and commercial space on the ground floor. This place promised to be a true pleasure to live in: beautifully designed, energy-efficient, with extra amenities, and plenty of entertainment, shopping, dining, and nightlife options nearby.
Project Goals
The Dagesse company wanted to start selling apartments in “City Gardens” long before the end of construction. And photorealistic CGI for real estate property was going to be the visual basis for their marketing campaign.
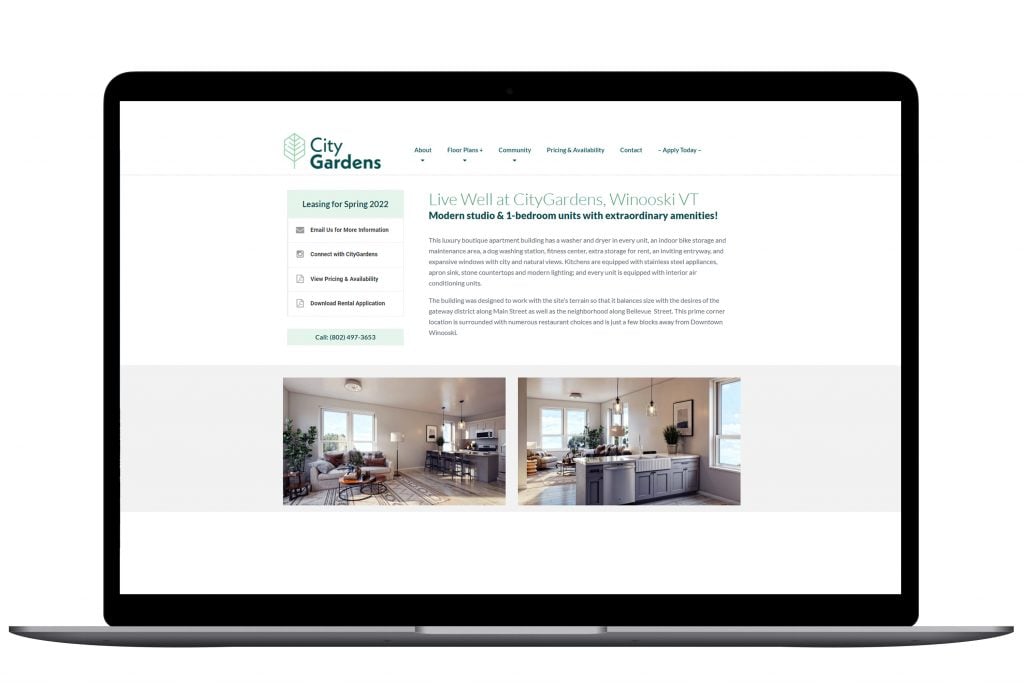
When setting the 3D rendering tasks, Jacqueline asked us to show how “City Gardens” would look when finished — both on the inside and on the outside. As a result of the project, our architectural visualization company provided Dagesse with five photorealistic images of the future property. The CGI revealing all the benefits of “City Gardens” is now used by the developers to attract potential buyers and renters.
Want to see how real estate CG images are created and then used in marketing campaigns? Then read on!
The Scope of Work
Jacqueline wanted us to make five photorealistic renderings of “City Gardens” in 4k:
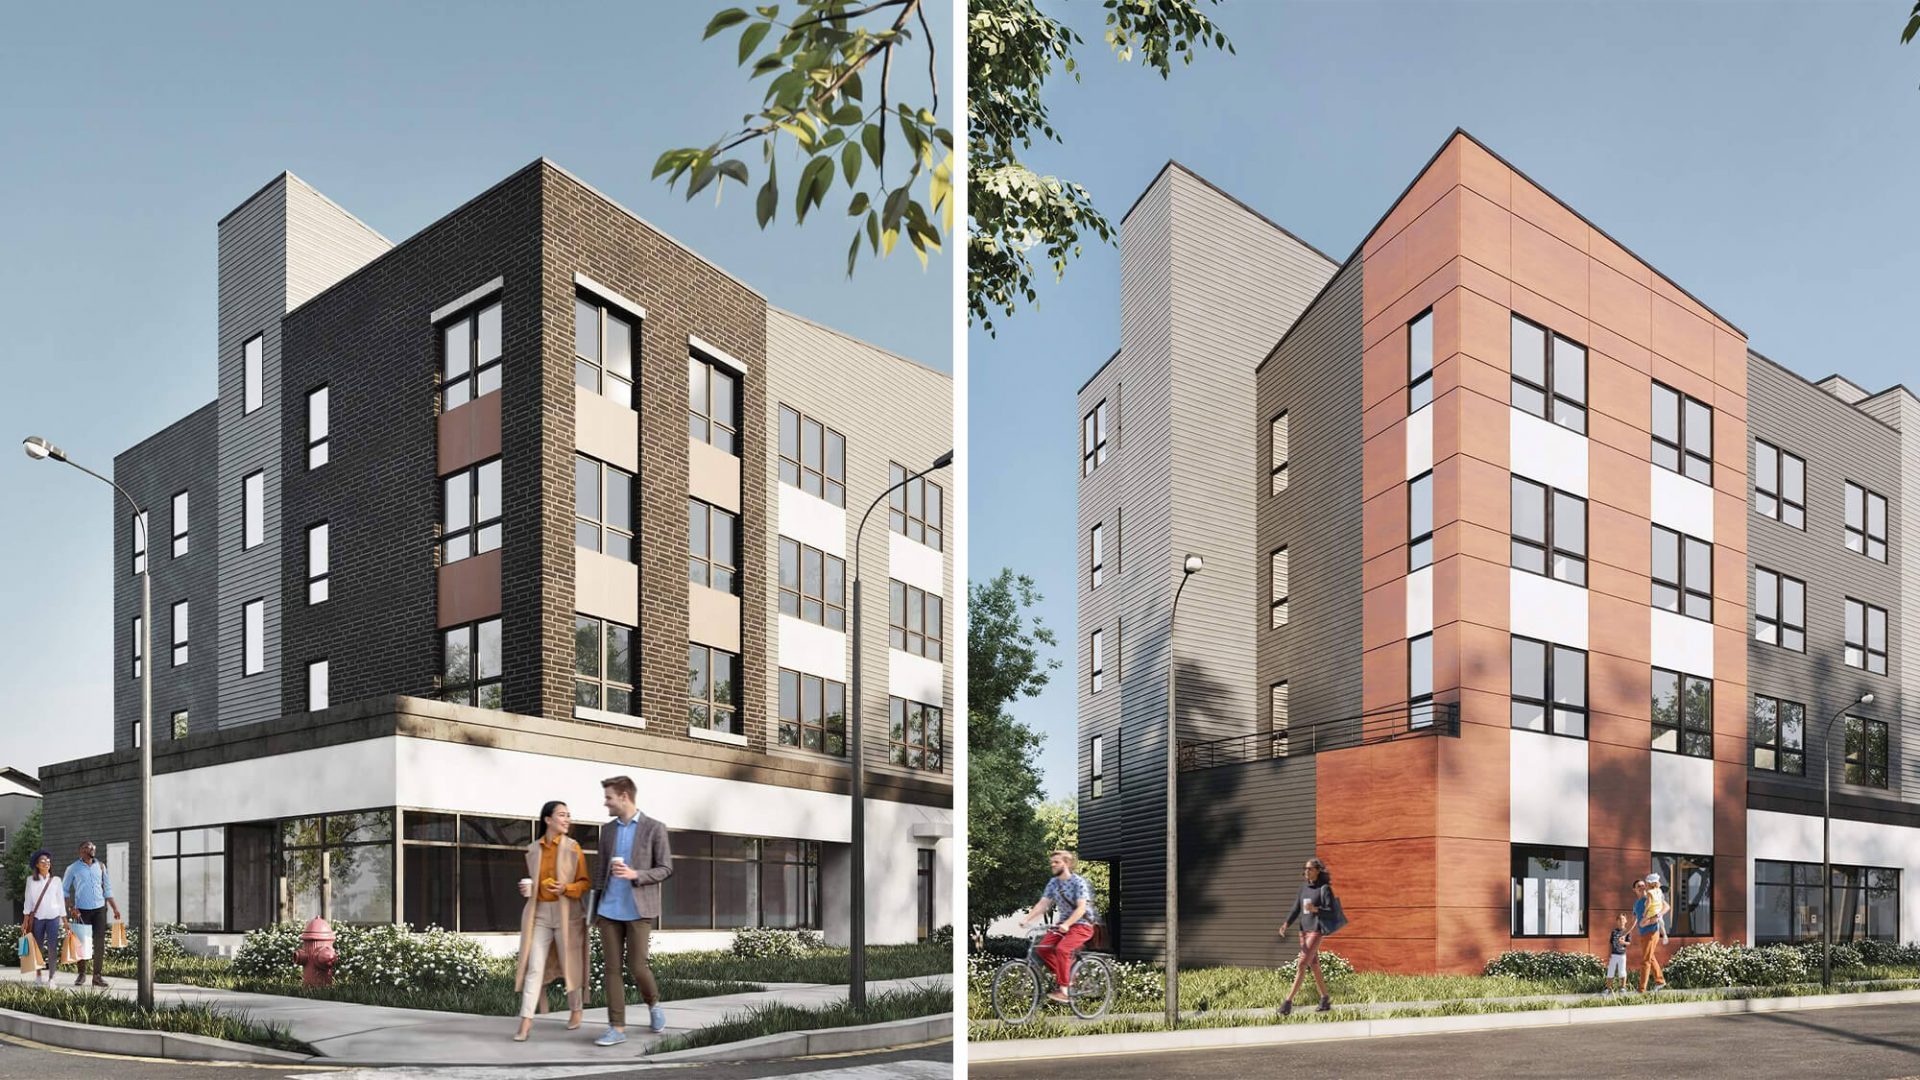
- two exterior renders — one showcasing the front view of the building and the second one depicting its rear side. The task of 3D exterior rendering was to show the architectural design and how it fit the neighborhood.
- two interior CG images — the first one showing the kitchen and the second one showcasing the living room of an apartment. Those were to unveil the smart layout, quality finishings, and kitchen equipment provided by the realty company. Also, the CG imagery had to feature stylish furnishings, lighting fixtures, and decor. It was needed to show how cozy the apartment would look when lived-in.
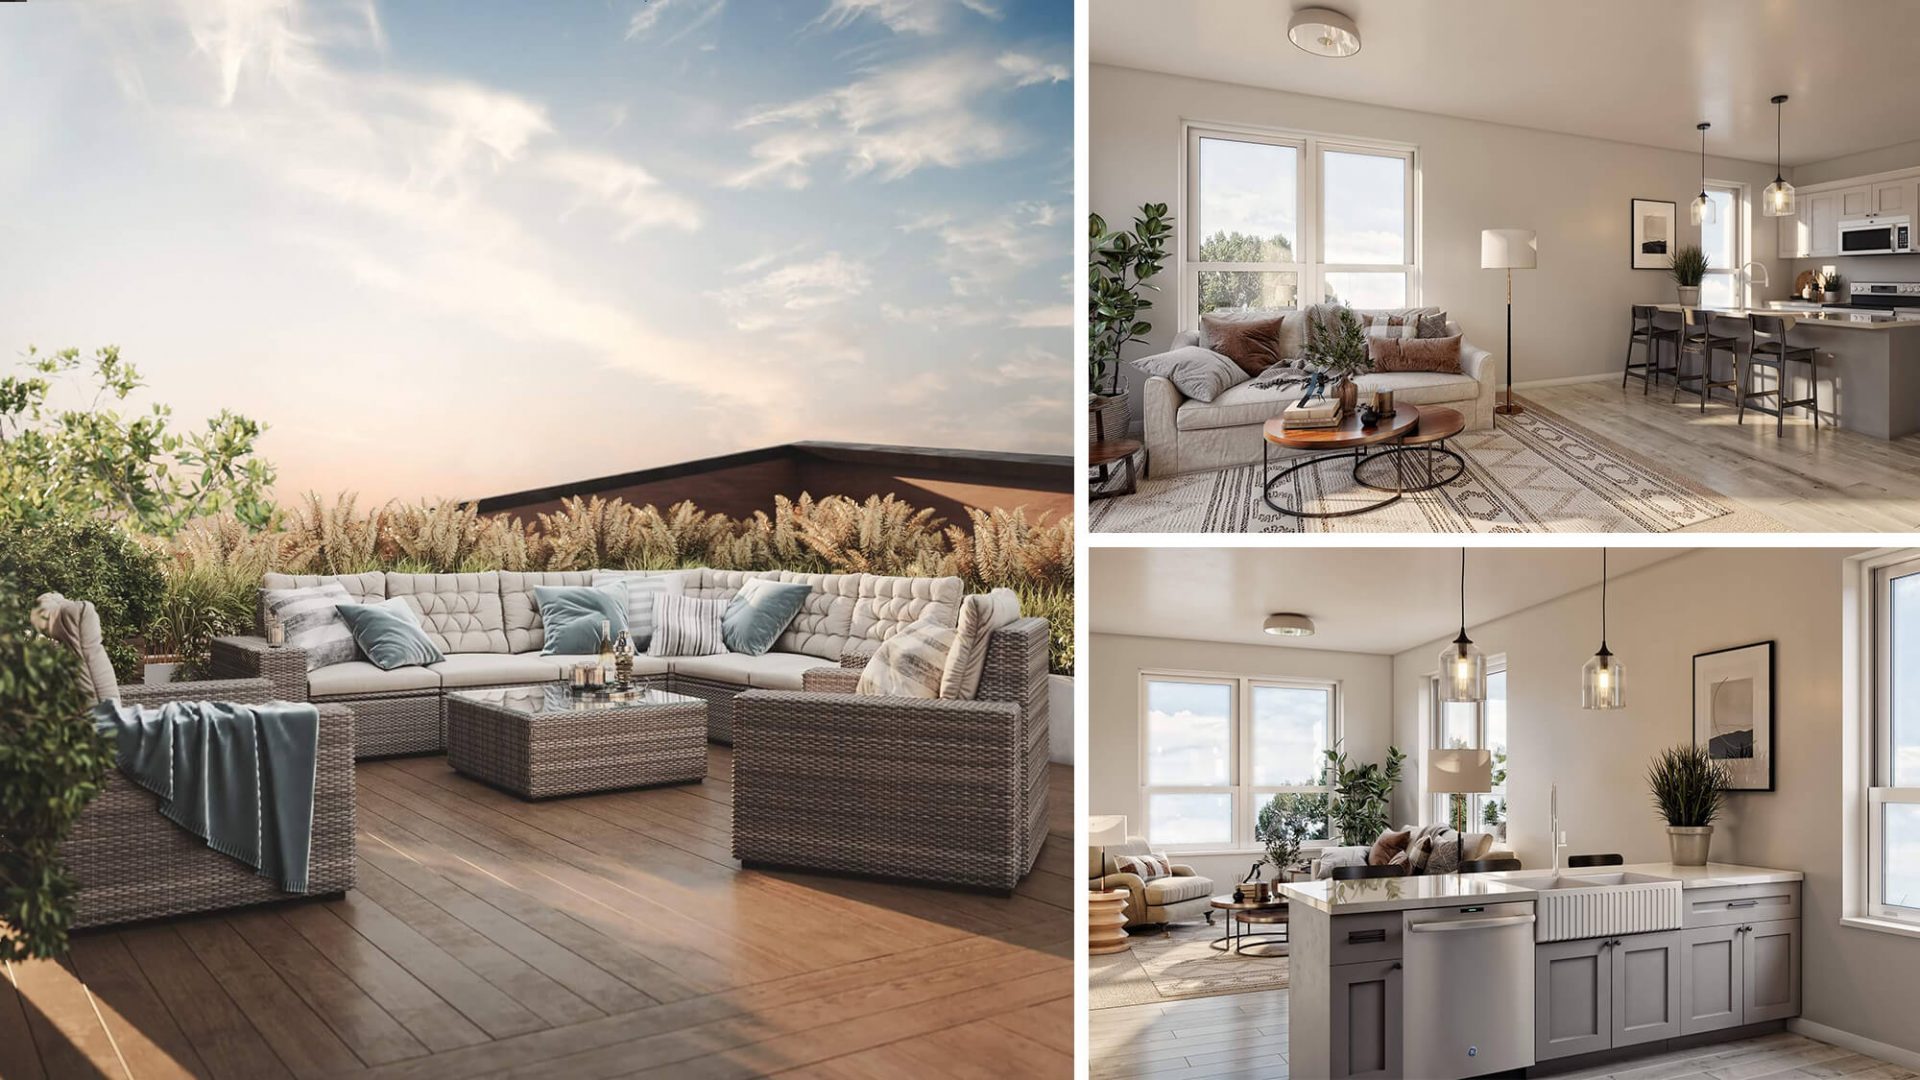
- one rooftop render — to show the comfortable area on the roof of “City Gardens” where potential residents or tenants would spend quality time in the open air.
Let us show you how we produced that part of the real estate rendering services.
Strengthen your design presentations with professional interior rendering
Part 1: Making Interior Renders
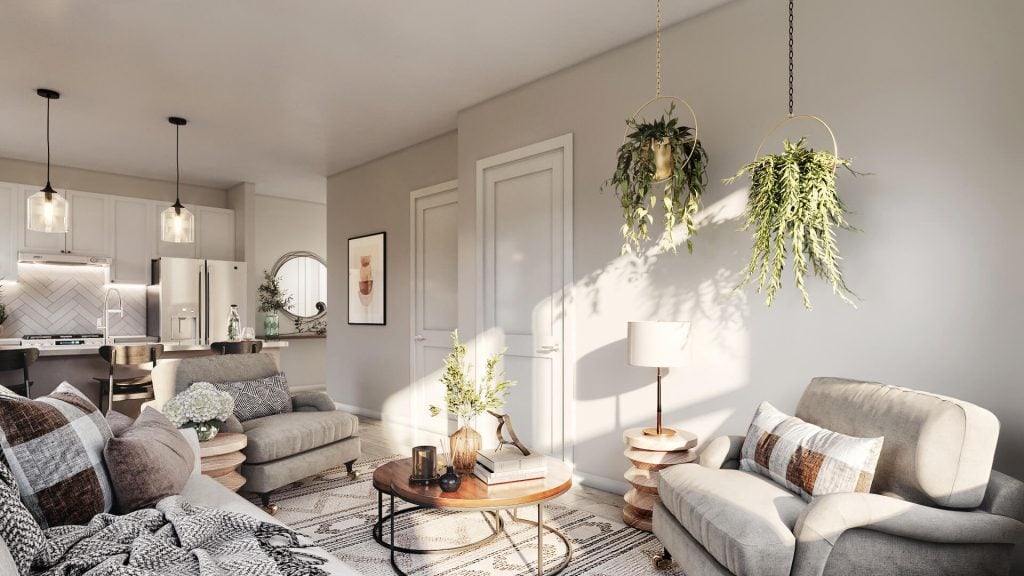
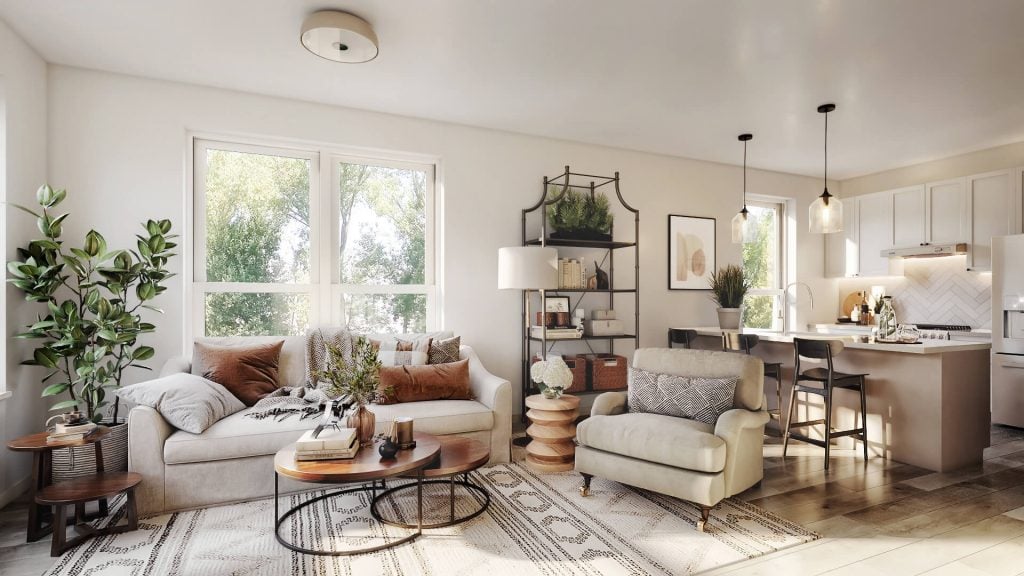
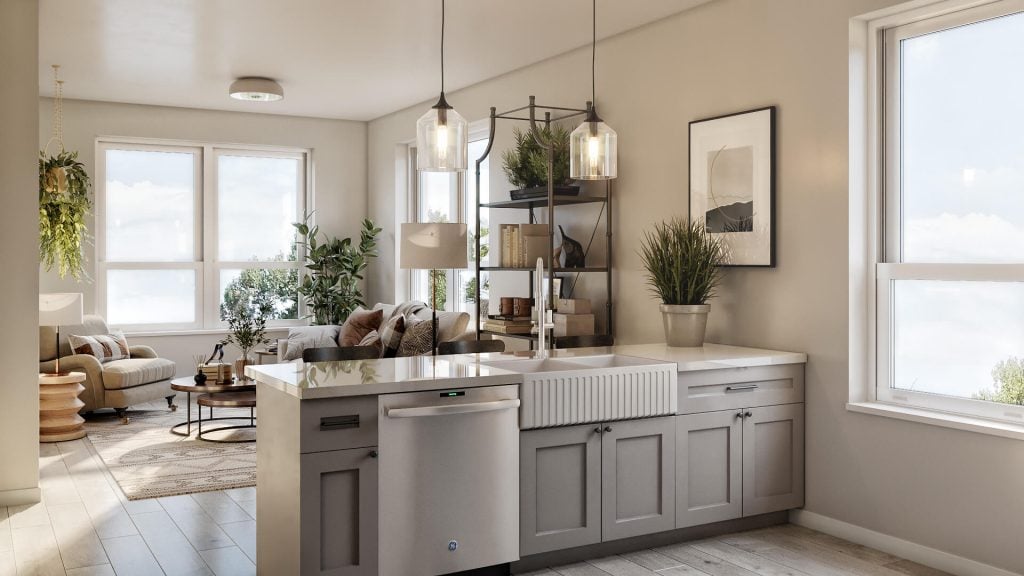
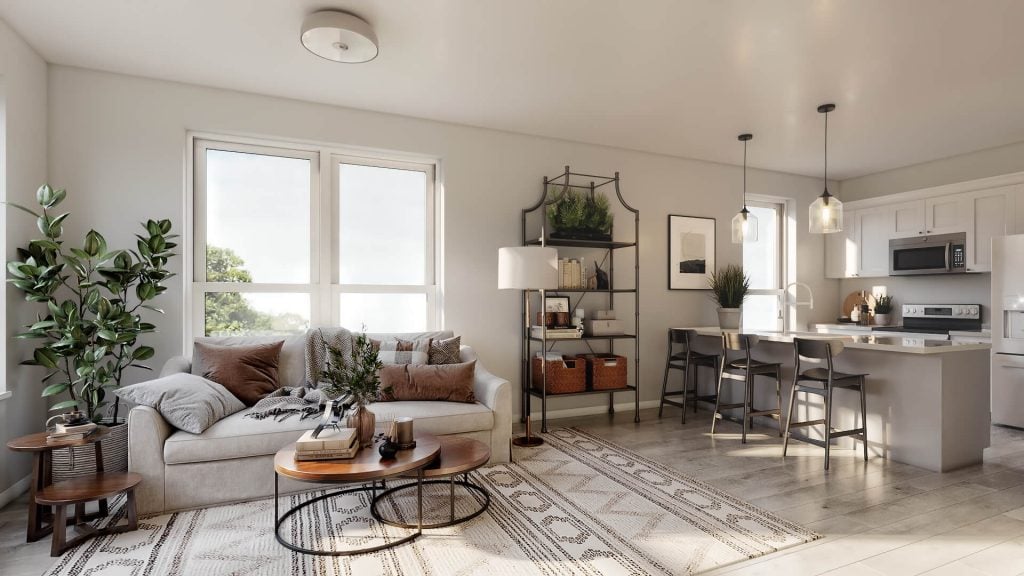
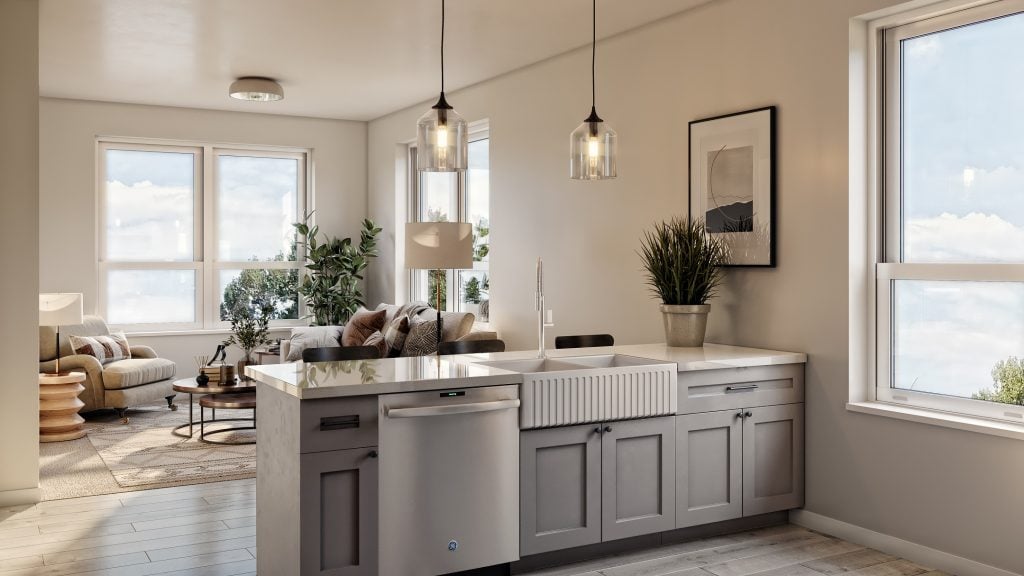
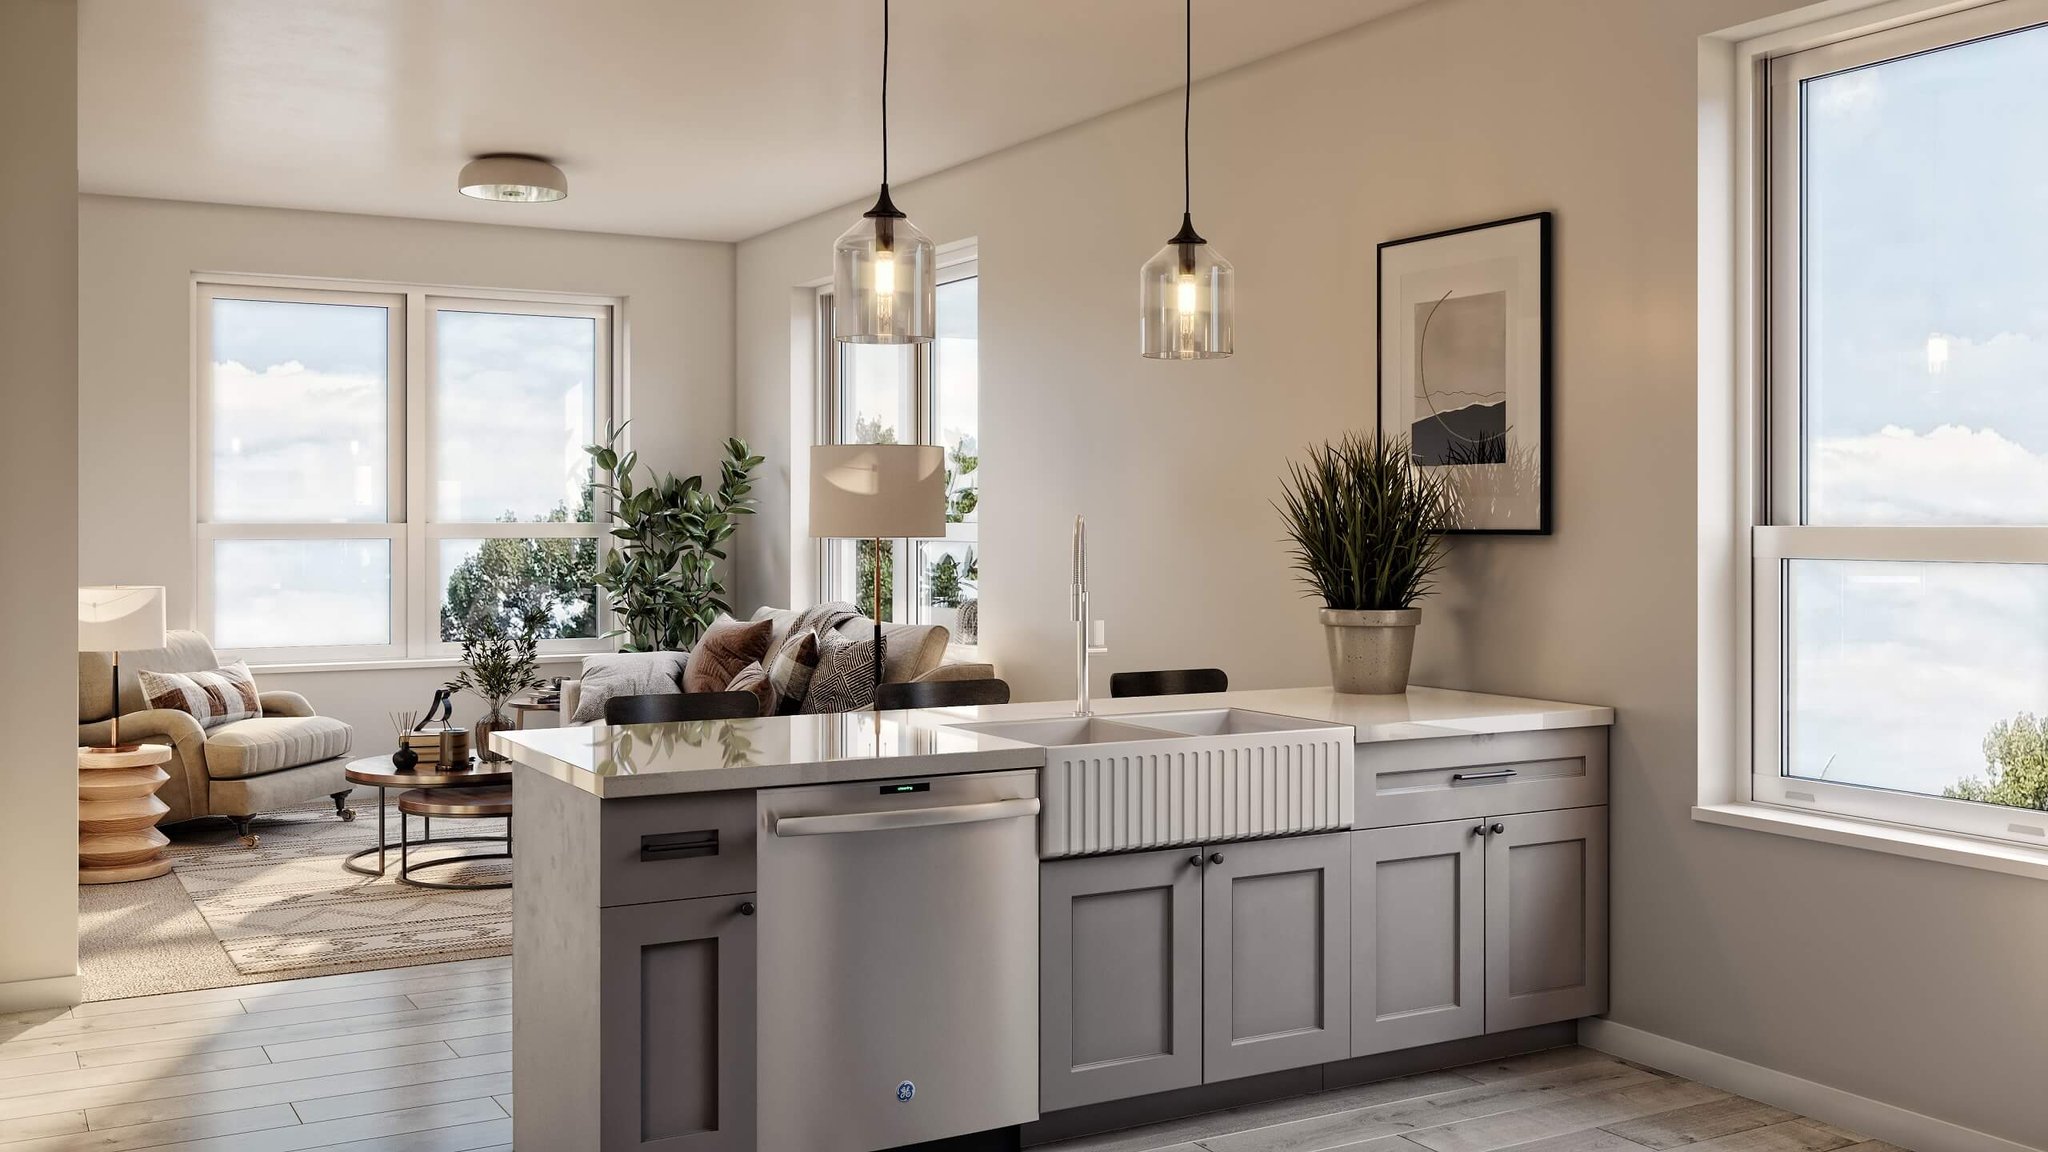
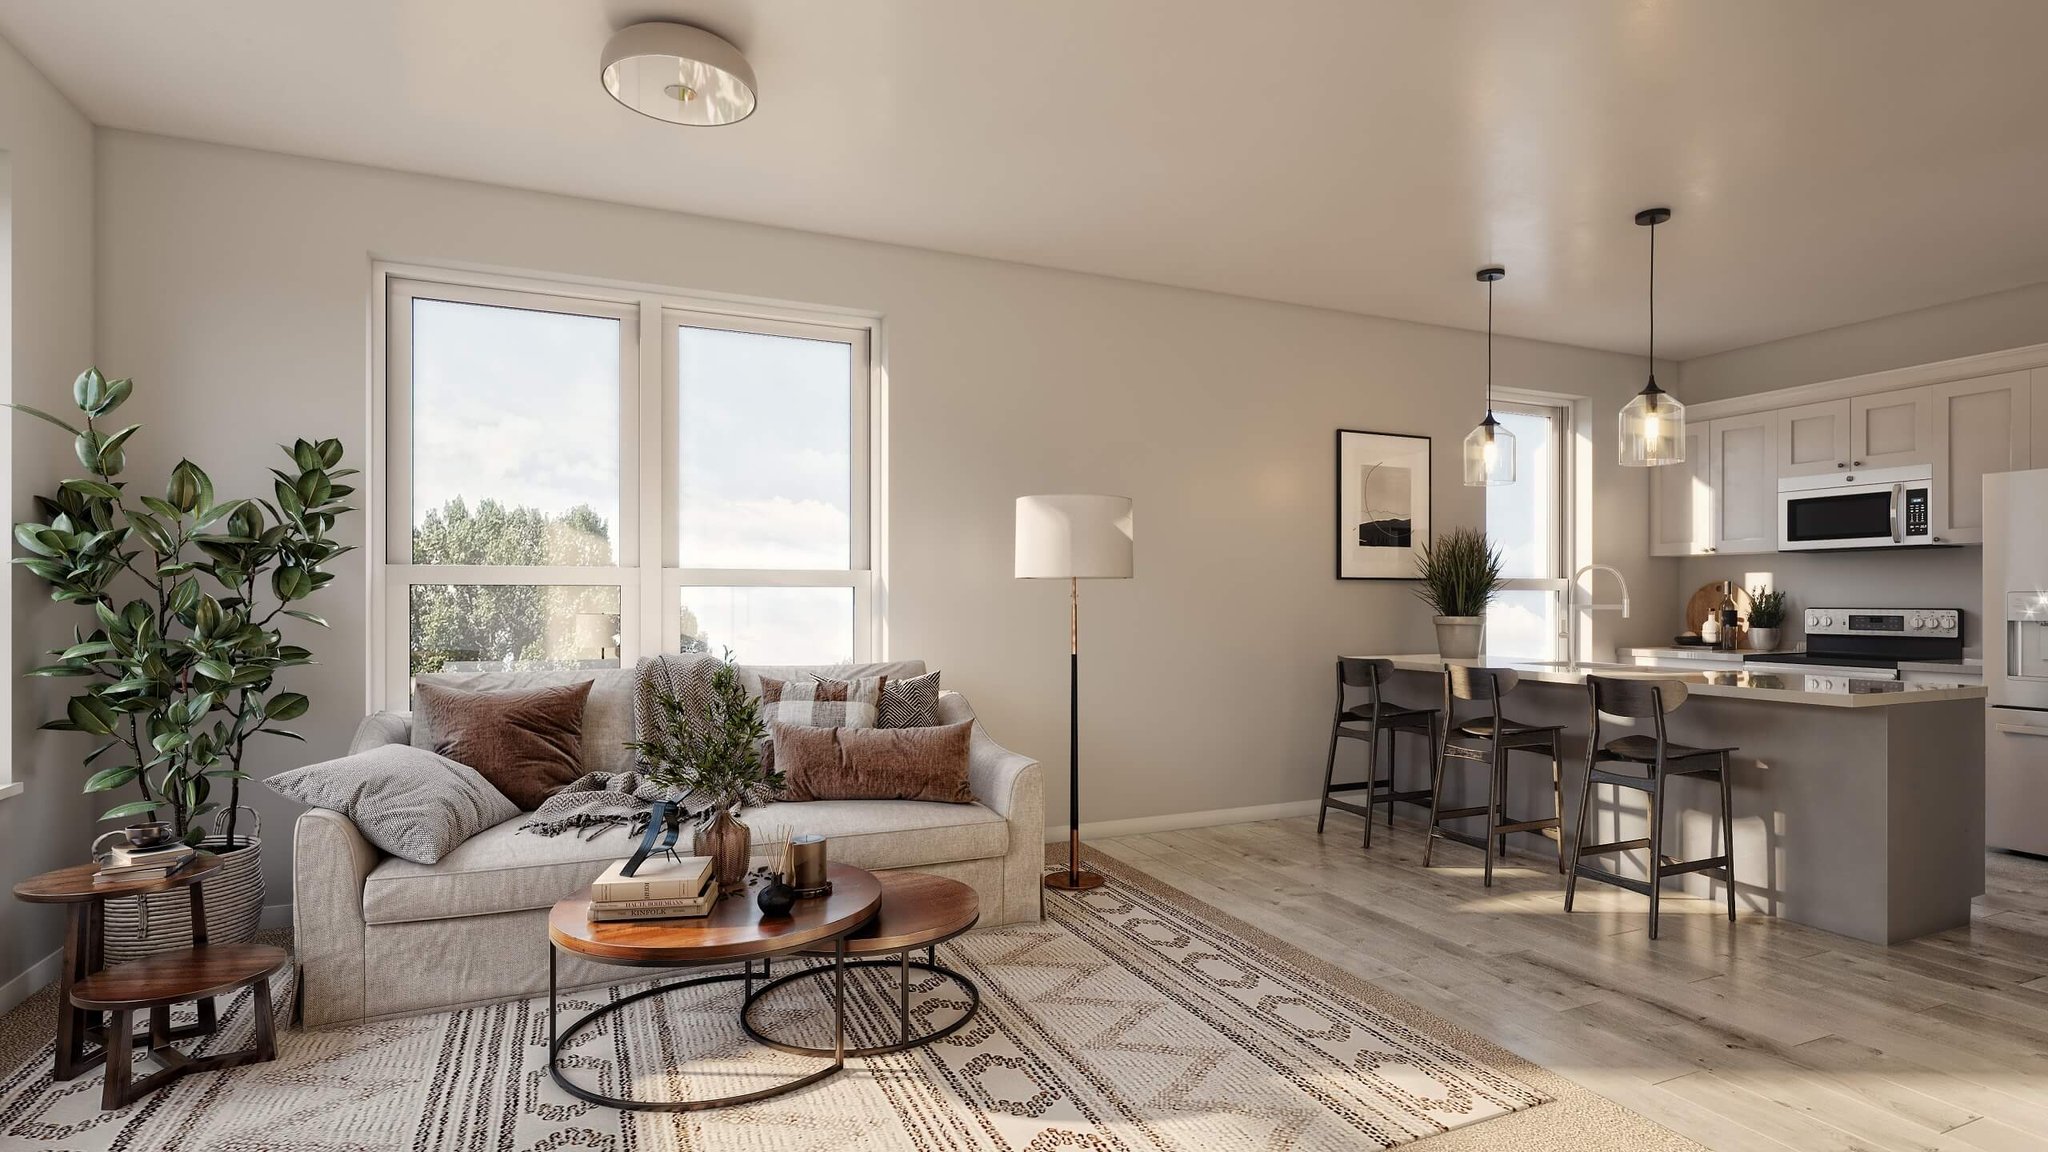
The Dagesse company will equip every apartment in “City Gardens” with quality finishes, doors, and a ready kitchen. So, we had to include those elements in interior scenes. Moreover, Jacqueline wished to show potential residents how a fully furnished apartment could possibly look. She specified that it had to be in the Modern Farmhouse style, with lots of neutrals and natural greens for accents.
To help us convey her vision with interior 3D rendering services, the Dagesse representative sent references. There were images for finishes, furniture, decor, and other design elements. Those were to help us make interior CGI feel elegant, comfy, and inviting.
#1.1 The References
For the creation of interior CGI for real estate unit, we received a comprehensive pack of reference visuals:
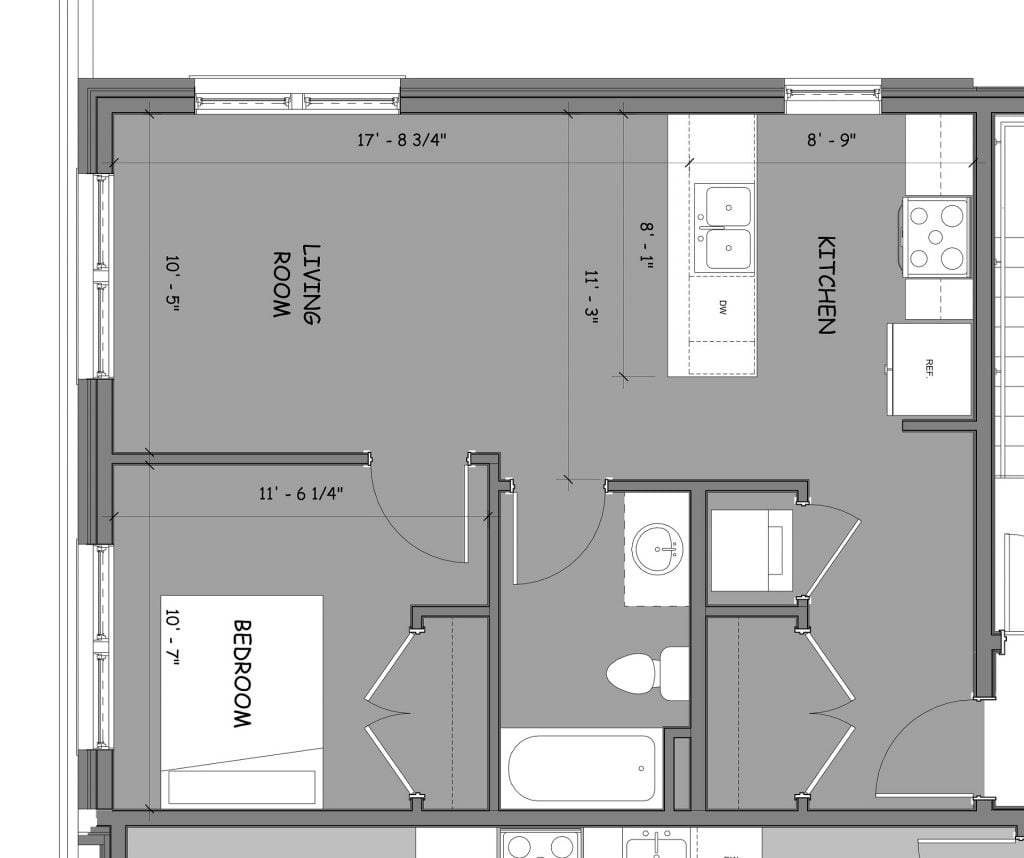
- a 2D floor plan of the apartment showing the proportions of the space and the placement of the kitchen furniture and appliances. It is an extremely useful document even when 3D floor plan rendering services are not involved. It is just as helpful for static CGI;
- photos and links to products and materials to use in the design: flooring, cabinets, knobs and pulls, doors and their handles, barstools, sink, coffee table, sofa, pillows, rug, chairs, lighting fixtures, artwork, decor, and plants. Wood plank flooring, kitchen cabinets, and sink had to be certain products of particular brands. And other items just had to look similar to the ones in references.
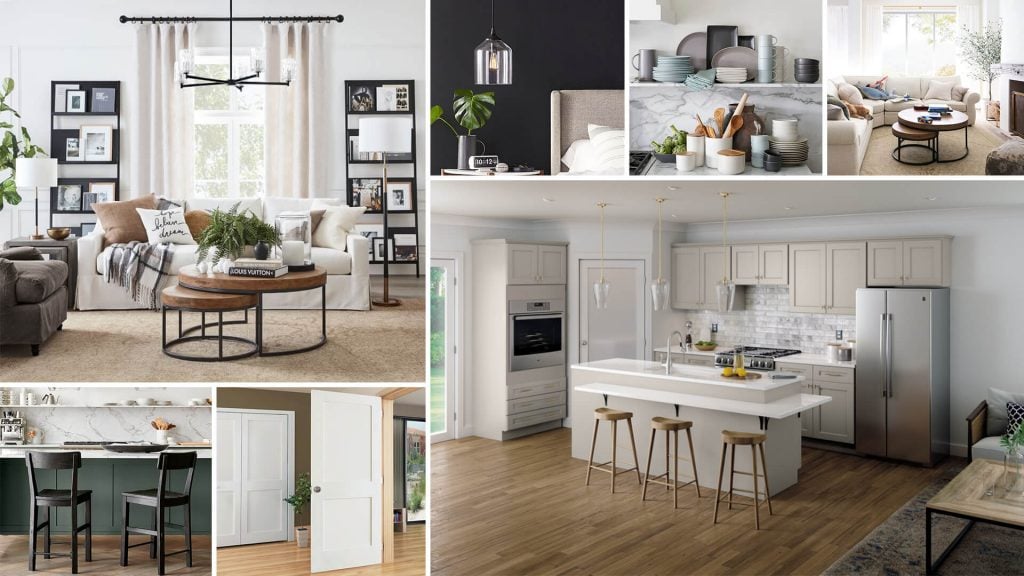
In addition, Jacqueline explained some design elements in words. Namely, she asked us to use white quartz countertops, GE stainless steel appliances, and Sherwin Williams “Site White” color for the walls.
#1.2 The Workflow
Our artist started with building a 3Ds Max scene of the apartment based on a 2D floor plan. Once the scene was ready, she set the lighting in it. Using the client’s references and similar visuals from Pinterest, the artist created a warm “golden hour” lighting in the room.
Then, the CGI specialist proceeded with filling the scene with 3D models of furnishings, appliances, and decor. She found almost all the required 3D assets in our library — except for a farmhouse-style sink and a custom-designed kitchen. So, she modeled those from scratch.
When all the 3D models in the scene were in place, the artist applied materials to them according to the given references. Then, she chose two camera angles highlighting the spaciousness and coziness of the real estate unit. The artist rendered those in FullHD resolution using the Corona Renderer plugin. After that, the resulting images were shown to Jacqueline.
Our client liked the outcome and told us what to change in it to align it with her vision. First of all, she asked to make the range, microwave, vent, and overall style of the cabinets look more like those in one of the previous Dagesse projects.
Regarding the first image specifically, we needed to:
- change the camera angle. It had to be more focused on the kitchen furniture and provide a detailed view of the sink.
In the second render, we had to:
- remove the side chair and end table with hydrangeas;
- remove the bottles and other items on the kitchen island;
- make the artwork more of a black and white instead of brown and ivory;
- show more sky with fewer trees in the window;
- remove the backsplash;
- remove lighting underneath the cabinets.
Our artist made all the requested corrections and presented the updated CGI for real estate property.
In this revision round, Jacqueline asked us to change just a few details:
- remove the shelf system;
- remove two plants hanging on the golden chain;
- add a carpet under the rug in the living area. She provided a link so that we could see the exact carpet to use.
After all these corrections were made, our CGI specialist proceeded to the post-production stage. Using Photoshop, she adjusted the contrast in the images to make the textures more readable and warmed the lighting to give the space a cozier feel. Then, she rendered the results in 4k and showed them to our client.

Jacqueline was happy with the interior images and approved them. So, we went on to create exterior CGI for real estate property. Let us show you how we did that.
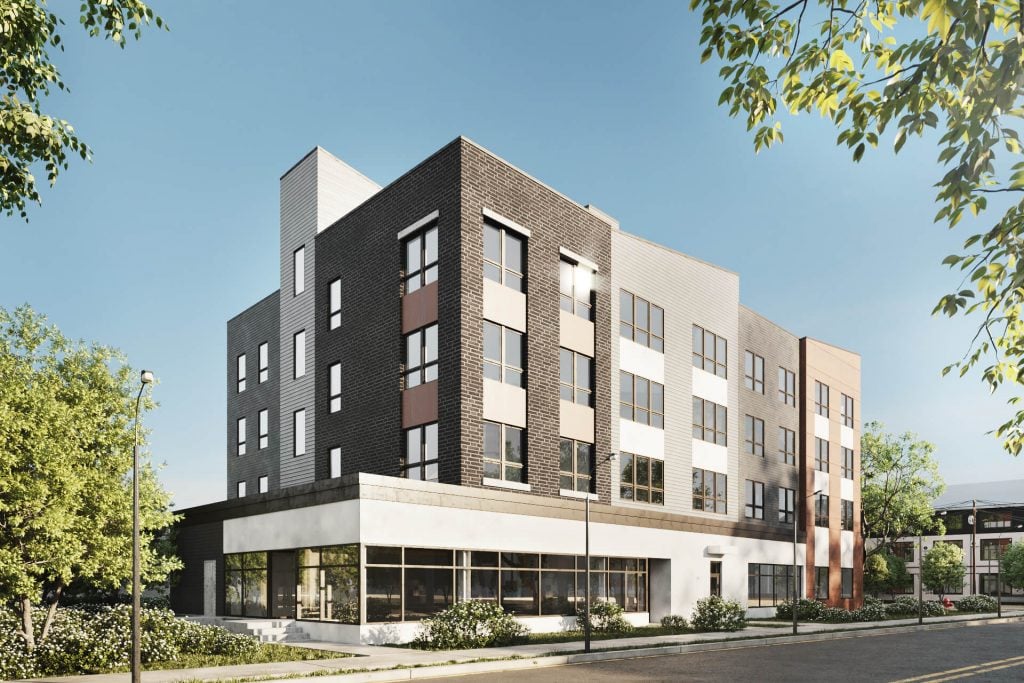
Part 2: Making Exterior Renders
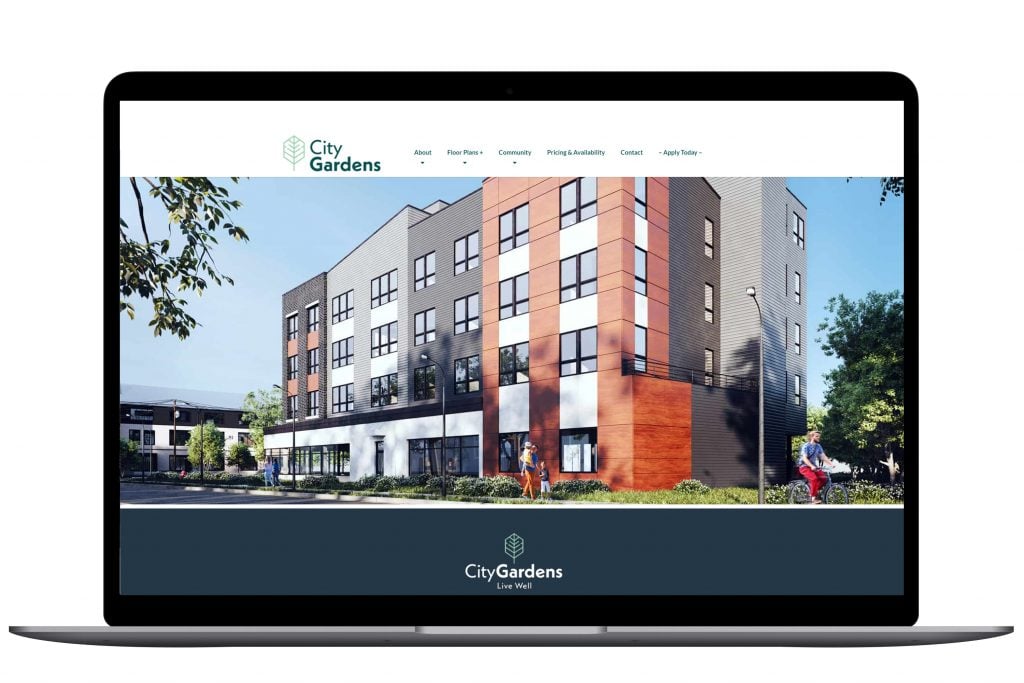
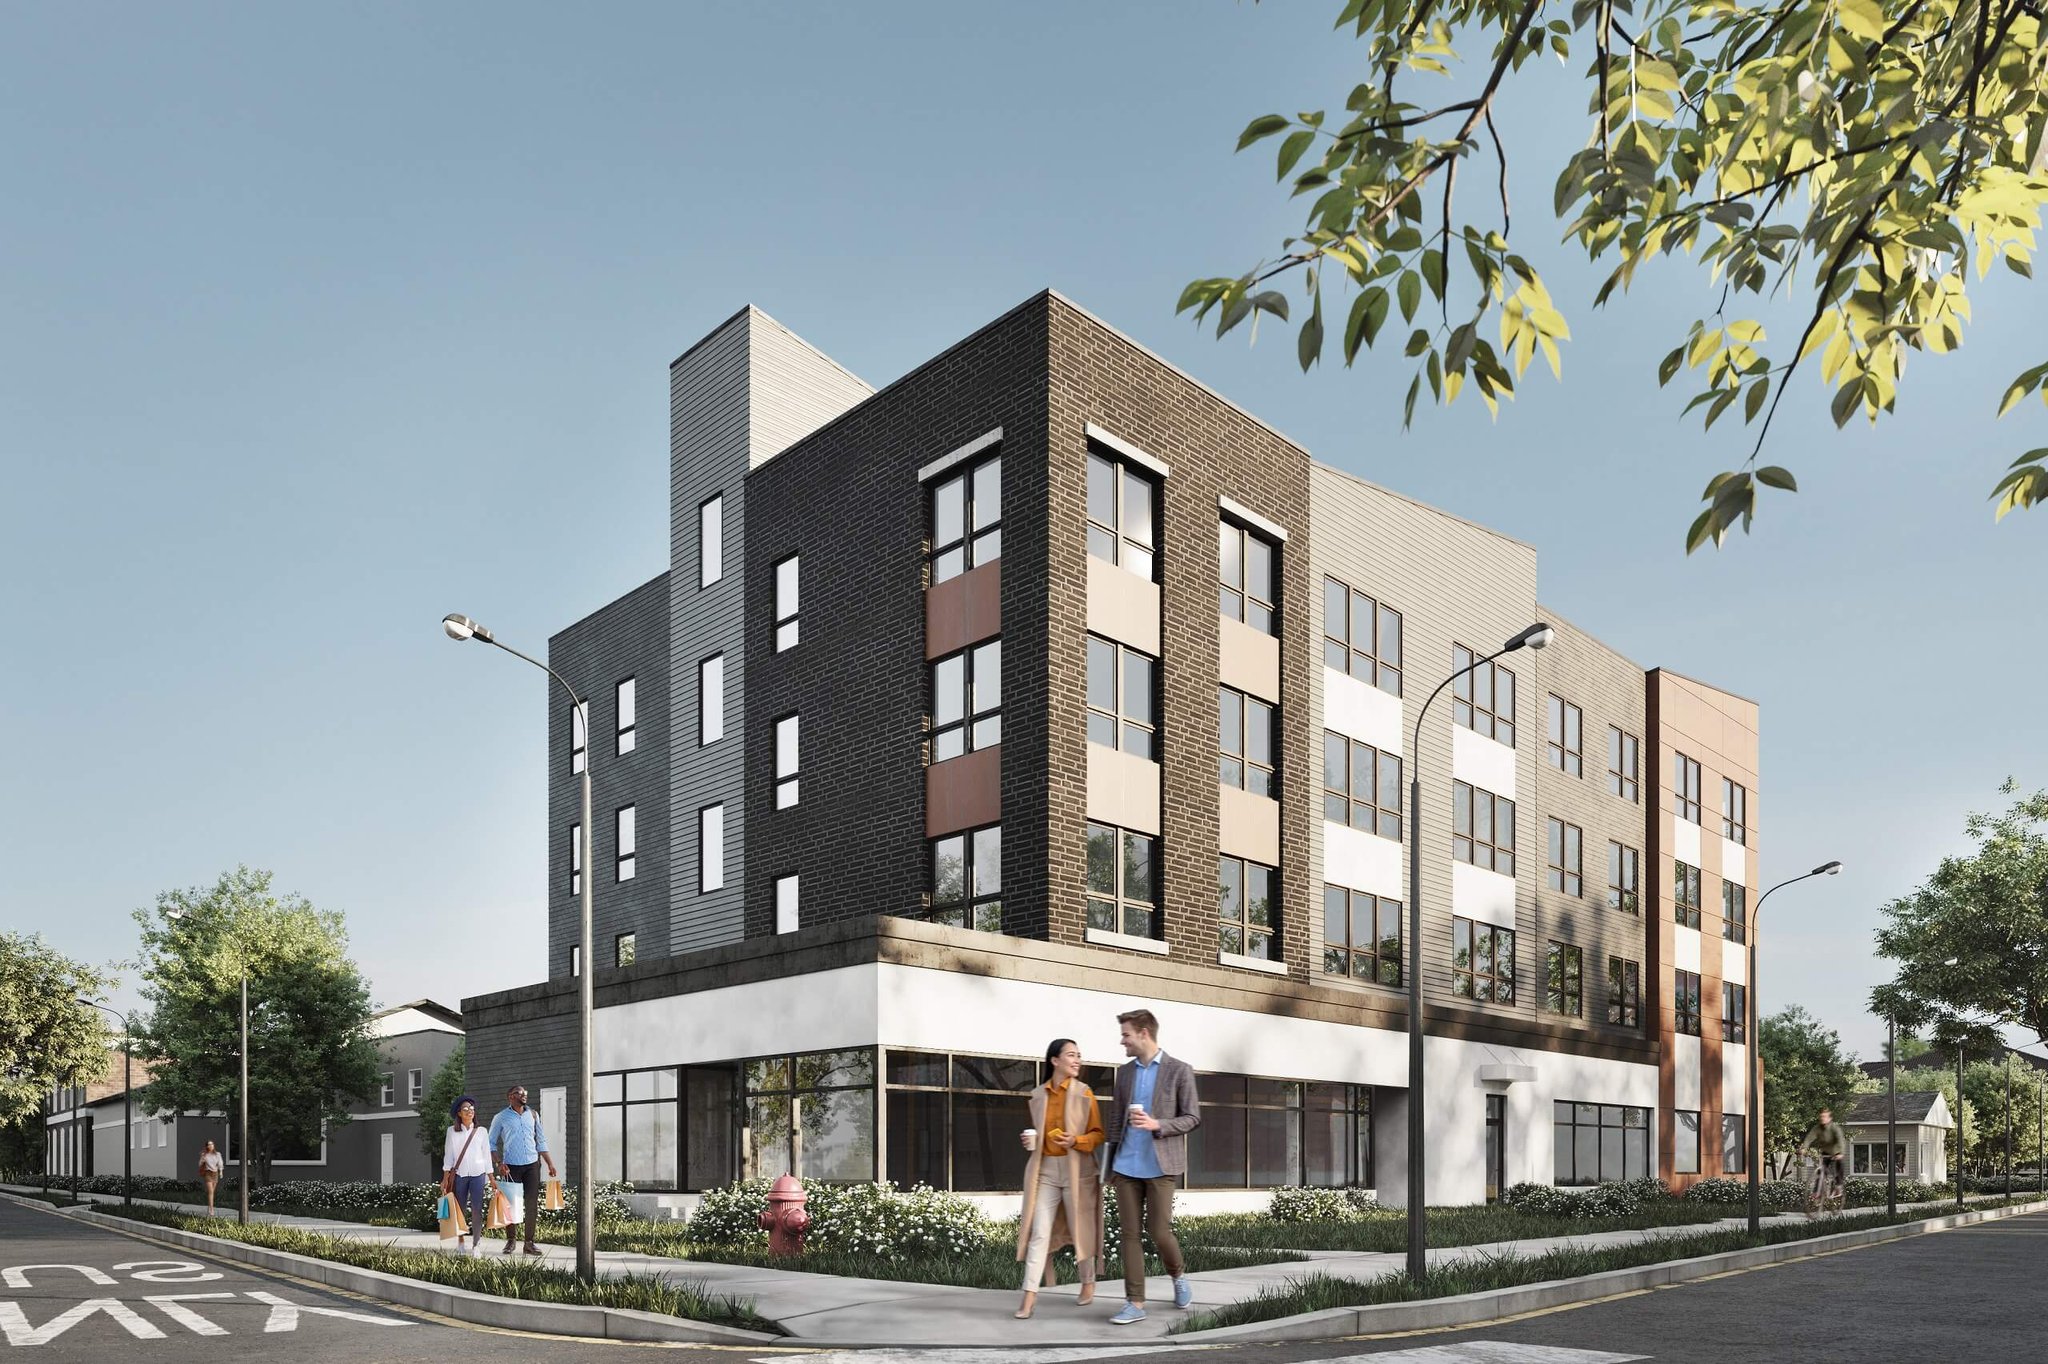
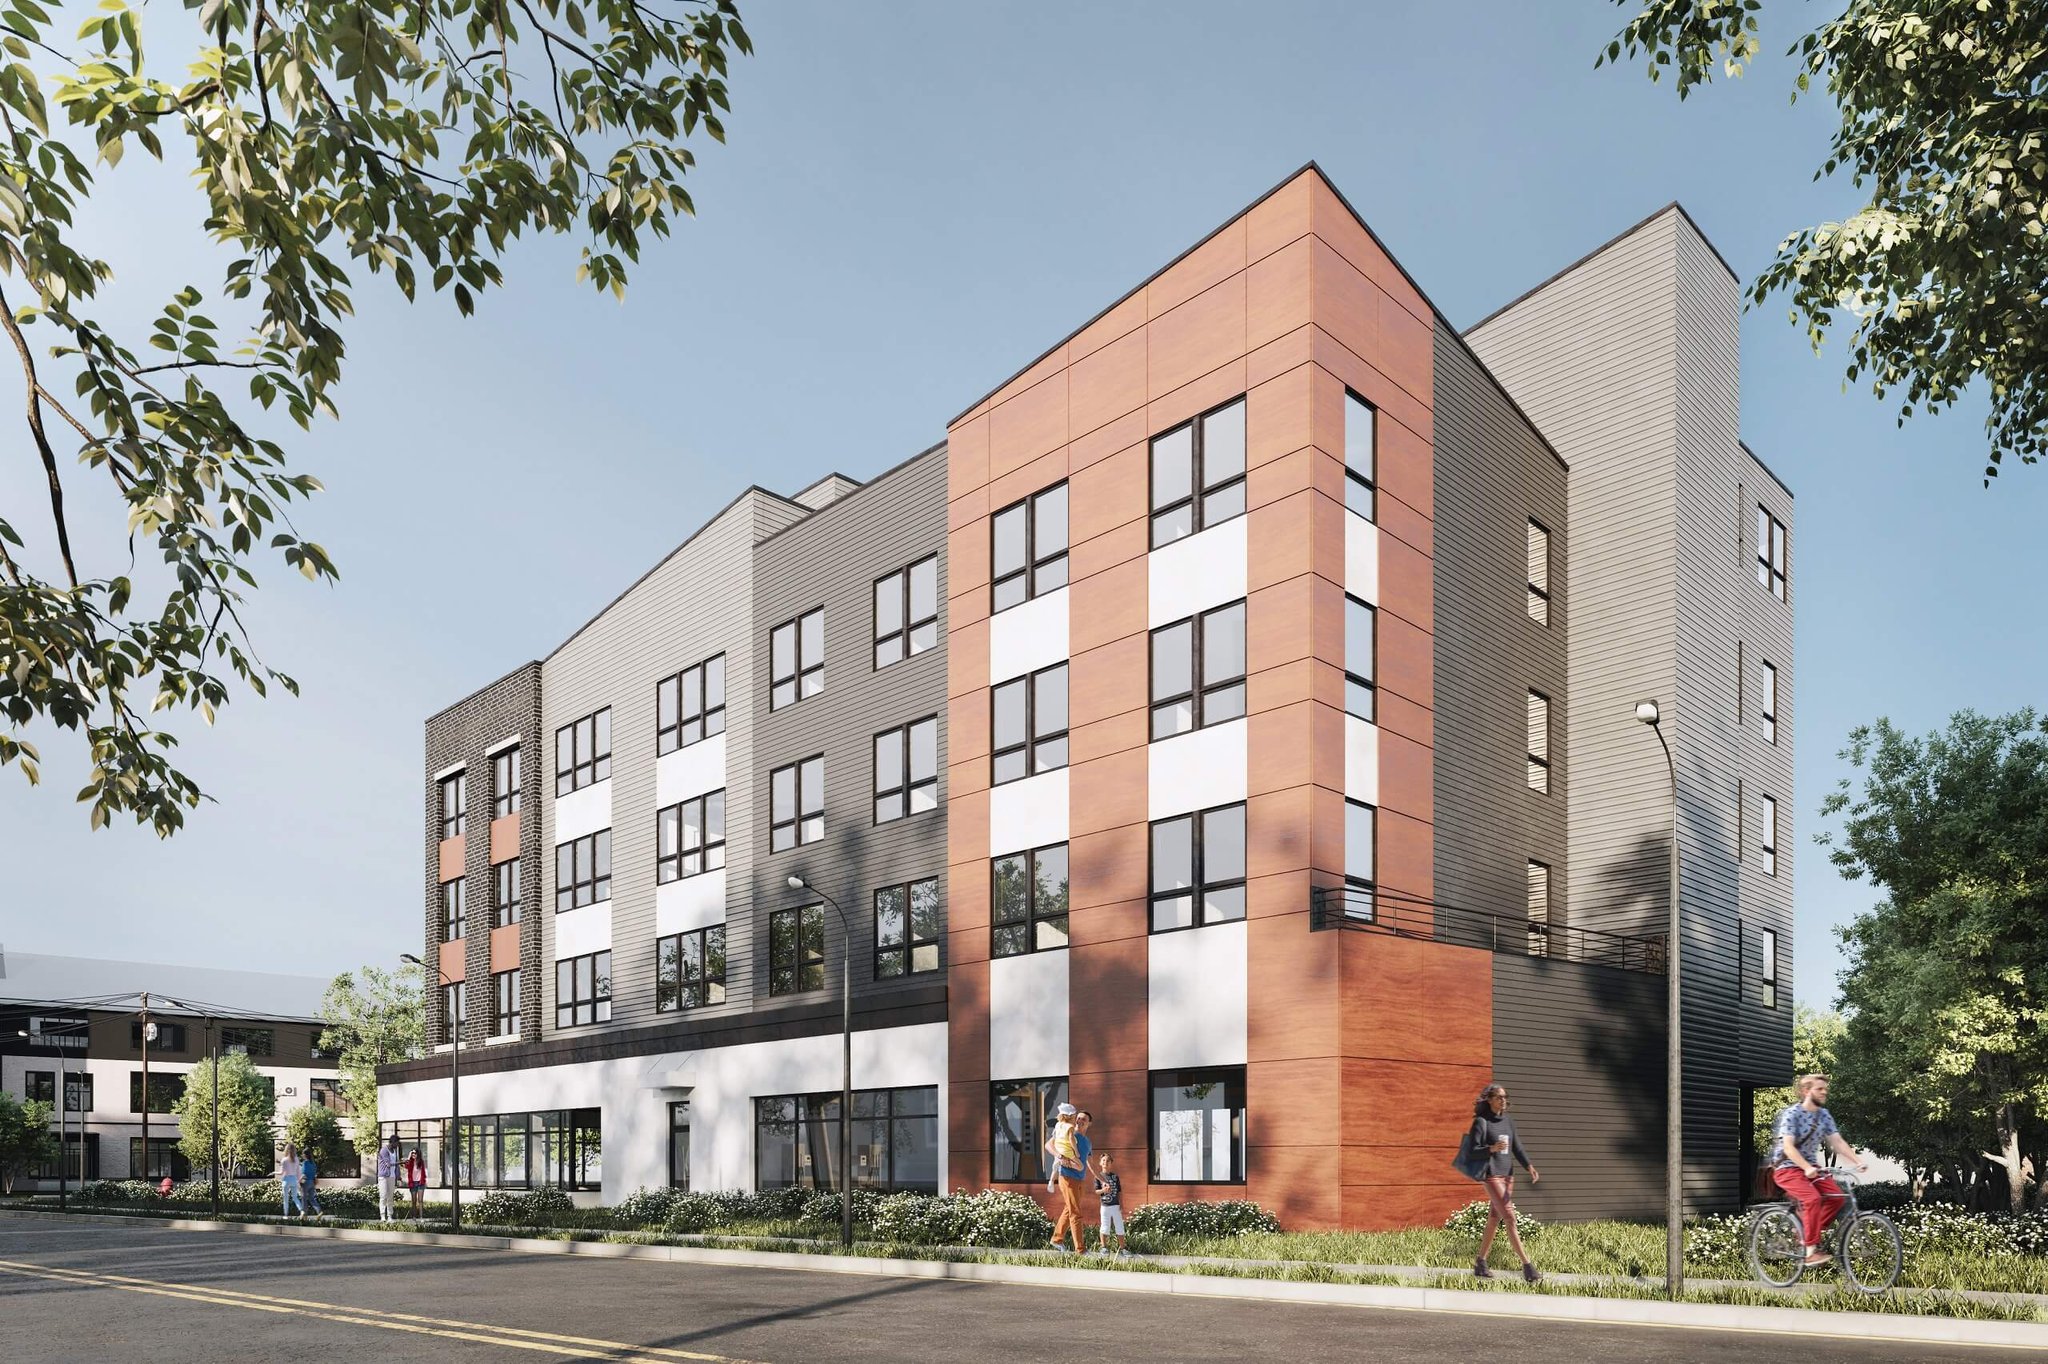
“City Gardens” will be a modern-looking, sleek four-story building. Its design can be described as a perfect harmony of simple geometric shapes, sharp edges, and clean lines. To help us show it accurately in 3D visualization for real estate, Jacqueline provided a detailed scope of work.
#2.1 The References
That’s what was included in the SoW for exterior CGI:
- drawings that indicated the structure, dimensions, and materials to be used;
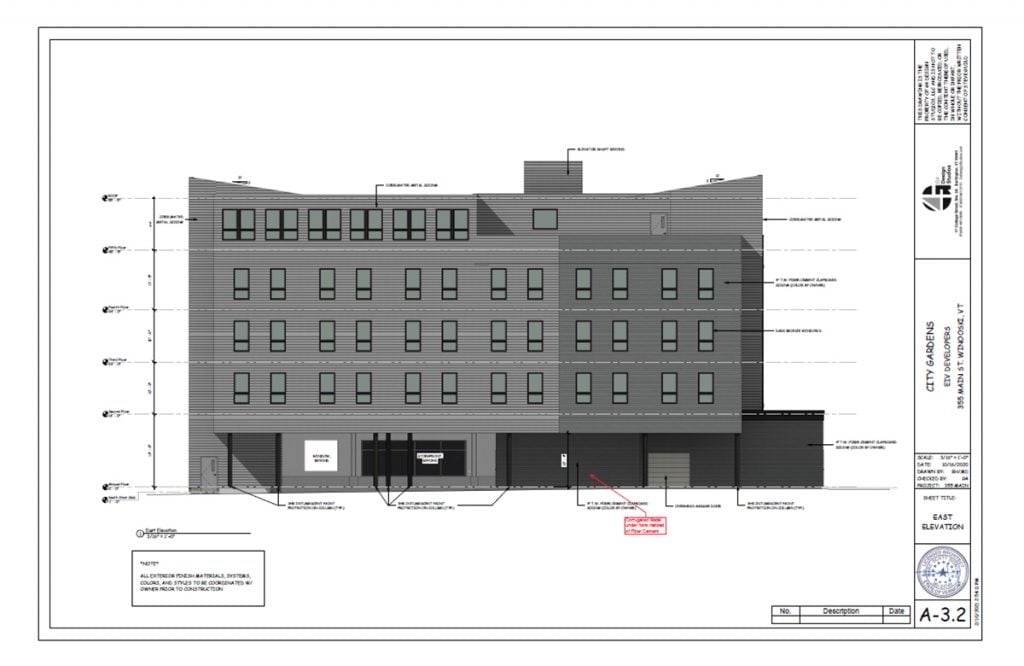
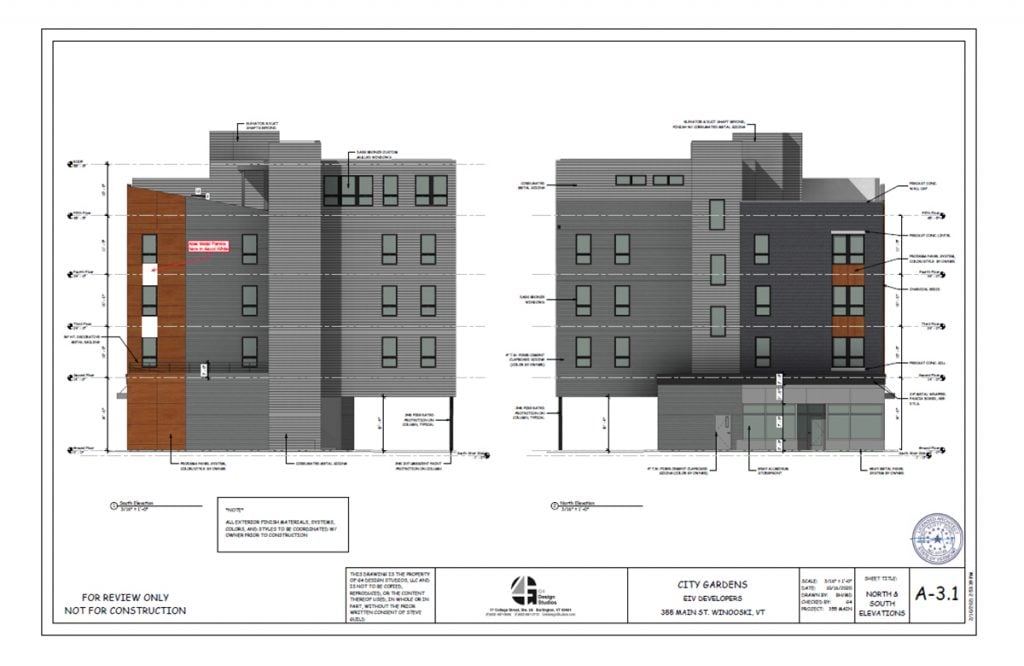
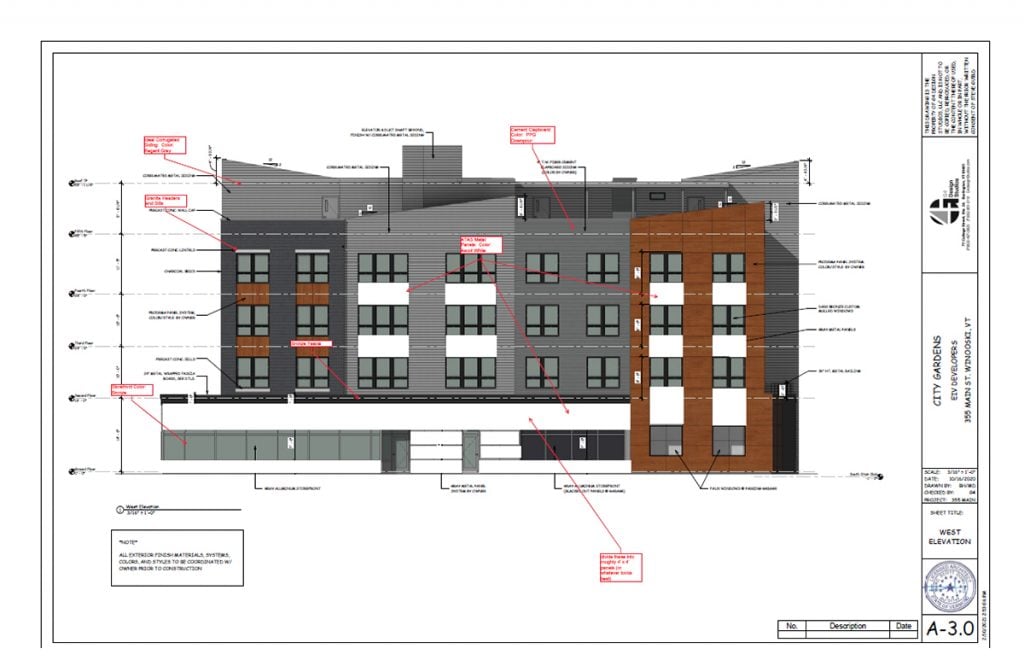
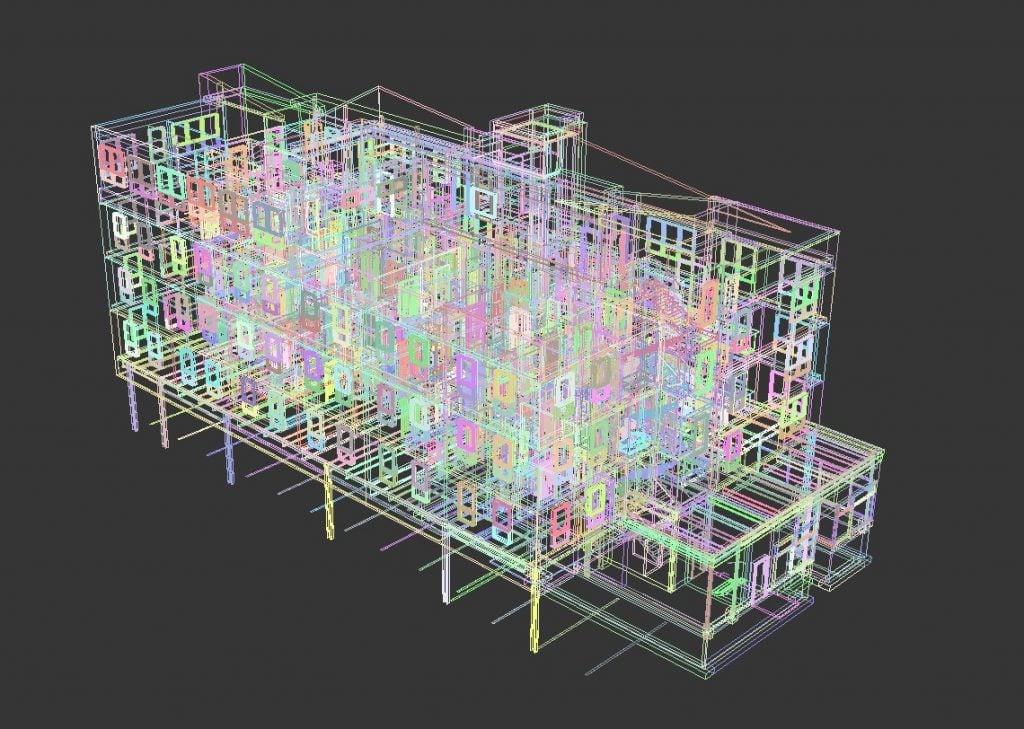
- a Revit model of the building that helped our artist accurately understand its construction and proportions;
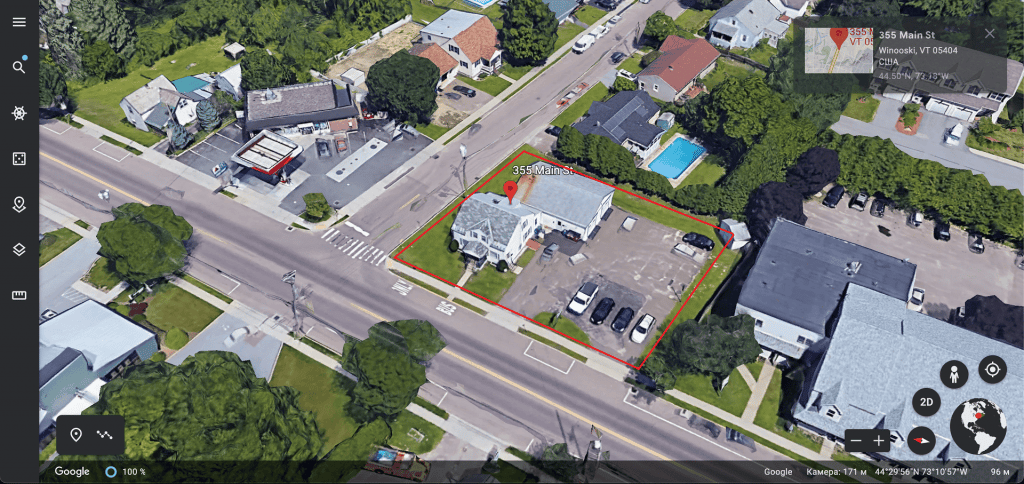
- a Google maps screenshot with an indication of the exact place where the real estate property will be constructed. It helped us understand the position of the building in relation to its surroundings. Also, it gave us a vision of the environment to depict in CG imagery.
To understand the mood we needed to convey in exterior CGI for “City Gardens”, we asked Jacqueline about the details of the location. She told us that the real estate property will be built in a lively urban environment — a so-called hip neighborhood. So, we needed to stick to this kind of atmosphere in CGI.
#2.2 The Workflow
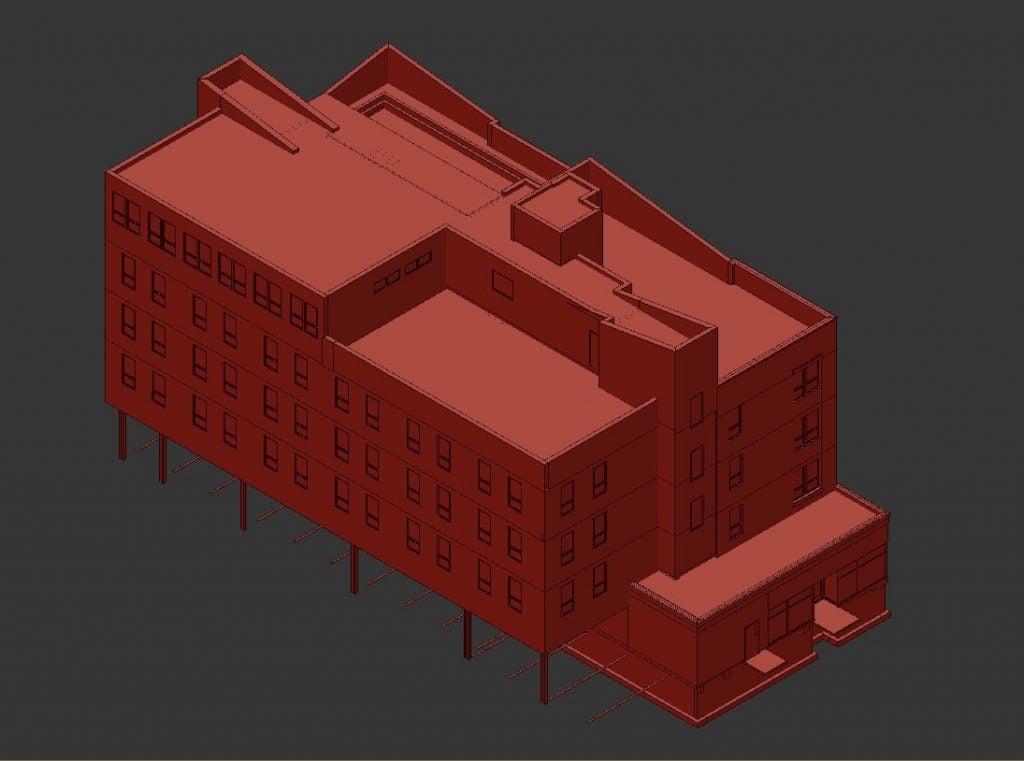
First, our artist accurately recreated the real estate object in 3Ds Max based on drawings and the Revit file. Once the model of the building was ready, she proceeded to create the environment. For this, she carefully examined the Google maps screenshot and built a 3D scene in accordance with it. The artist ensured that the layout and all objects in the scene looked similar to real-life ones in terms of shapes, proportions, and relative position to each other.
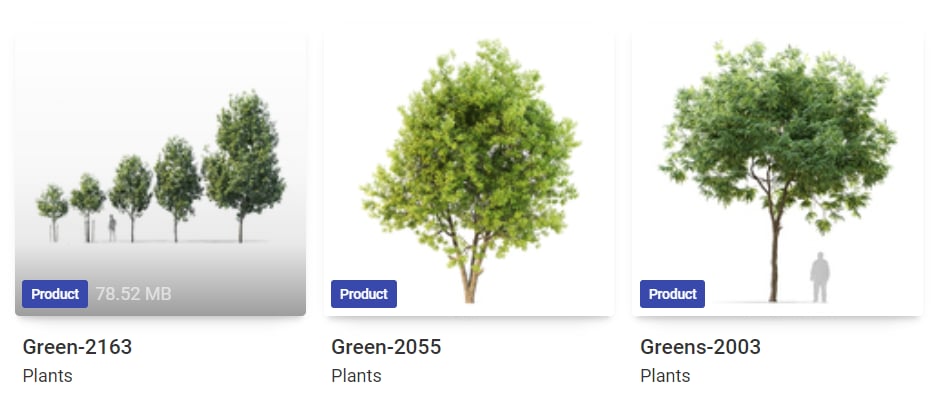
Then, the CGI specialist studied the geolocation of the future real estate object. It was needed to find out what types of plants are typical for that area. The CG artist then picked suitable 3D models of trees and bushes in our virtual library and put them into the scene.
The next step was to set the lighting. For this, the CGI specialist used an HDRI map. It is a panoramic photo that is uploaded to 3Ds Max so that the software could recreate the depicted sky, light, and shadow patterns in the CG scene. Our artist chose a photograph showing daytime with a clear sky. This type of lighting was best to emphasize the quality and color of the construction materials.
Elevate your exterior design project with photorealistic 3D visuals that help clients confidently approve your proposals.
The CGI specialist did thorough work on adjusting reflections. She even made sure that there is a reflection of a gas station in the building’s windows. The station was not in the frame in the CG image but the artist knew that it was there in real life. So, she took it into account to make the renders 100% accurate.
After that, the CG artist chose four views that exquisitely highlighted the design of the real estate property. She rendered images in greyscale in FullHD resolution and sent them to Jacqueline so that she could approve the geometry and select the best angles.
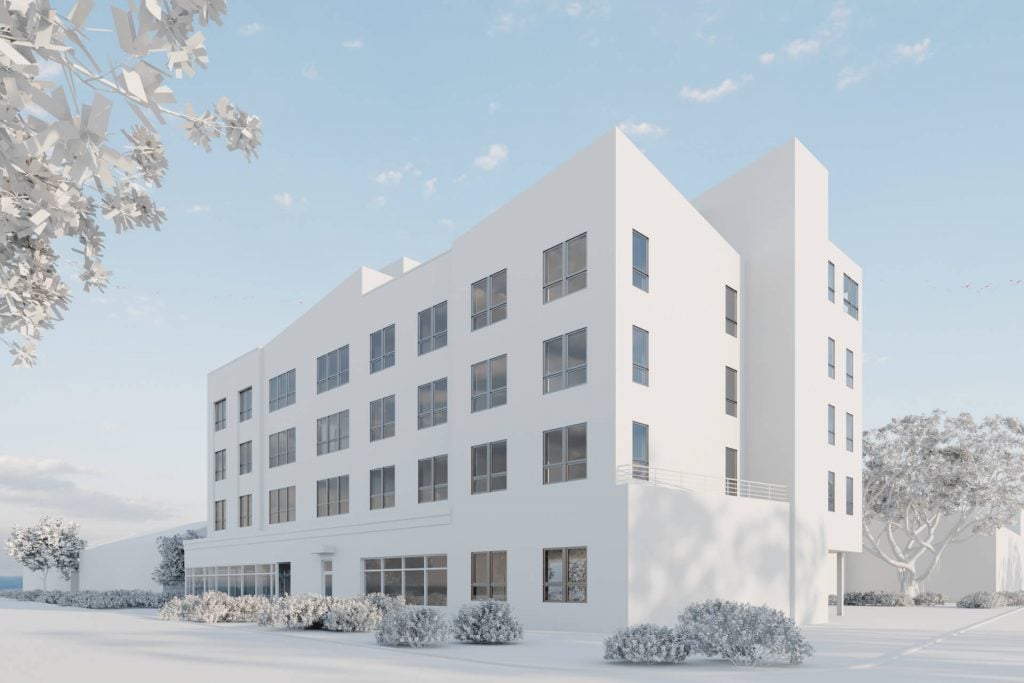
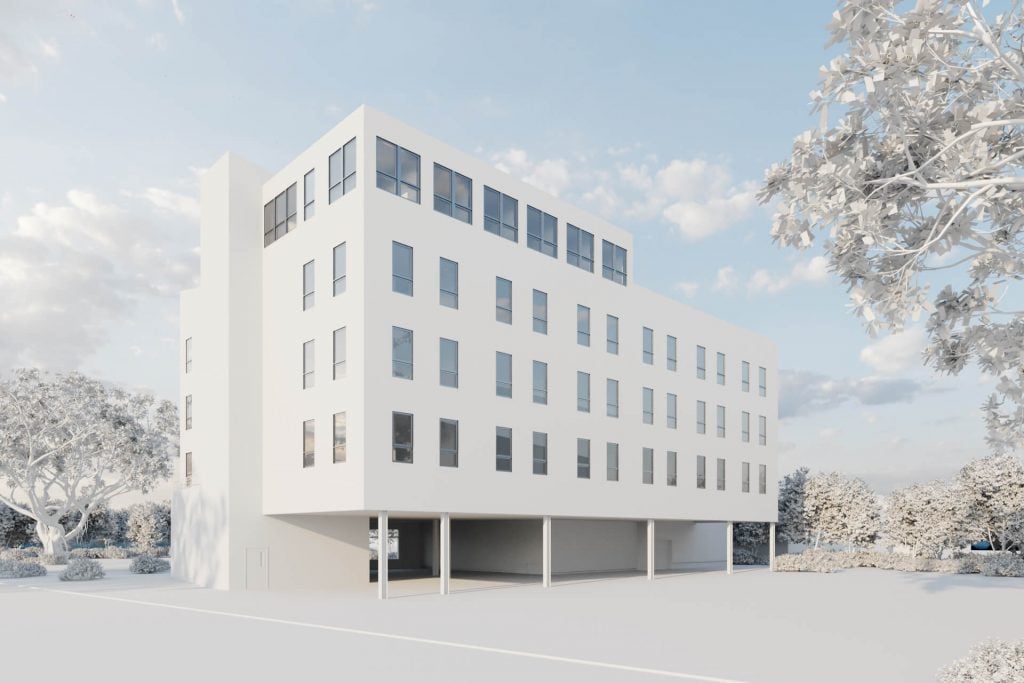
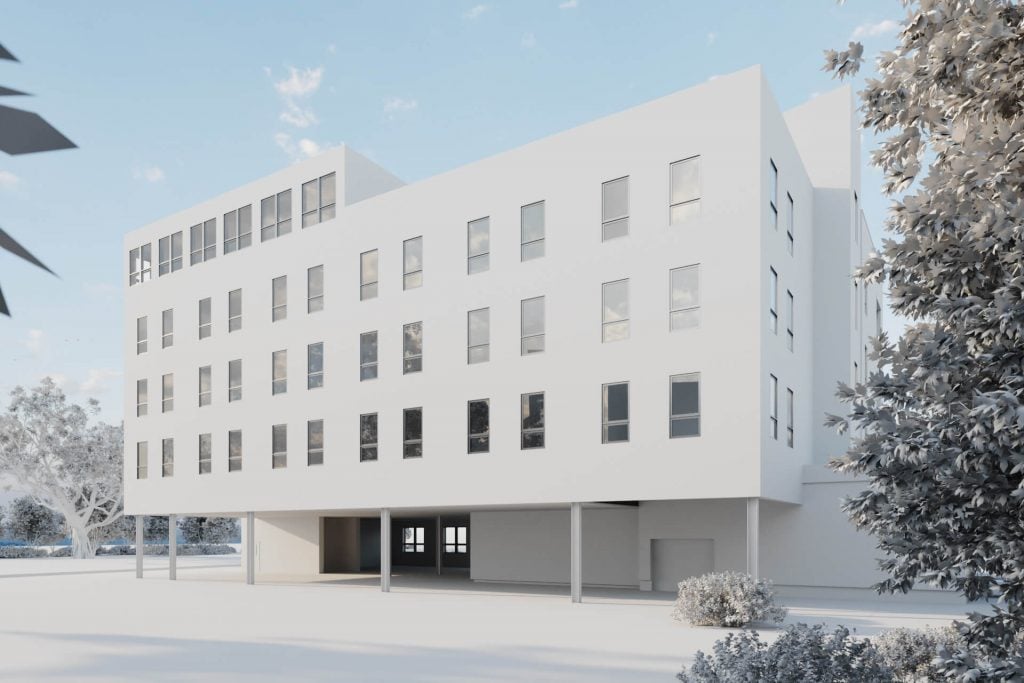
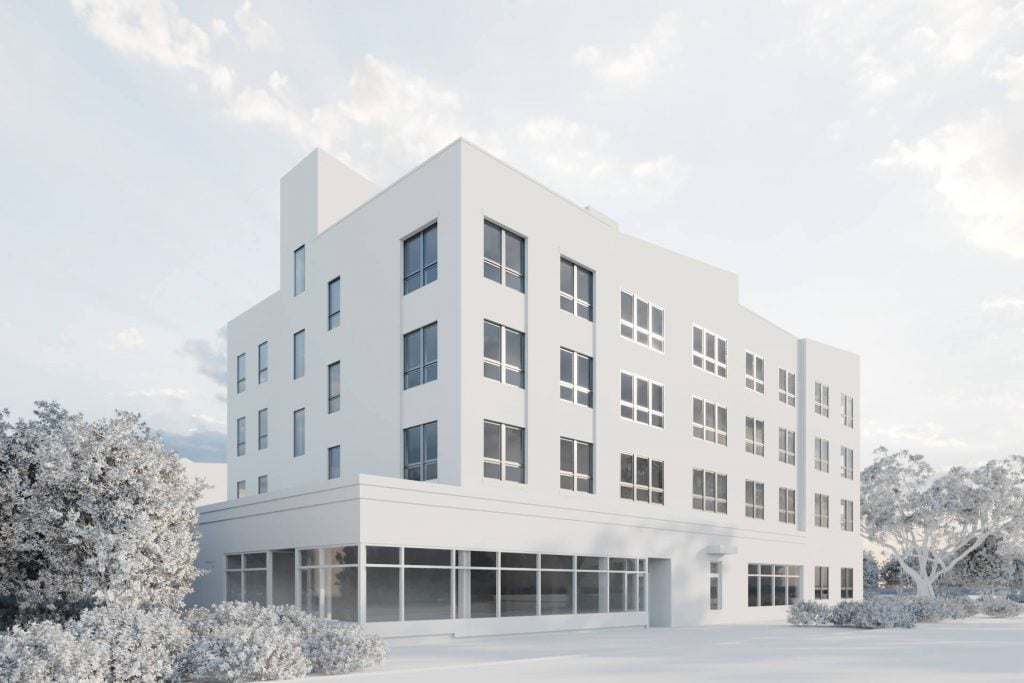
Out of the offered views, our client chose the first and the fourth. She had no comments on the geometry. So, the CG artist could go on with the work.
Using a Google maps screenshot as a reference, the CGI specialist added more surrounding details: roadway, curbs, sidewalks, and driveways. Then, she applied materials to the building according to the specification in the drawings and textured all the other elements in the scene. The next step was rendering two views in FullHD resolution.
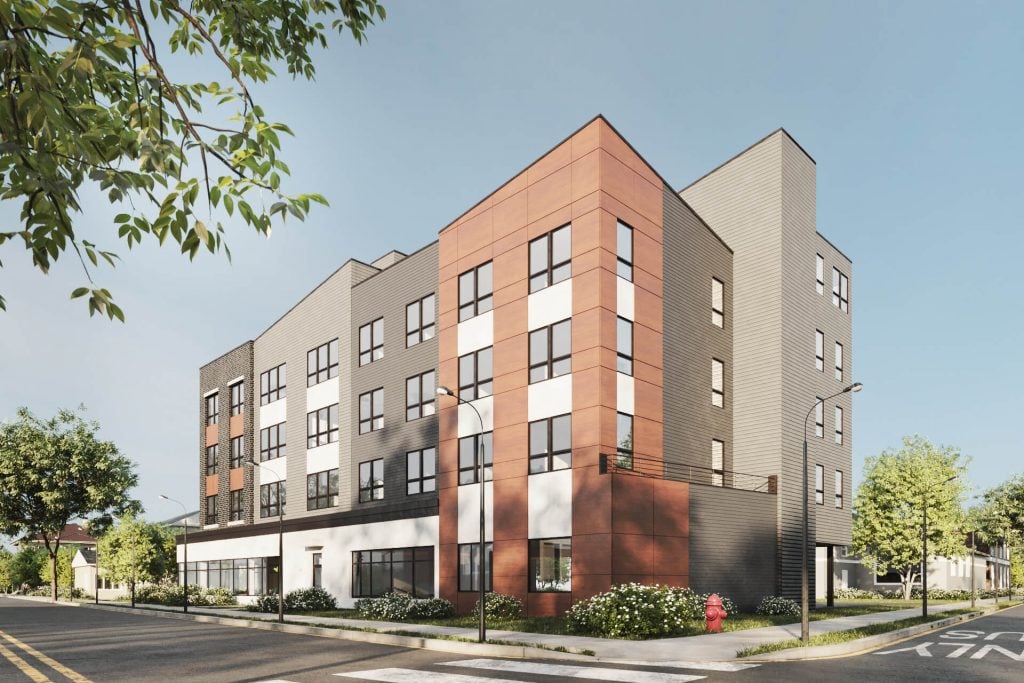
Jacqueline said that she loved everything about the renders and there is only one thing to change. Namely, after seeing the images in color, she realized that the side street was shown in a “reversed” way. It had to go on the opposite side of the building, i.e. its corner with all the glass parts. So, the building itself was oriented the right way along Main Street. It’s just the side street that was shown incorrectly.
To fix this mismatch, our artist re-adjusted the environment in 3Ds Max to put the streets and the building into the right position in relation to each other. She also had to replace some of the trees to make the resulting view correspond to reality. When all the corrections were made, we showed the updated CGI to our client.
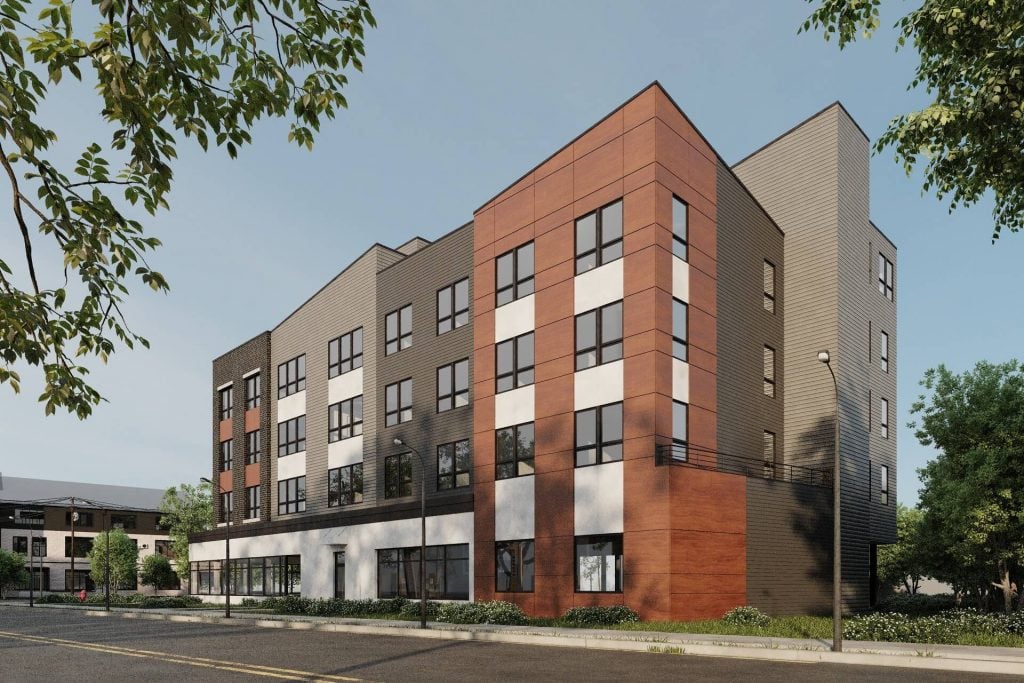

Jacqueline confirmed that the street was shown correctly. So, we could proceed to the final stage — post-production. Here, our CGI specialist adjusted contrast and made colors brighter so that they looked more lifelike. She also brightened the light to add more realism to the renders — for instance, by showing how the sunbeams gleam through the leaves.
The last thing left to do was to add people to the CG images. According to Jacqueline’s request, those had to be well-dressed city dwellers in their thirties, wandering around the building. Our artist chose the images of that kind of people and added them seamlessly to the renderings. Then, the finalized imagery in 4k was presented to Jacqueline.
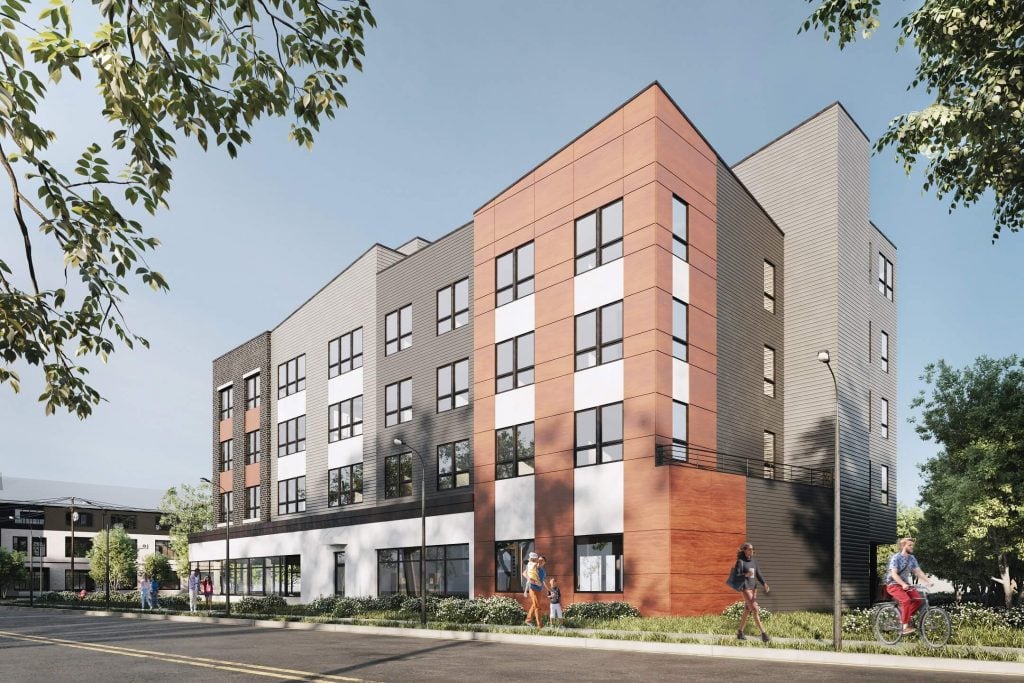

Our client approved this version of exterior CGI for real estate property. Which meant we could go on to the last part of this project — creating the rooftop 3D visualization.
Part 3: Making Rooftop Deck CGI
“City Gardens” will offer an open-air relaxation area — a cozy rooftop terrace with comfortable furniture and magnificent views over the city. As it is definitely one of the selling points of the real estate property, the Dagesse team wanted to show it in a separate render. They provided us with all the required visual aid to create it.
#3.1 The References
For the making of the rooftop render, we received the following materials:
- a greyscale rendering in which the rooftop terraces were indicated by the client with colors. We were asked to show the one in the green circle;
- a visual reference for a furniture set;
- a photograph showing the preferred style and color for pillows;
- a visual reference for flooring material.
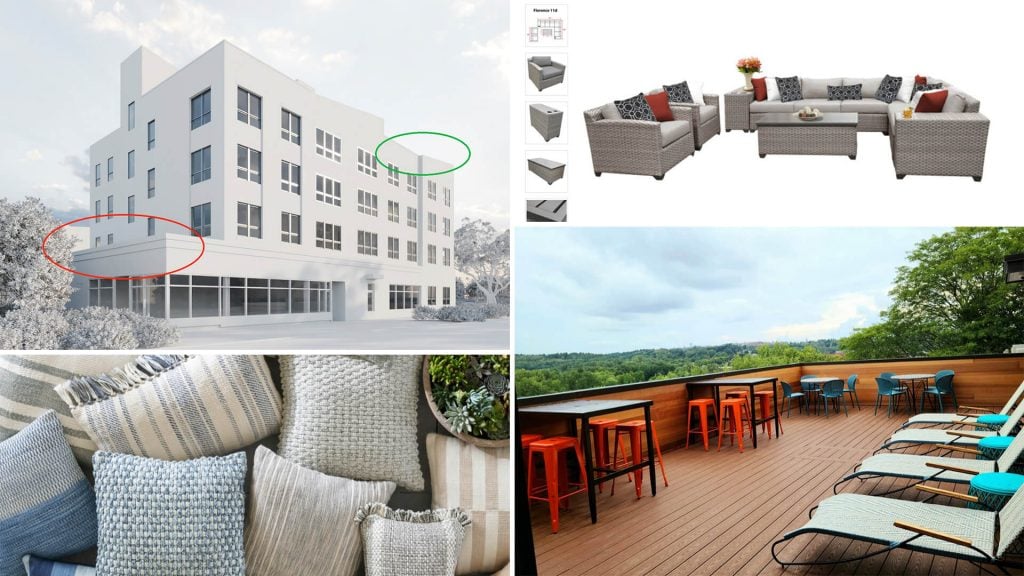
Jacqueline also told us that there would be three movable planters with grass and trees. Those were to be placed between the furniture pieces to create an atmosphere of a lovely garden. We received no specific reference for planters — the client entrusted us with choosing suitable CG models of them on our own.
#3.2 The Workflow
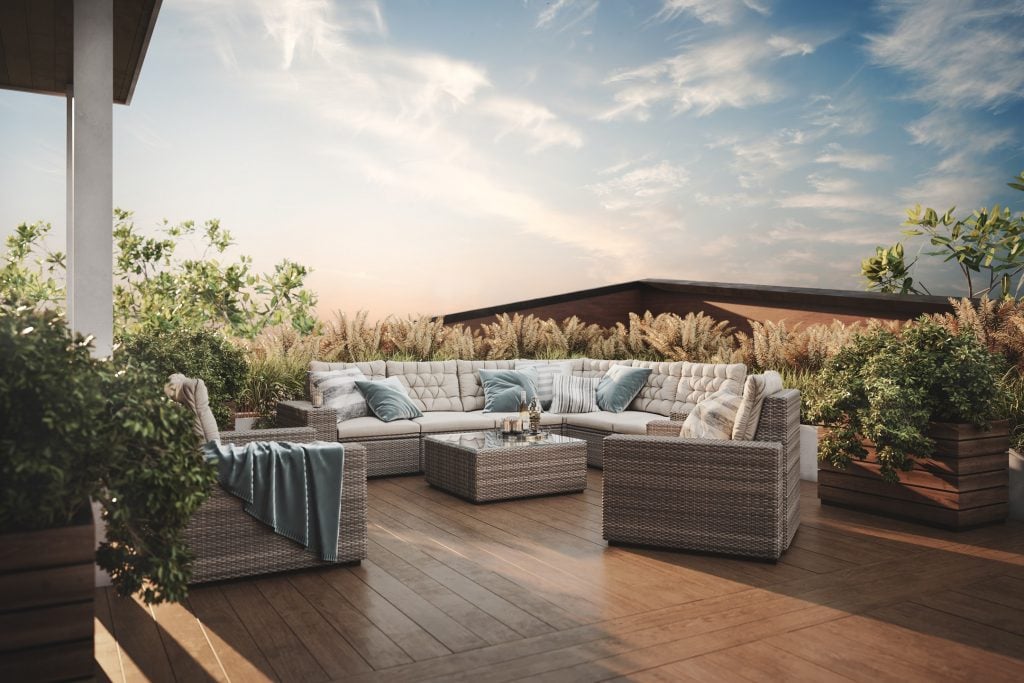
- To create rooftop CGI, our specialist used the ready 3D model of the building that she had previously made for exterior renders. It already included almost all the required architectural details — except for the flooring. So, the CG artist did a little extra modeling to add this element to the scene.
- Then, the CGI specialist set the lighting using the Corona Renderer plugin. She chose a warm, golden-colored sunset light with delicate rose shades. It was the best option to emphasize the coziness of the rooftop terrace and to show a wonderful view one could see from it.
- Then, the artist filled the scene with 3D models of furnishings and decor from our virtual library. She picked furniture and pillows that were the most similar to the ones shown in the references. As for the planters, trees, and decor items, she relied on her own taste and chose those that suited the overall style and mood of the image.
- When every element in the scene was in its place, it was time to set the camera angle. The rooftop terrace was partly surrounded by columns, so the artist picked the angle at which they would not obstruct the view. After that, she rendered the image in greyscale and sent it to the client to get approval of the camera angle, geometry, and proportions.
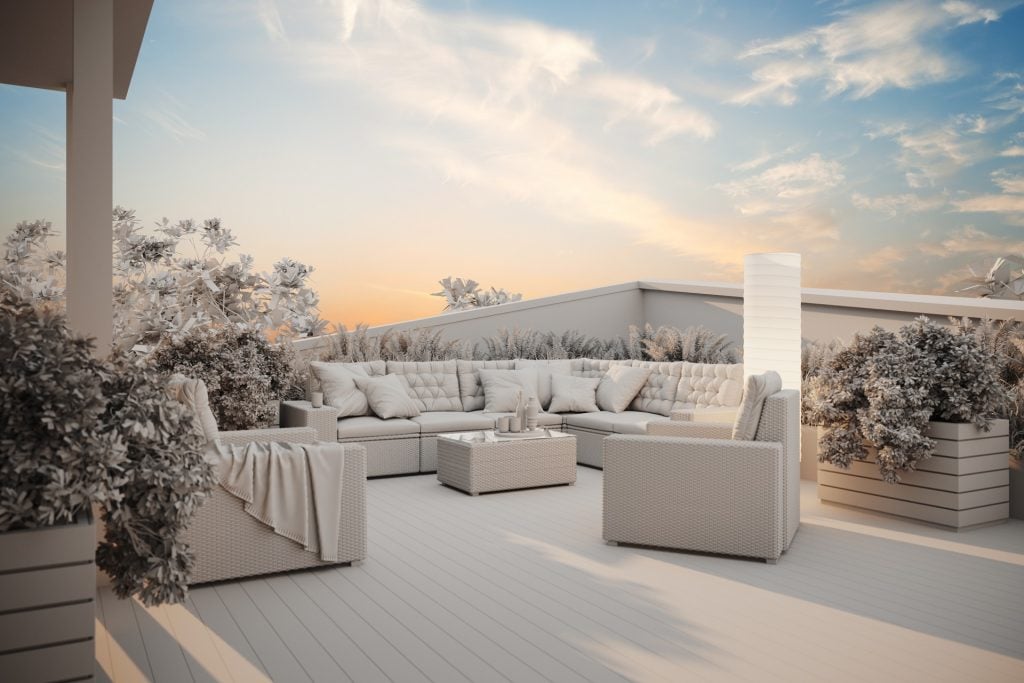
Jacqueline had only one note: she asked to remove the light column on the right. Our artist did that and proceeded to texture the CG items in the scene. When all the textures were applied, she rendered the image in 4k and fine-tuned it in Photoshop. Namely, she increased contrast, brightened the sunlight, and made the green color of the plants more natural to give the image a more lively atmosphere.
Then, the artist presented the final render to our client.
That’s what Jacqueline said once she saw this CG picture.

So, that was it! The project was completed and all 5 renderings for the real estate object were ready. Let’s take a look at them.
The Results
Here they are — all the 5 renders we’ve done in the course of our project with DagesseCo.
Interested to see how the real estate company used the results of our work? We’ll show you right away.
How Dagesse Used CGI to Market and Presell Apartments in “City Gardens”
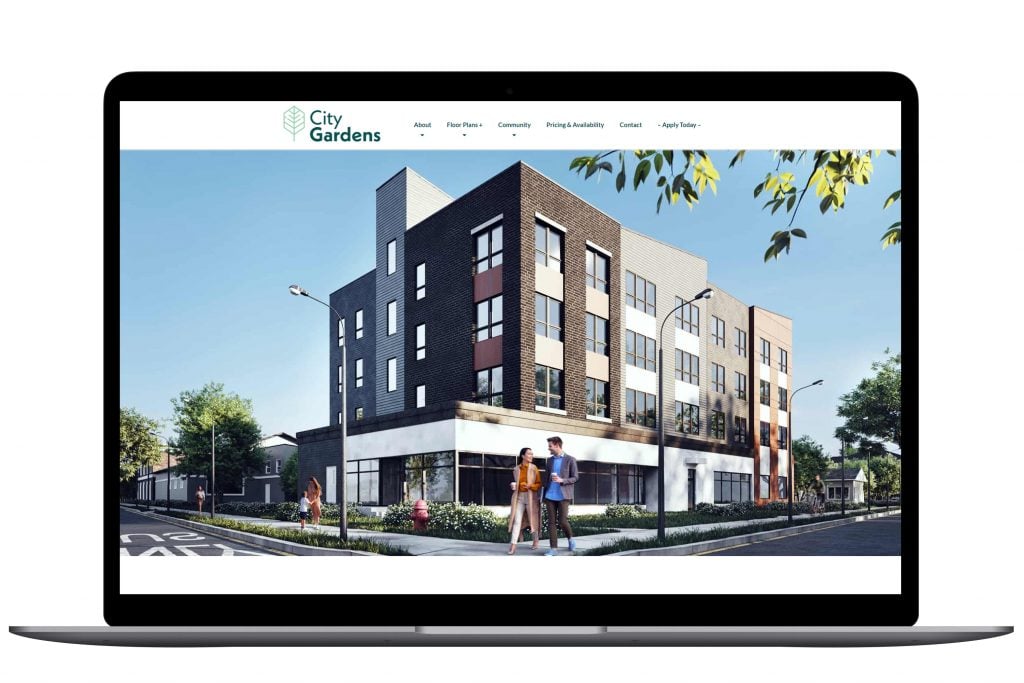
Now, photorealistic renders that we’ve made are featured on the “City Gardens” landing page. The real estate company uses them to show potential buyers how beautiful and comfortable the property is going to be. Accompanied by texts describing all the benefits of the place, 3D renderings make for powerful marketing materials.
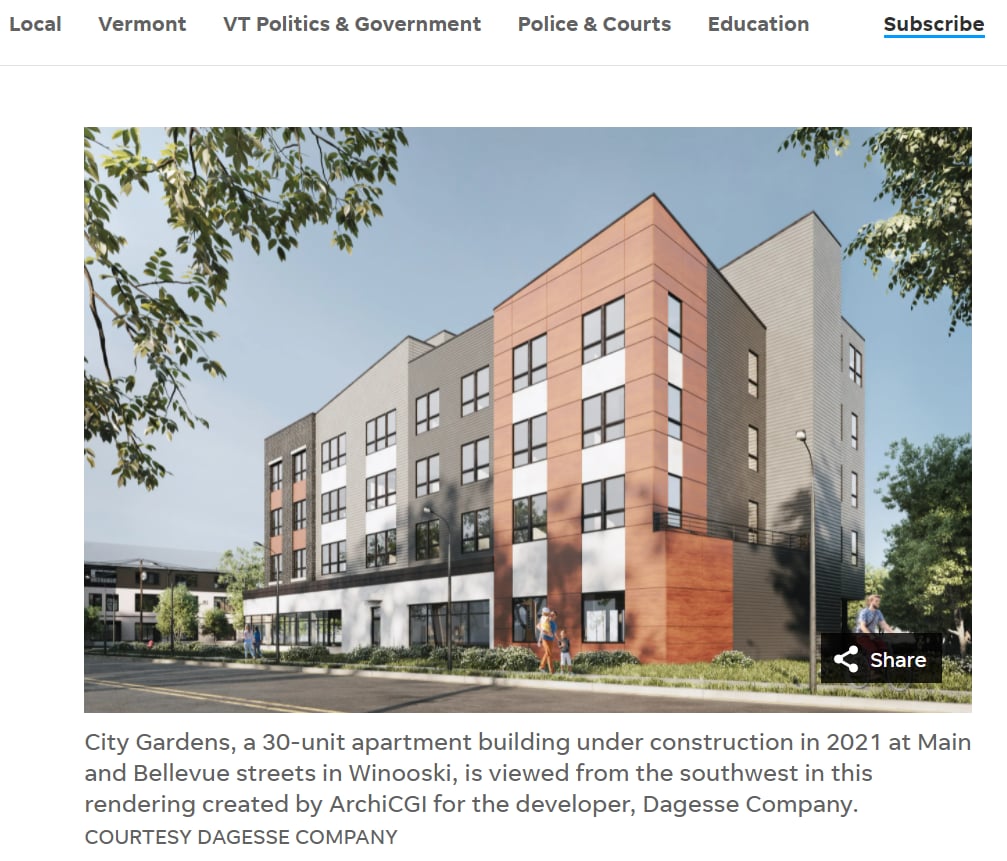
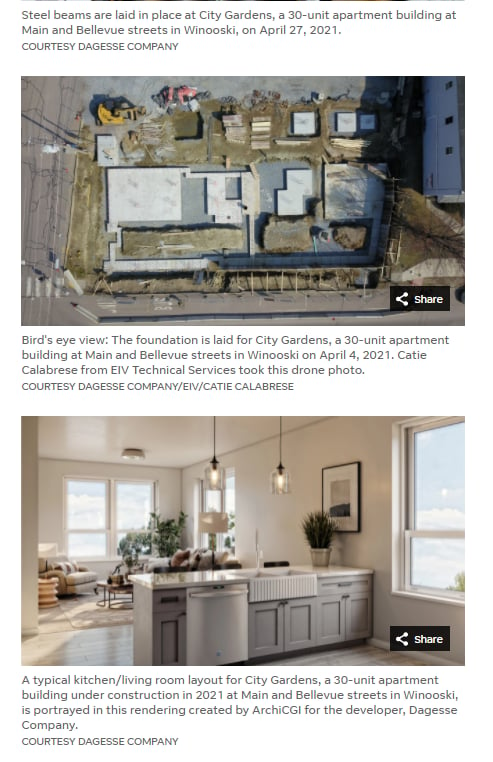
Also, CGI for real estate property got featured in a Vermont local online newspaper. The article gave details about the development of the “City Gardens” project. It included both photos of the construction site and photorealistic renders of the future result to give readers a before & after picture.
Working with the Dagesse company was a smooth and pleasant experience. Throughout the process, Jacqueline was very helpful and quickly provided us with all the answers and references we needed to do the job. As a result, we delivered CGI that unveils the full potential of the real estate property, showing how fantastic it would be to live there.
Get your project estimated in just 1 hour - fill out this brief!
We are sure that Dagesse developers will find buyers for the lovely apartments in “City Gardens” in the shortest possible time. And our team was happy to help with that by providing photorealistic CGI for the real estate company’s marketing campaign. Now, we can’t wait to work on more of their amazing projects.
Need heart-winning photoreal CGI for real estate projects, presentations, and marketing campaigns? Contact us for CGI services and get CG visuals of the top quality at the speed of light!

Catherine Paul
Content Writer, Editor at ArchiCGI
Catherine is a content writer and editor. In her articles, she explains how CGI is transforming the world of architecture and design. Outside of office, she enjoys yoga, travelling, and watching horrors.
Like this project? We’ve got plenty more! Check out these CGI beauties.

