


Architectural Design Visualization for a Scandinavian Church
The Story Behind a Viral Architectural Visualization
This architectural design visualization made a big splash. As soon as the image was published on our website and shared on social media, we immediately started receiving questions from clients about how it was created. Frankly, we understand their curiosity — half of our office fell in love with the render.
In fact, many marketers and project managers are now using it as their desktop wallpaper. And even our graphic designer set it as a screensaver on both screens of his dual monitor setup.
So, want to know more about this render? Without further delay, let’s explore the concept behind the architectural visualization project, the technique used, and the process of its creation.
The Right Tools for the Story
The author of the render is Andrii Diachenko, senior 3D artist and mentor with ArchiCGI 3D visualization company.
His goal was to demonstrate what CGI and photography combined can achieve in storytelling and emotional marketing. And, as any successful marketer knows, emotions sell — stories connect people to design.
This principle applies perfectly to architectural design presentations. Investors, business owners, tender boards, and developers grasp a concept faster when it’s framed as a story. Therefore, 3D visualization makes it possible not only to showcase a project but also to build a powerful visual narrative around it.
Creating a Visual Narrative Through CGI
With photoreal 3D modeling, the 3D artist can digitally recreate the design in every detail. This would be the protagonist. Then, comes the context, the setting where the story unfolds. There are 3 ways of getting it:
- With CGI — when the scene is constructed from scratch digitally.
- With photomatching — which implies merging or blending a few photos or 3D assets.
- With a combination of the two, which was used in this architectural design visualization.
The Protagonist
Defining the Concept and Emotional Vision
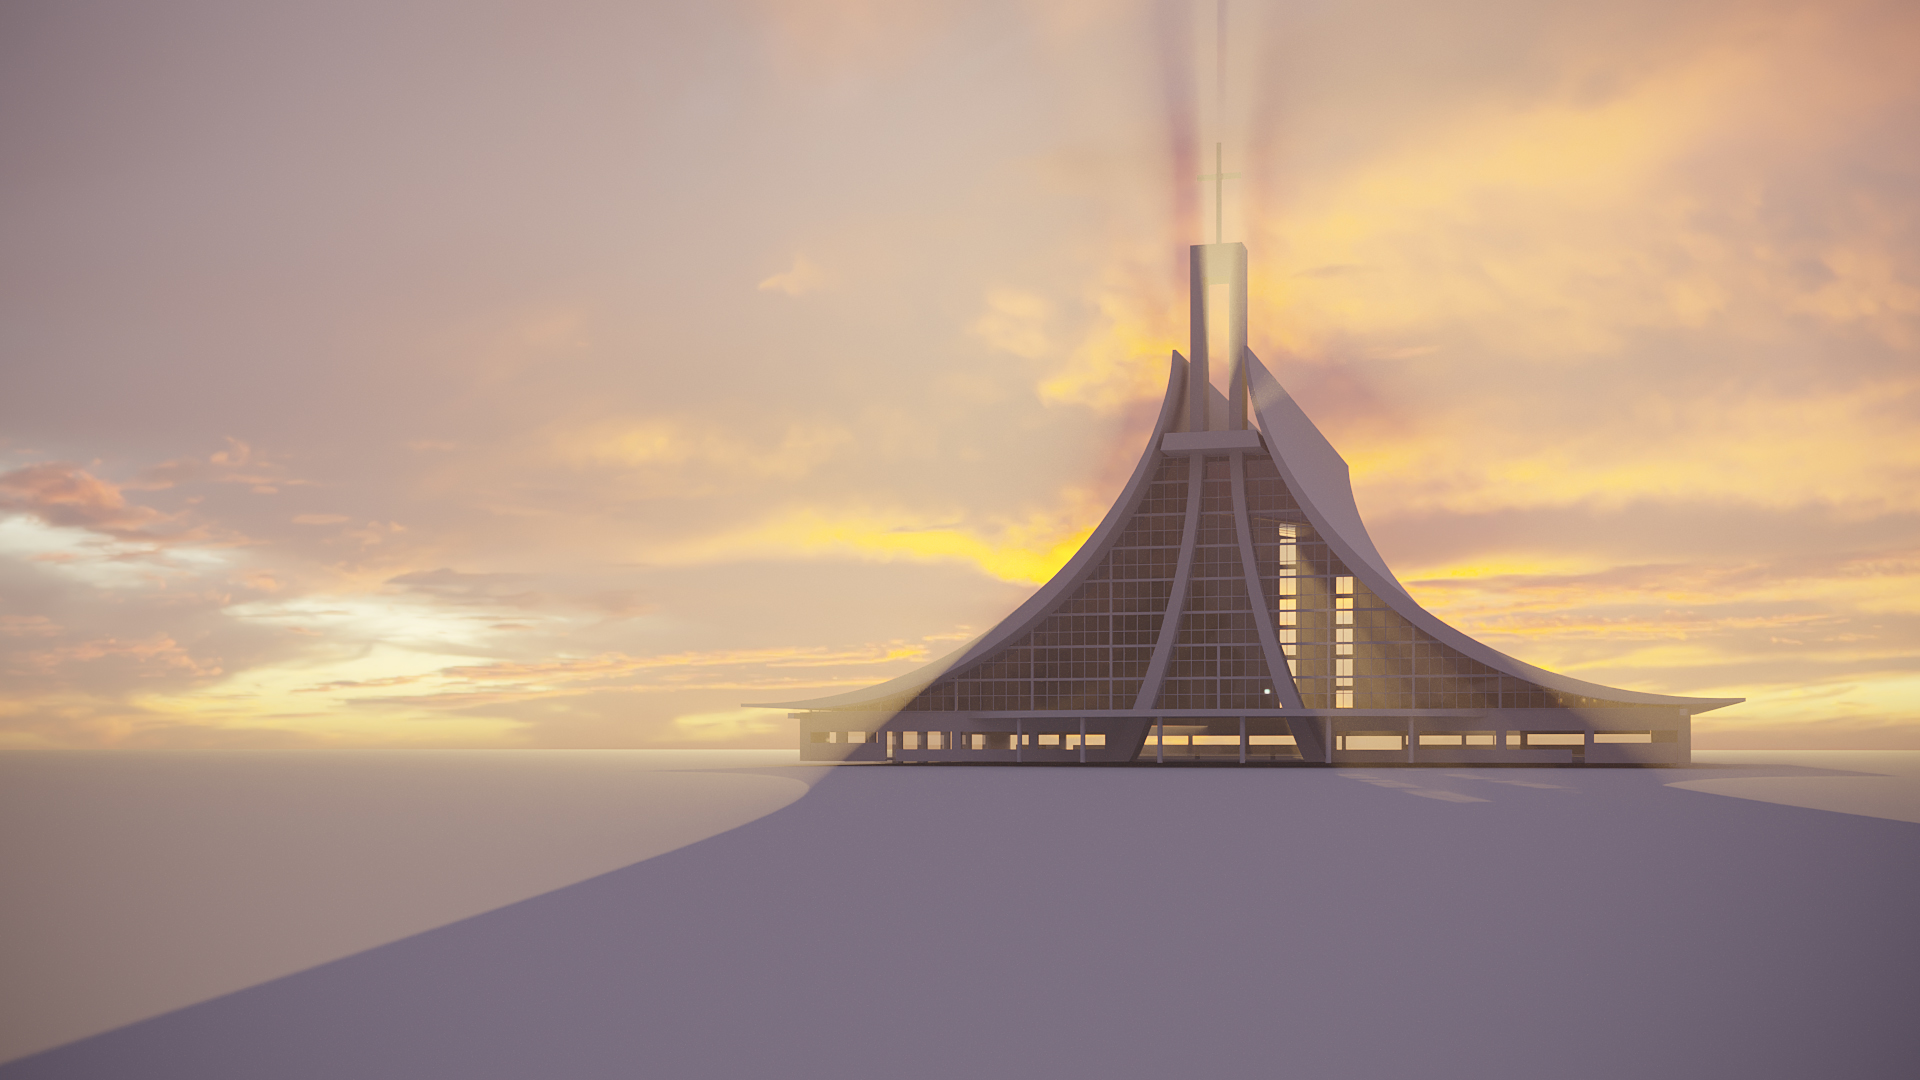
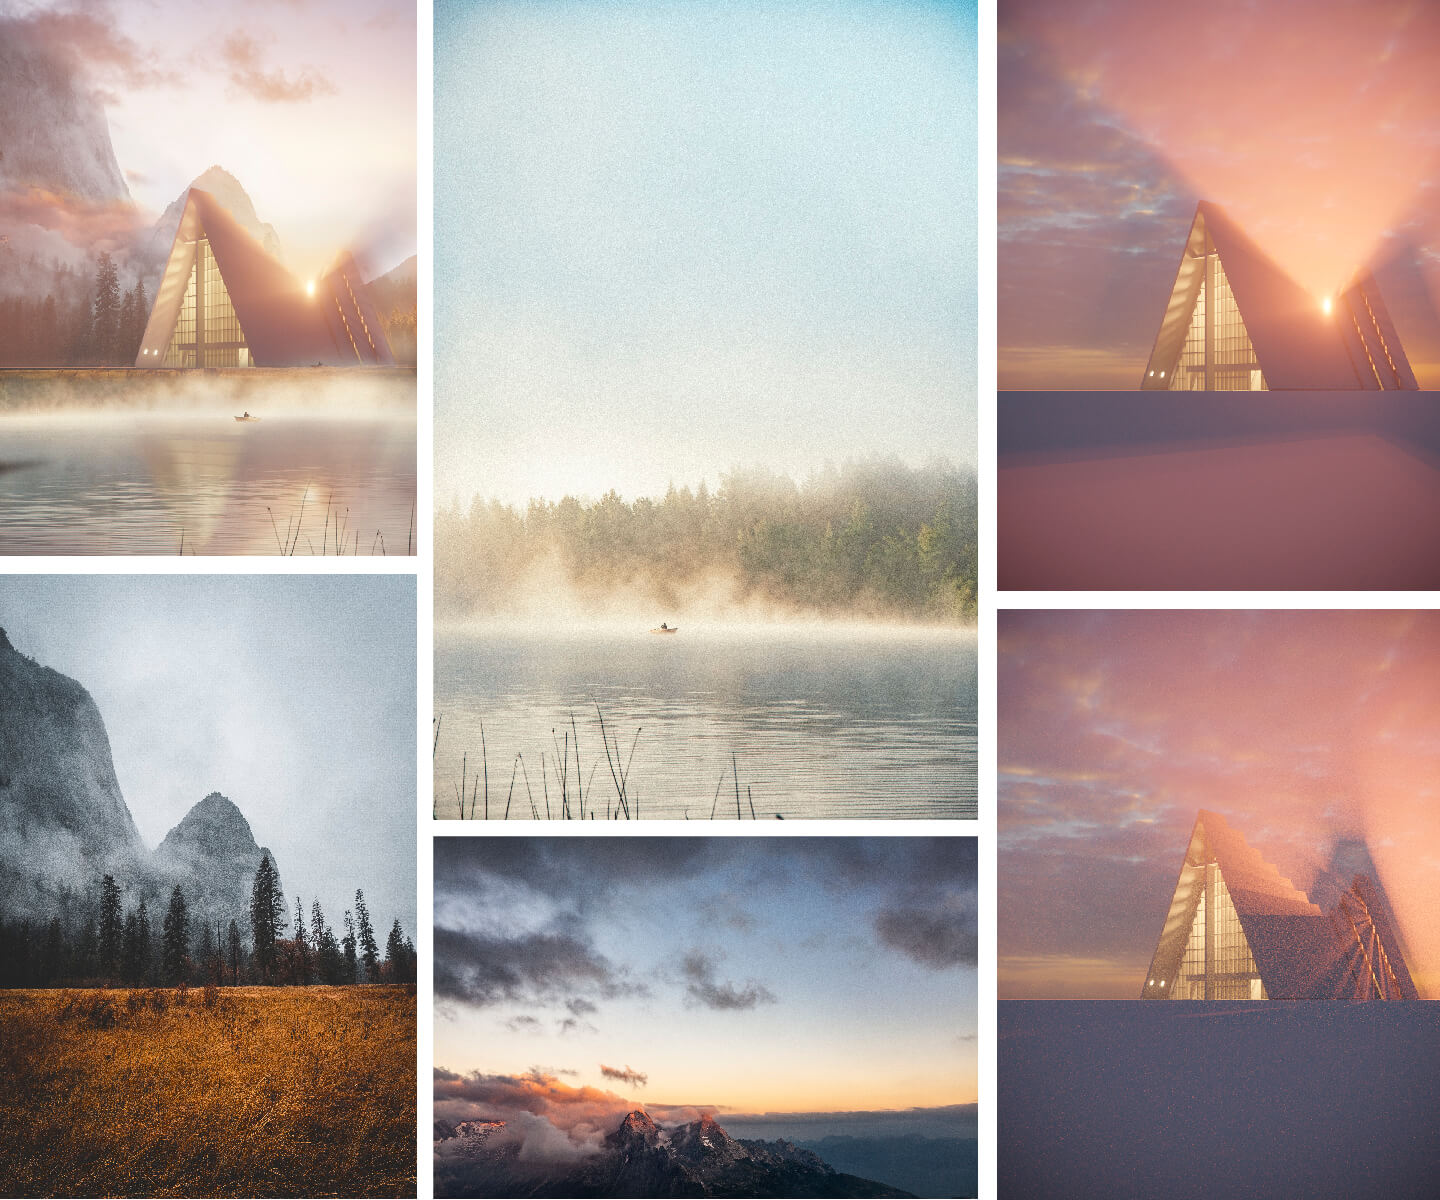
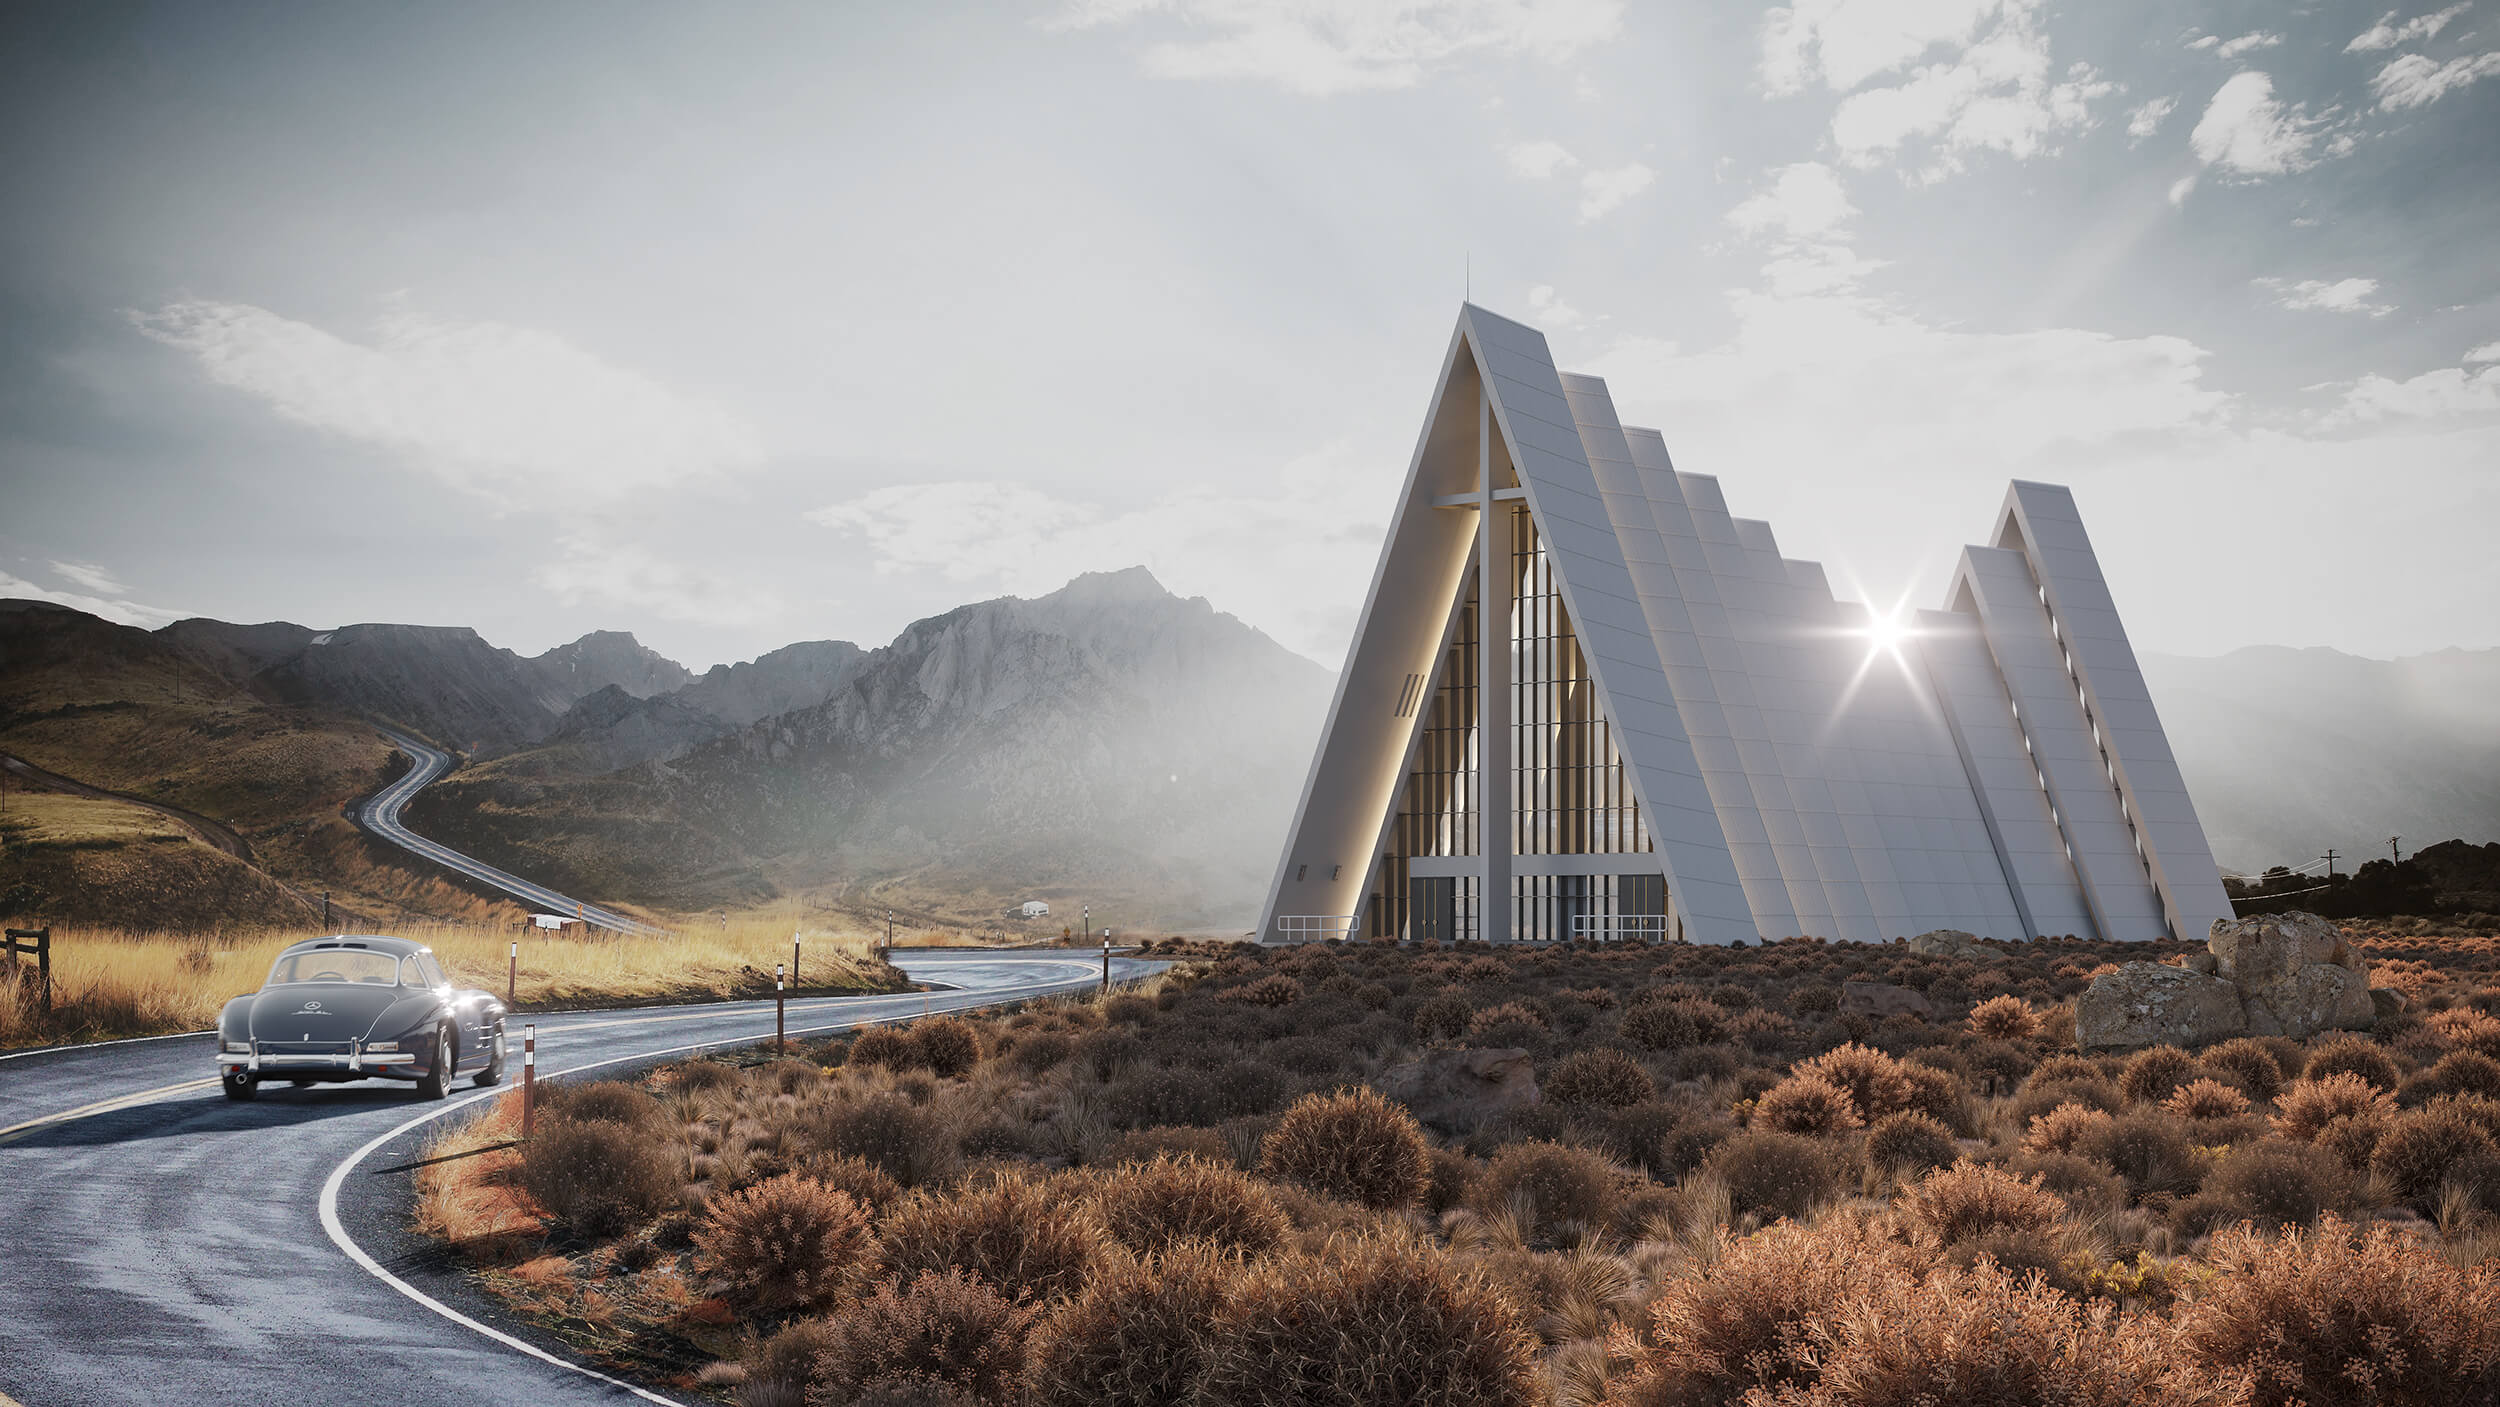
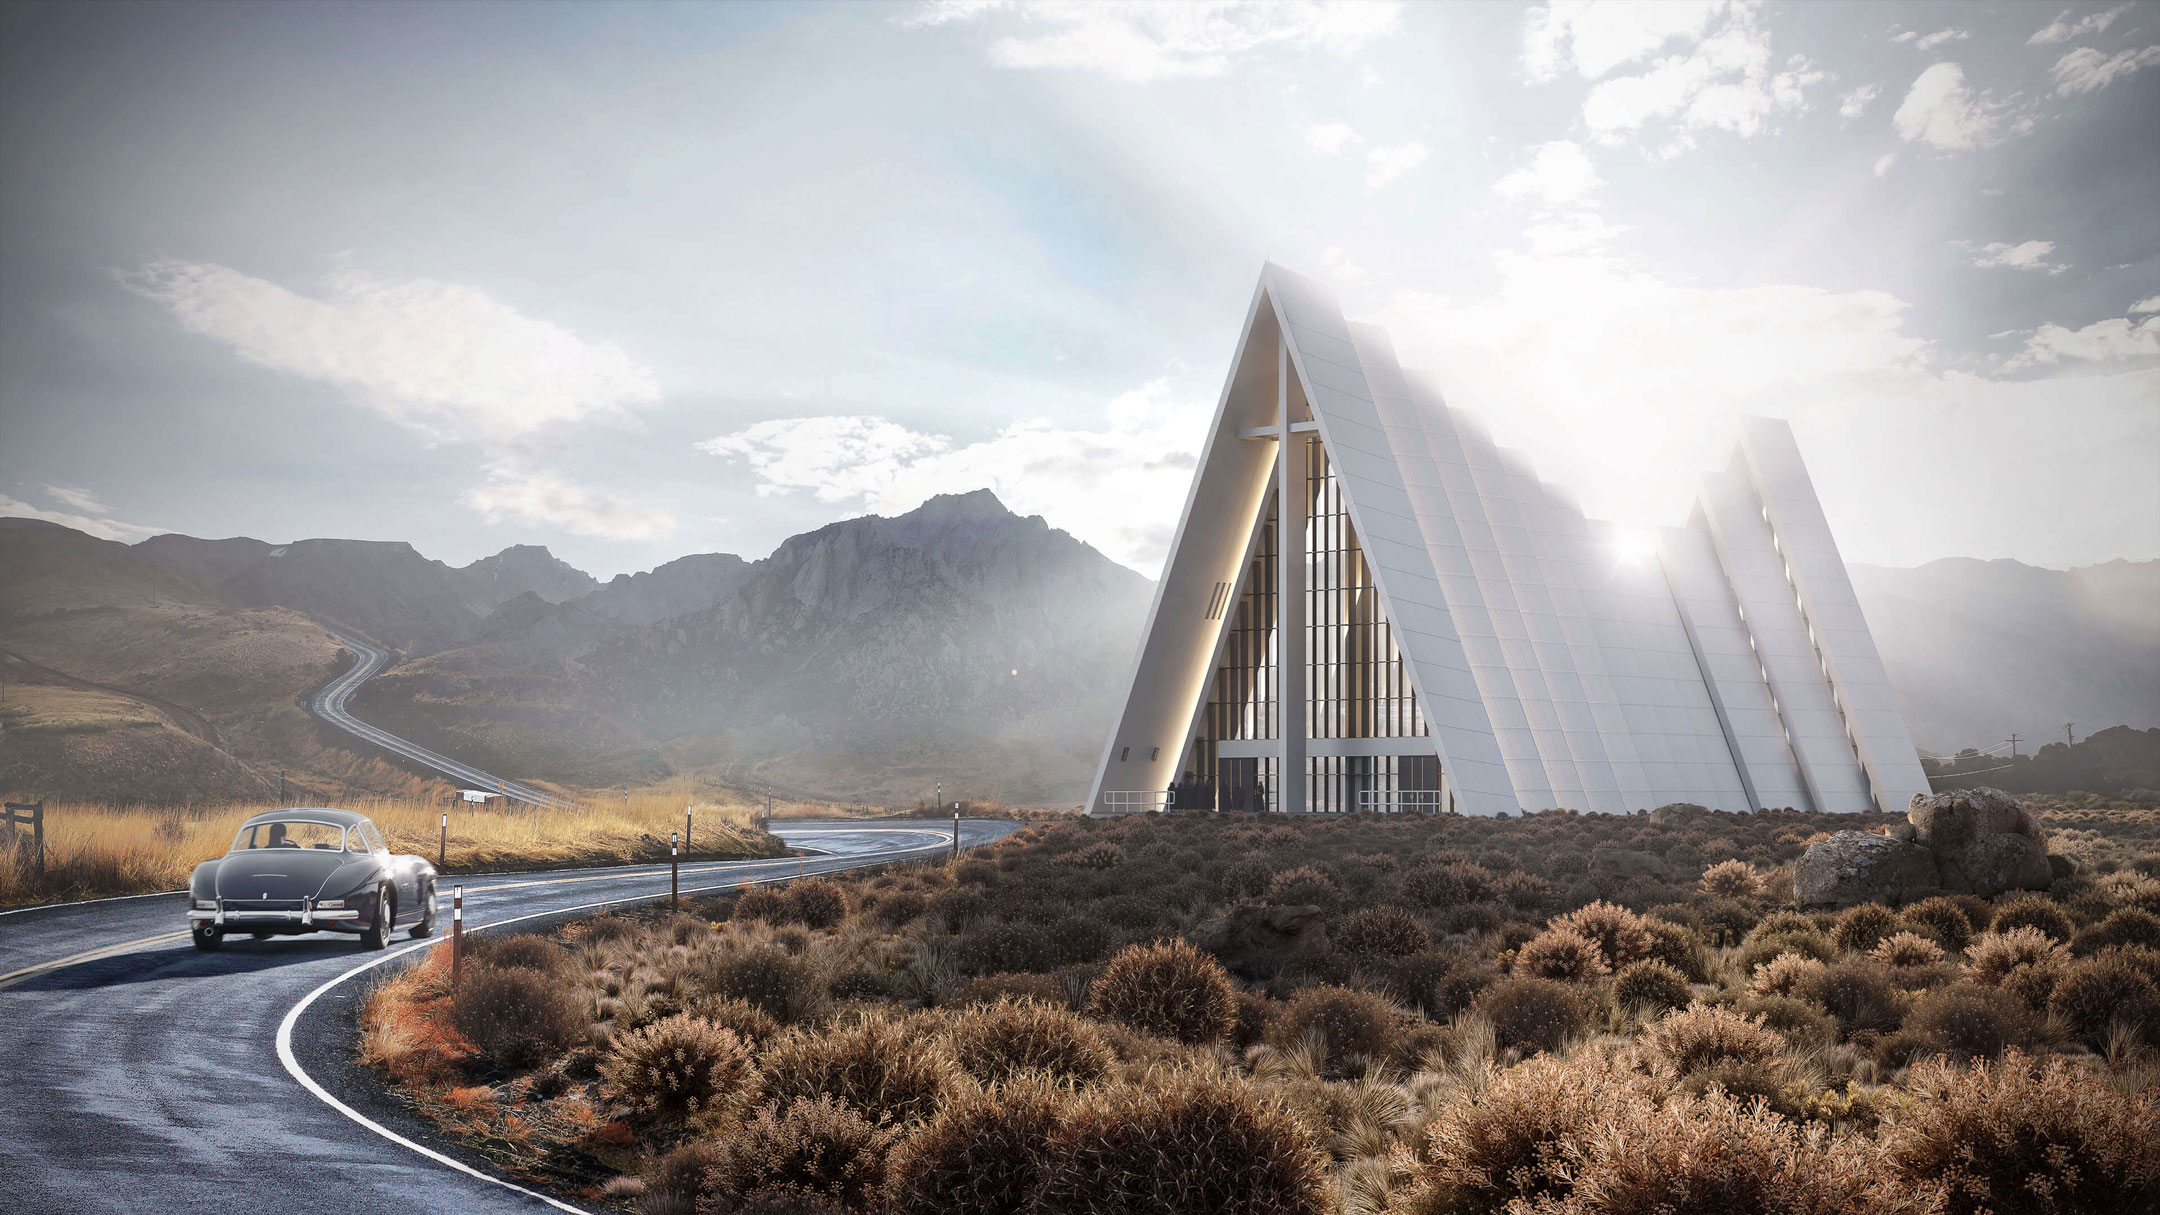
The 3D artist aimed to show how a building can interact harmoniously with its surroundings and evoke a strong emotional response from viewers. To achieve this, he decided to take an existing church design and place it in a completely new environment. Specifically, he envisioned the structure bathed in sunset light — illuminated by what photographers often call “God light.”
As you may know, this visual effect occurs when sunlight breaks through fog, creating dramatic, radiant beams. The result is a powerful and emotionally charged atmosphere that captivates the viewer.
Establishing the Visual Formula
For this reason, Andrii saw it as the perfect story for a church 3D visualization — a moment of unity between nature, architecture, and spiritual presence. At this stage, he formulated a clear artistic vision for maximum emotional impact: a minimalist church contrasted with the untamed beauty of Scandinavian nature.
.
Choosing the Right Architectural Symbol
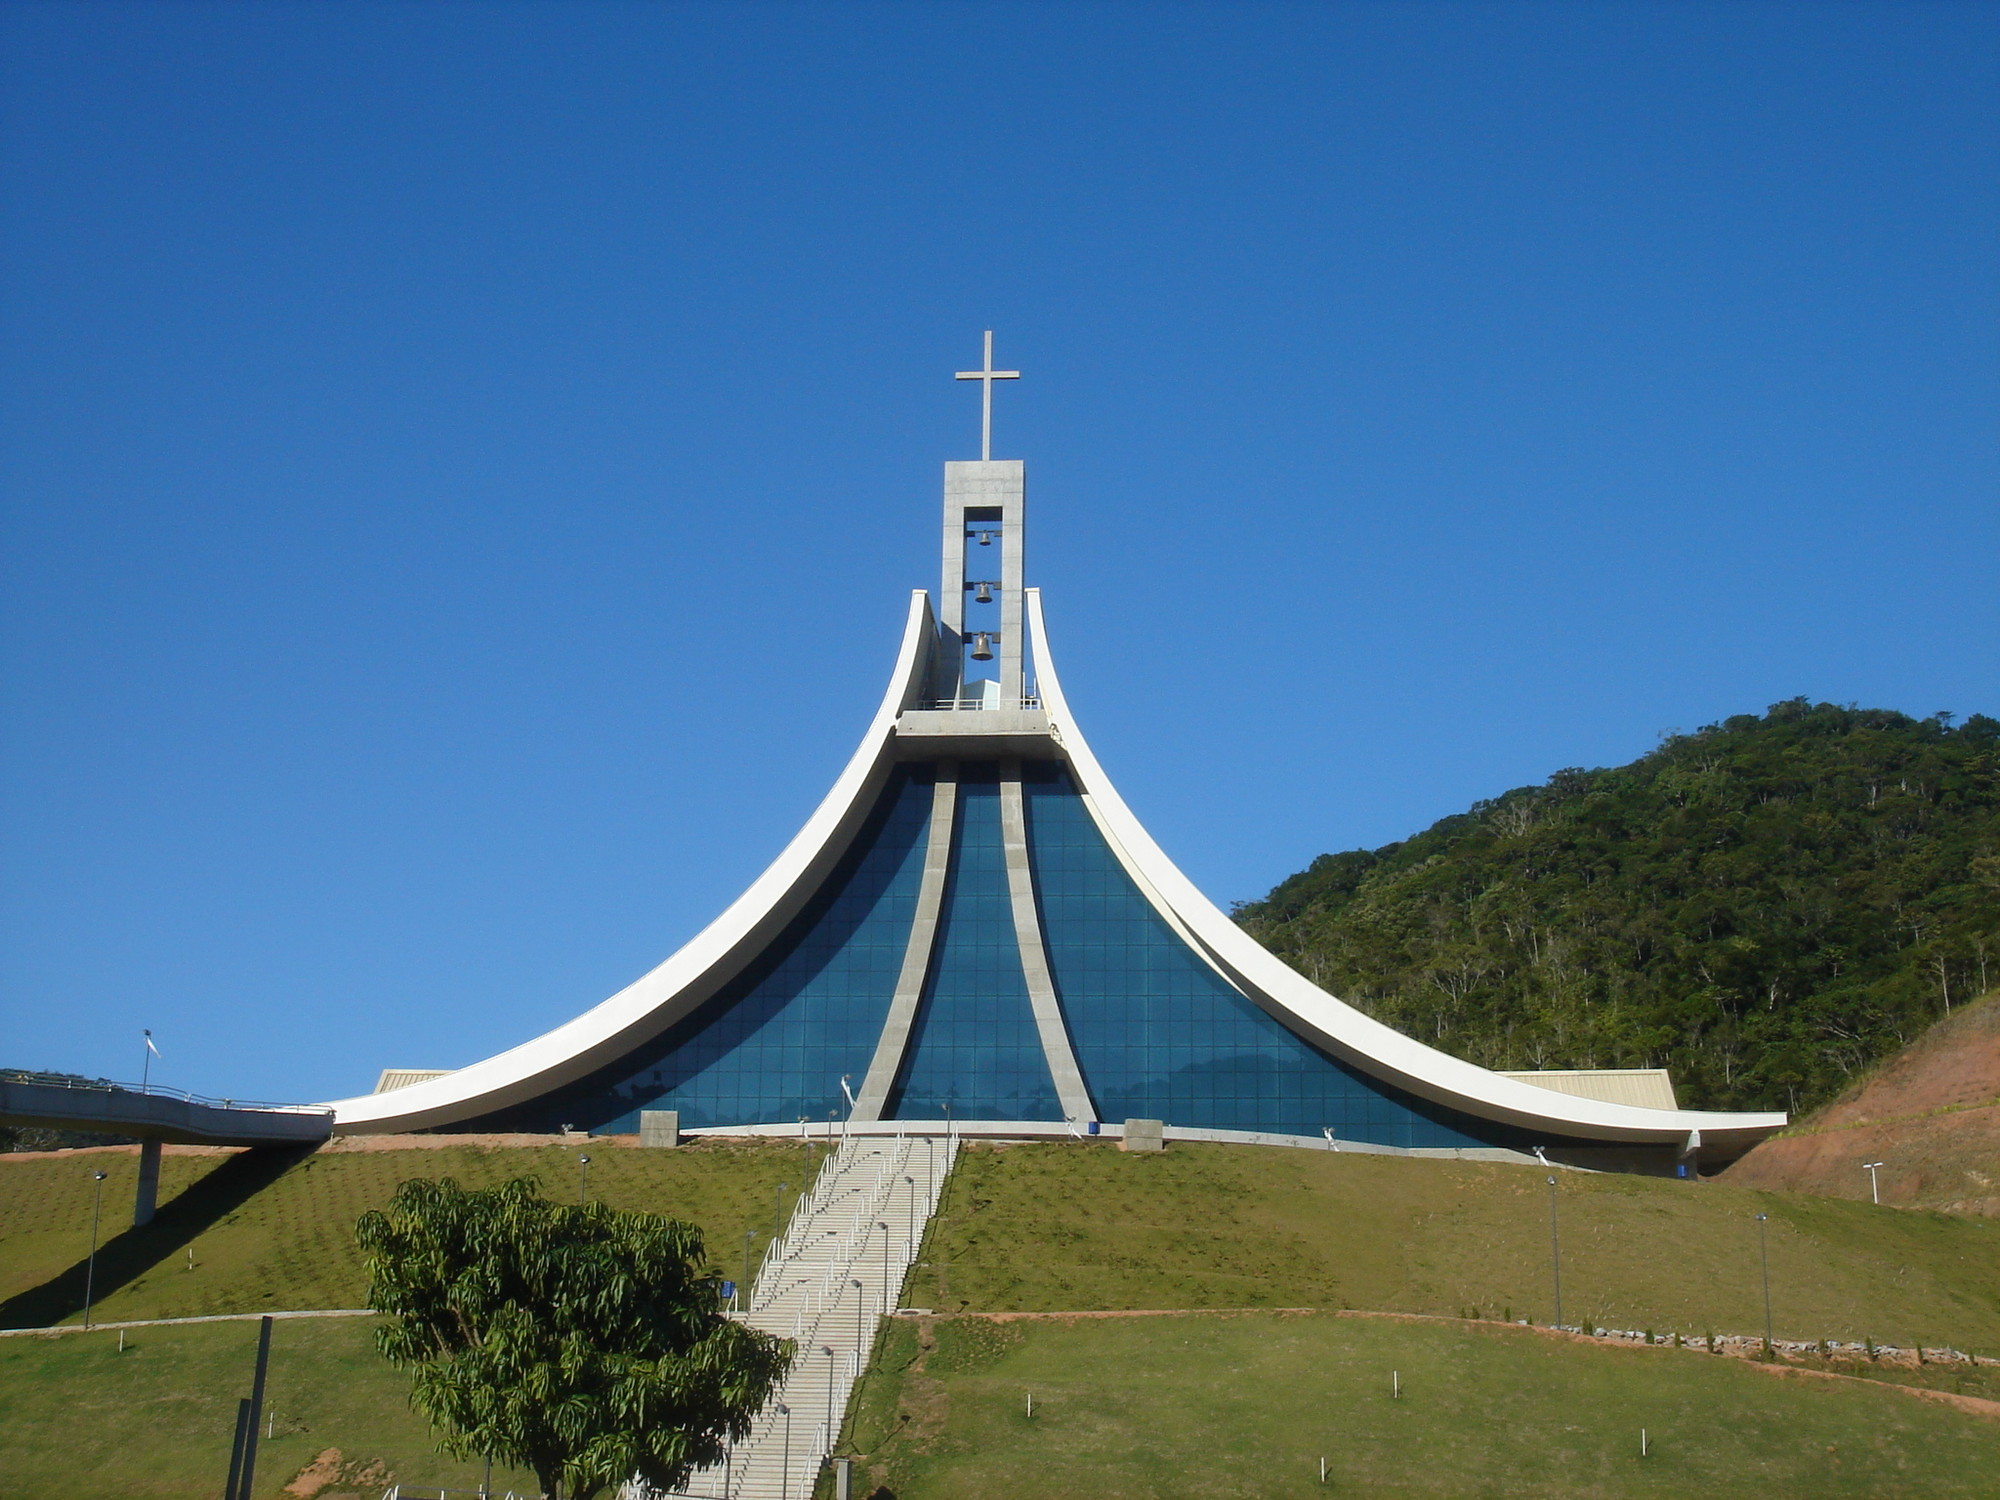
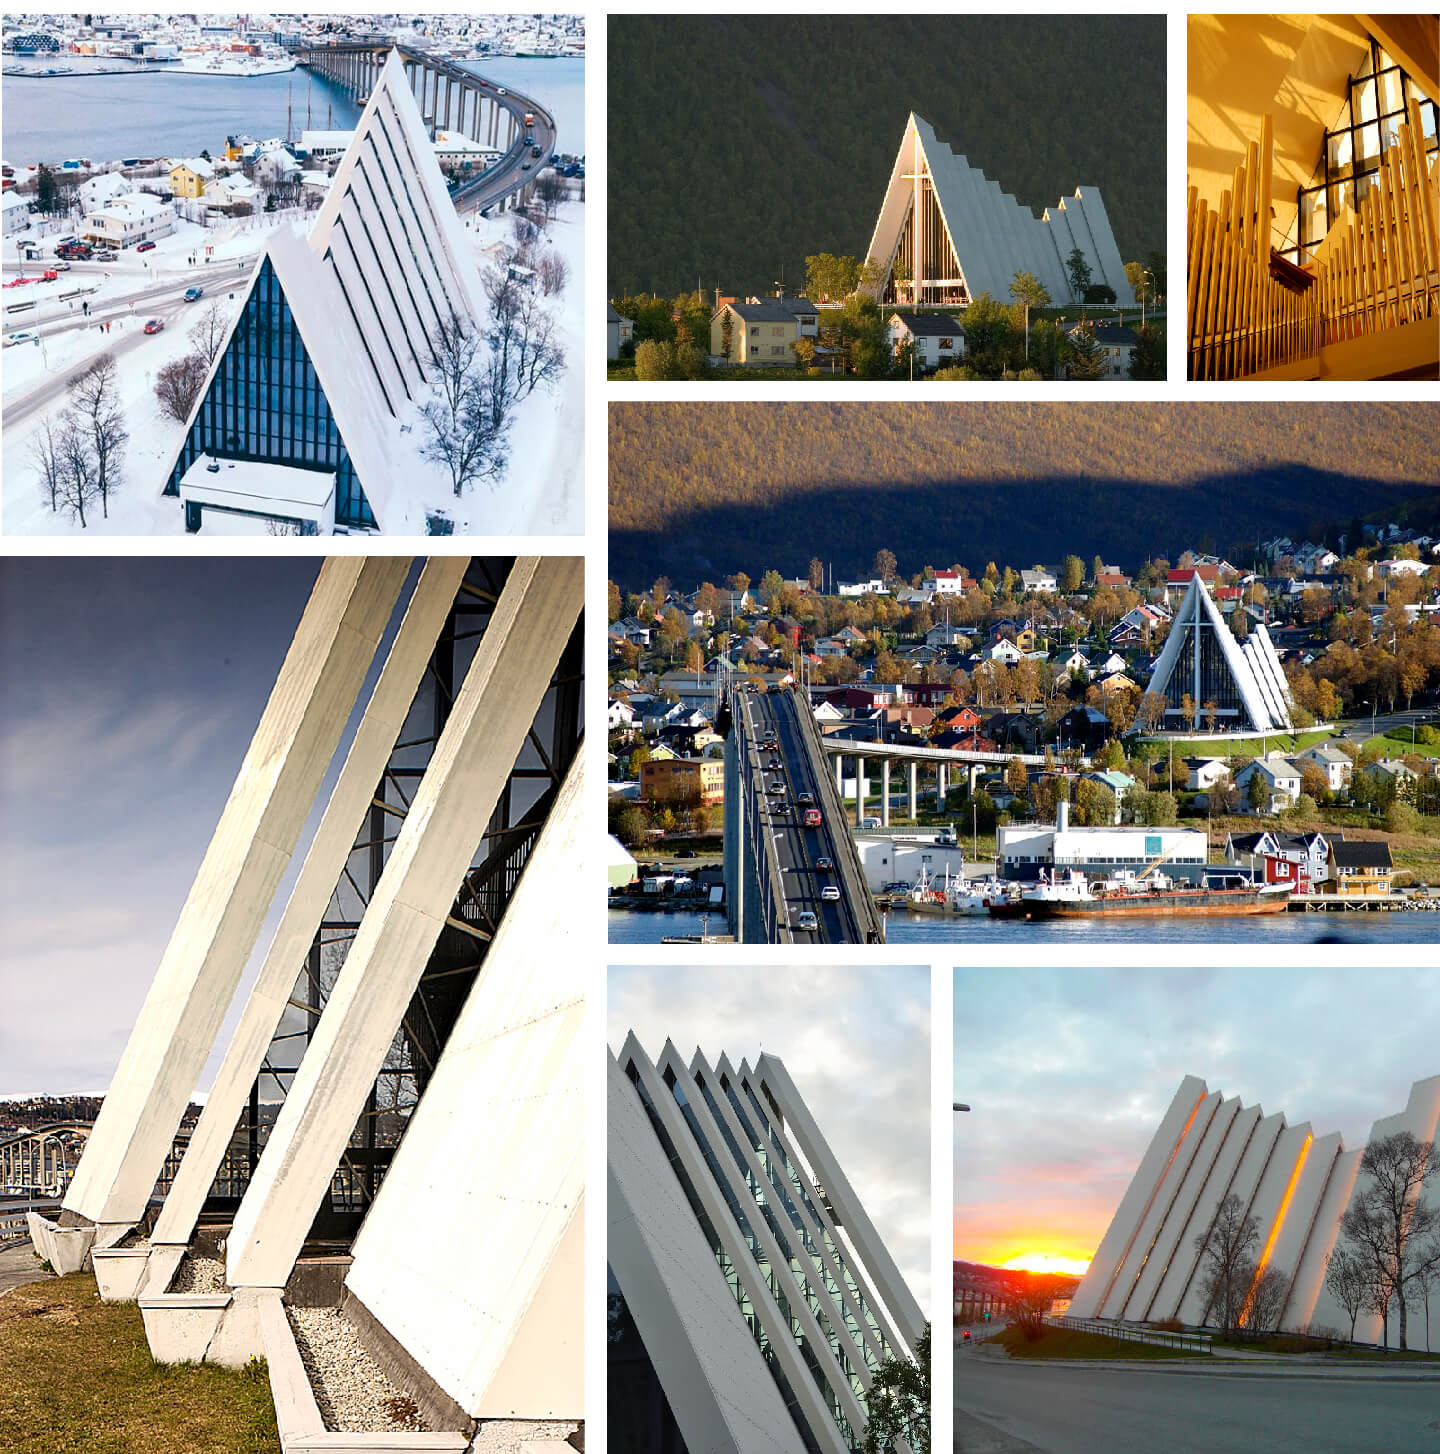
After that, the 3D artist began choosing the architectural subject for visualization. Andrii considered several iconic churches — the Santa Paulina Sanctuary in Brazil, the Ålgård Church in Norway, and the Arctic Cathedral (Tromsdalen Church), also in Norway. Although each of them looked sensational, he had to select only one — and finally chose the Tromsdalen Church.
To understand how tough was the choice, let’s take a good look at all of them. Here you can see the Santa Paulina Sanctuary designed by HS Arquitetos. More information on this architectural gem you can find in this Archdaily article, where Andrii was looking for inspiration.
Testing Composition and Light
The 3D Visualizer even created a 3D model of it to see how the building will work with the light he wanted. Here’s you can see the sketch where Andrii tried the composition out.
This is the amazing Aalgaard church by Link Arkitektur that caught Andrii’s eye as highly innovative and atmospheric. You can learn about its design in this Archdaily article.

And finally, the masterpiece that simply took Andrii’s breath away — the Tromsdalen church.
This is an exquisitely beautiful design. But what would it look like situated in a wild landscape rather than in the city by a busy road? Let’s discover.

The Process of Architectural Design Visualization
Stage 1: Geometry
First, Andrii modeled the geometry of the architectural object. When the grayscale 3D model was ready, he played with it to choose the view and lighting. Based on the position of the sun and fog, the 3D visualization artist found the best angle and height for the camera. All this information will help choose a photo for the background. For it’s crucial that the 3D model fit the picture in order to get a beautiful and natural look.
Sketching
To find the perfect perspective, the 3D Visualizer played with a few options he analyzed and tweaked in a series of sketches. Here are the versions he considered.
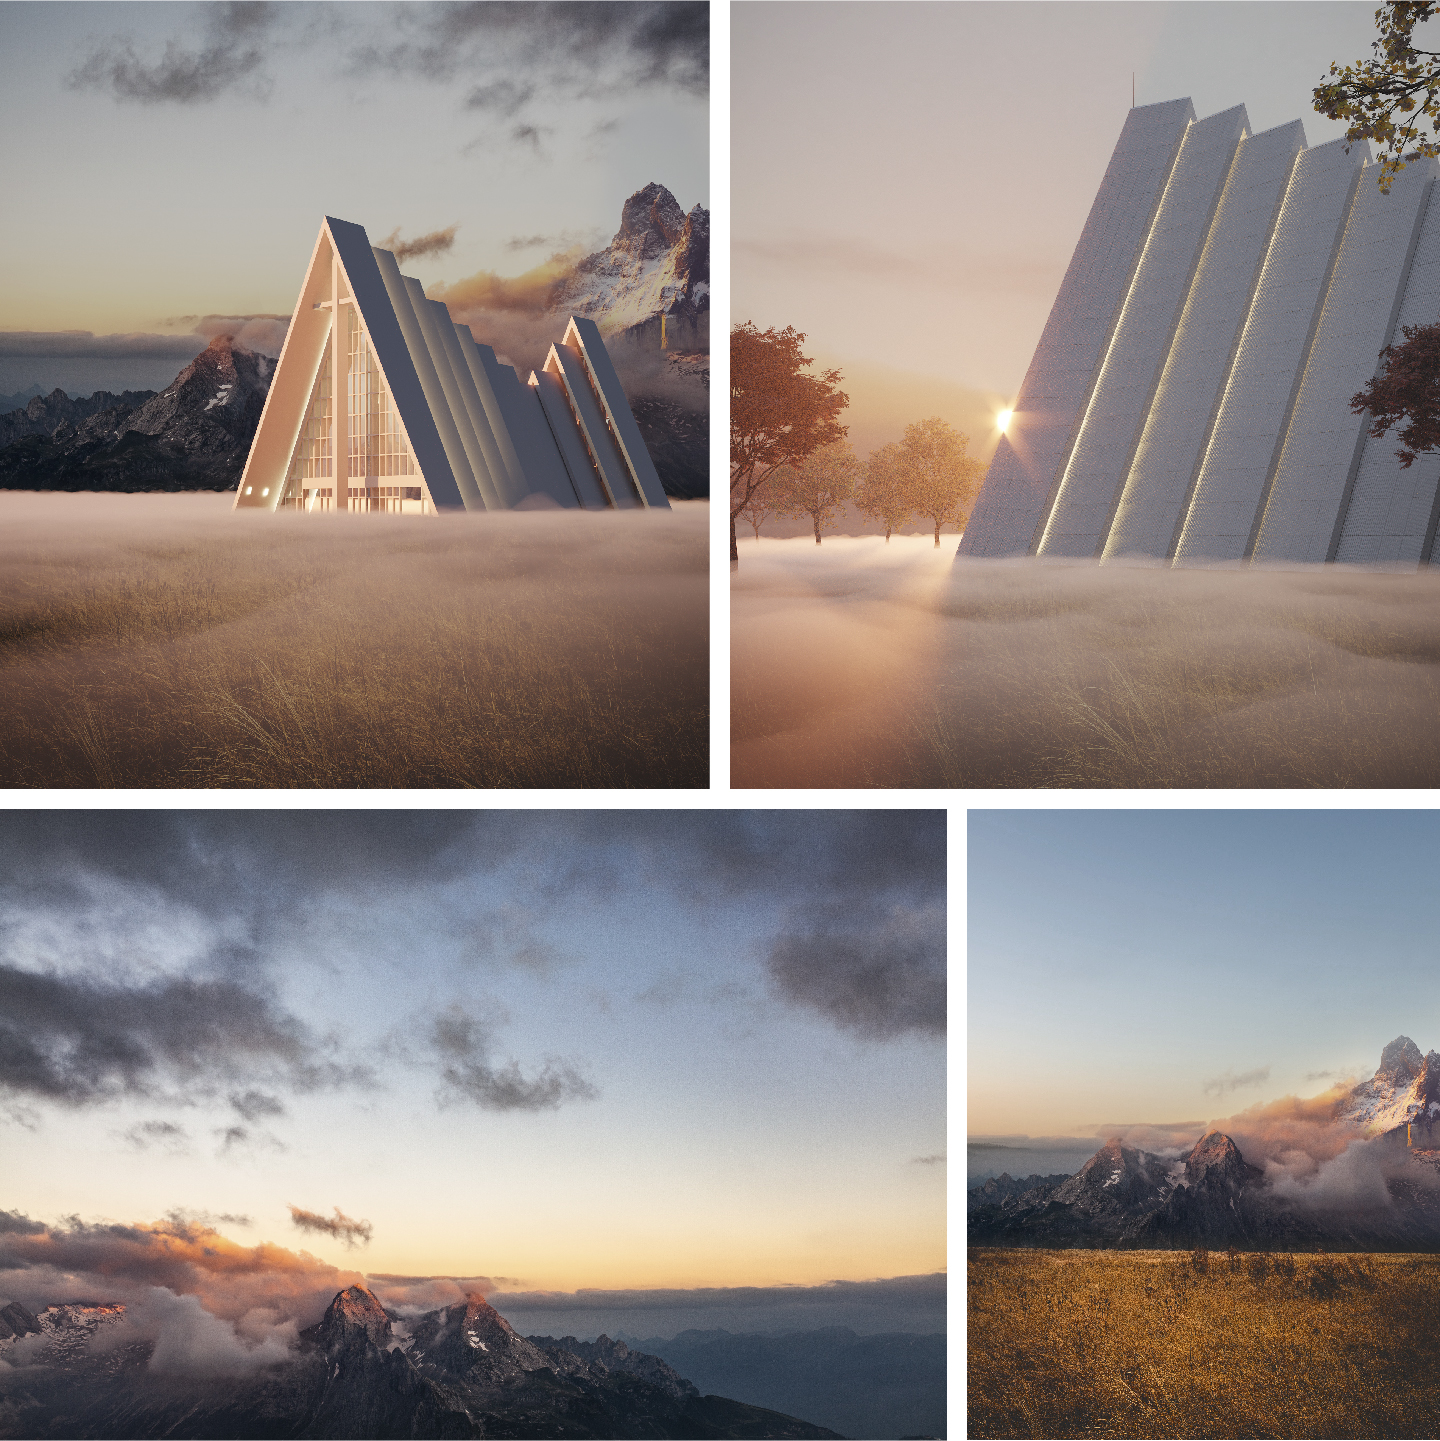
Next, it was time to work on the 3D model realism. Andrii textured it, recreated the details. As the building CG model was ready, the 3D artist checked whether all elements worked together. He put the 3D model in the scene, switched on the lighting and the fog. Everything was perfect.
Stage 2: Background
It was time to search for the right backdrop photo for the 3D architectural design visualization. The image was to conform to the following criteria:
- it had to be a Scandinavian landscape
- it needed to accord with the chosen perspective
- its lighting had to combine well with the fog.
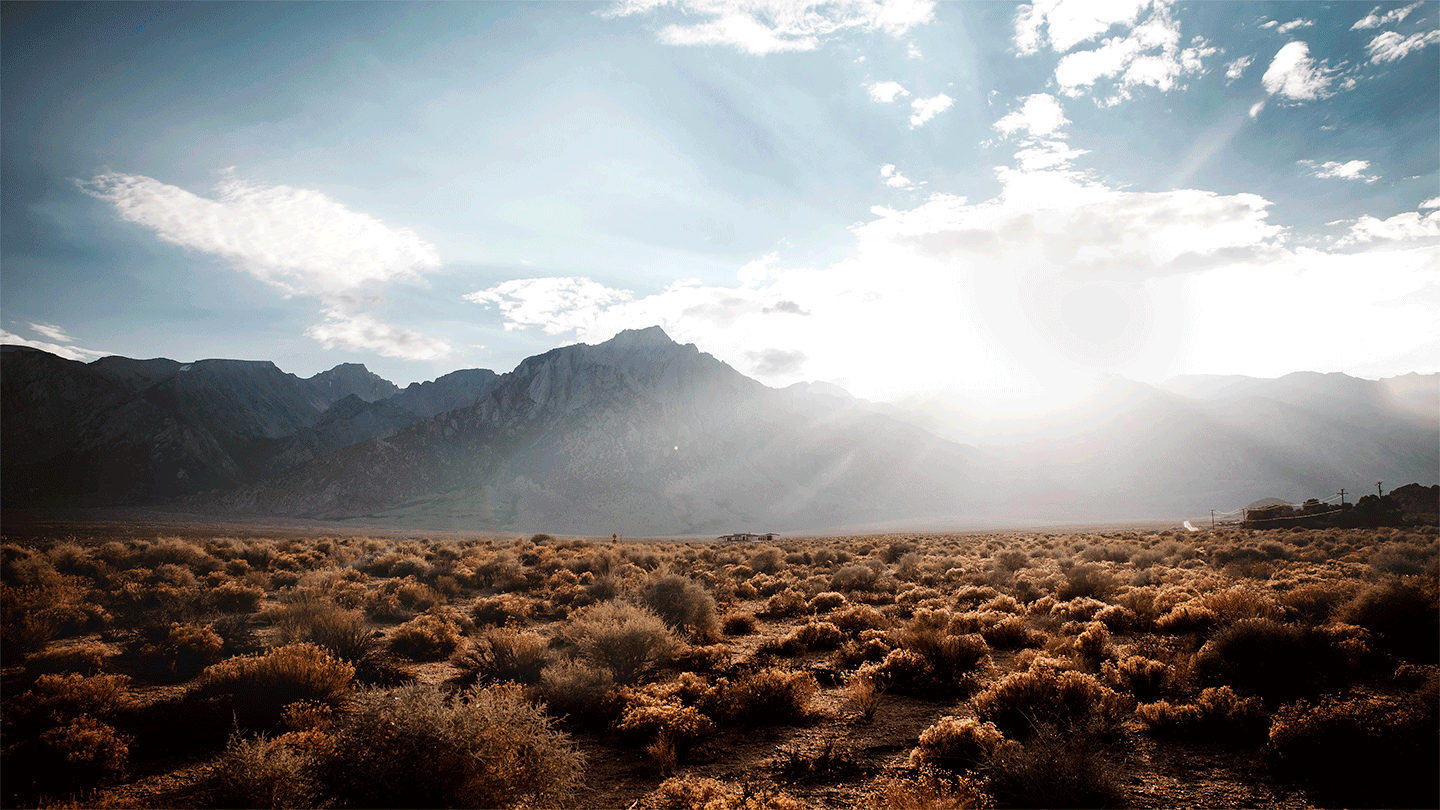
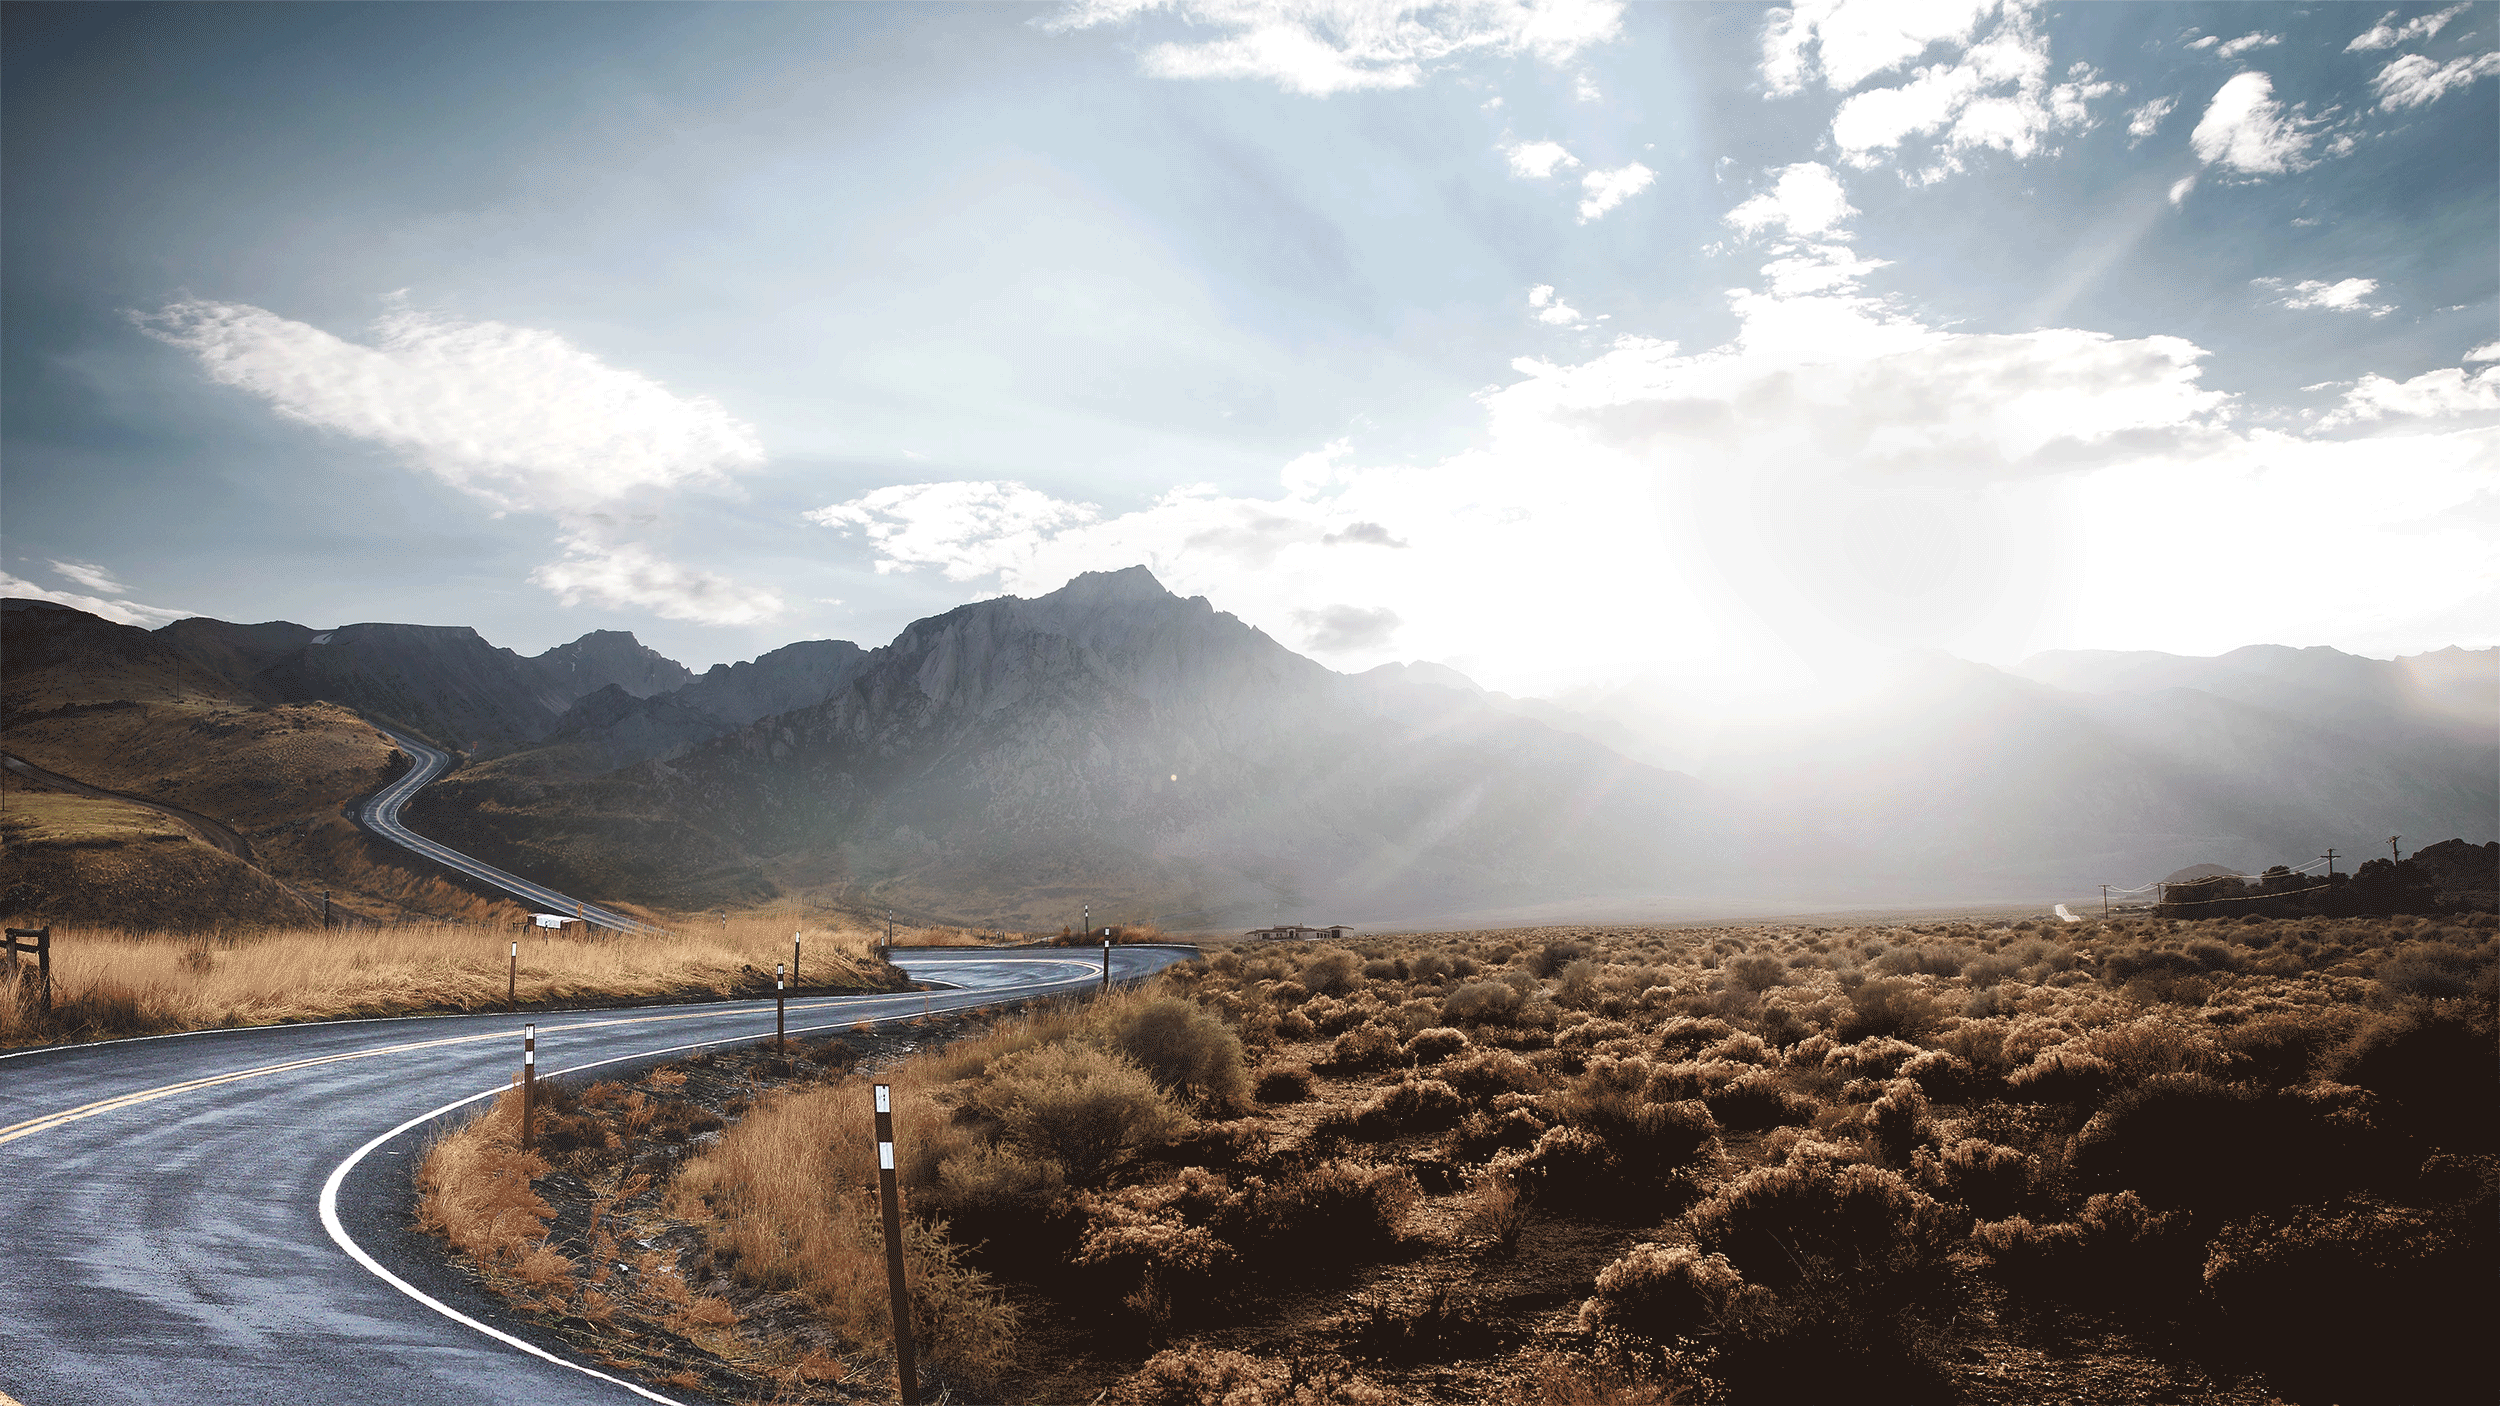
Finding the Perfect Background for the Scene
The 3D visualizer searched for several hours until, finally, he came across the perfect fit. The photo ticked all the boxes — composition, mood, and perspective — and, moreover, conveyed the exact atmosphere he envisioned.
The landscape looked absolutely breathtaking, while the sunset light added an emotional impact that elevated the entire setting. Admittedly, this lighting would present a technical challenge later on — but, as it turned out, it was one Andrii could easily turn to his advantage. We’ll return to that part a bit later.
Building Movement and Life into the Composition
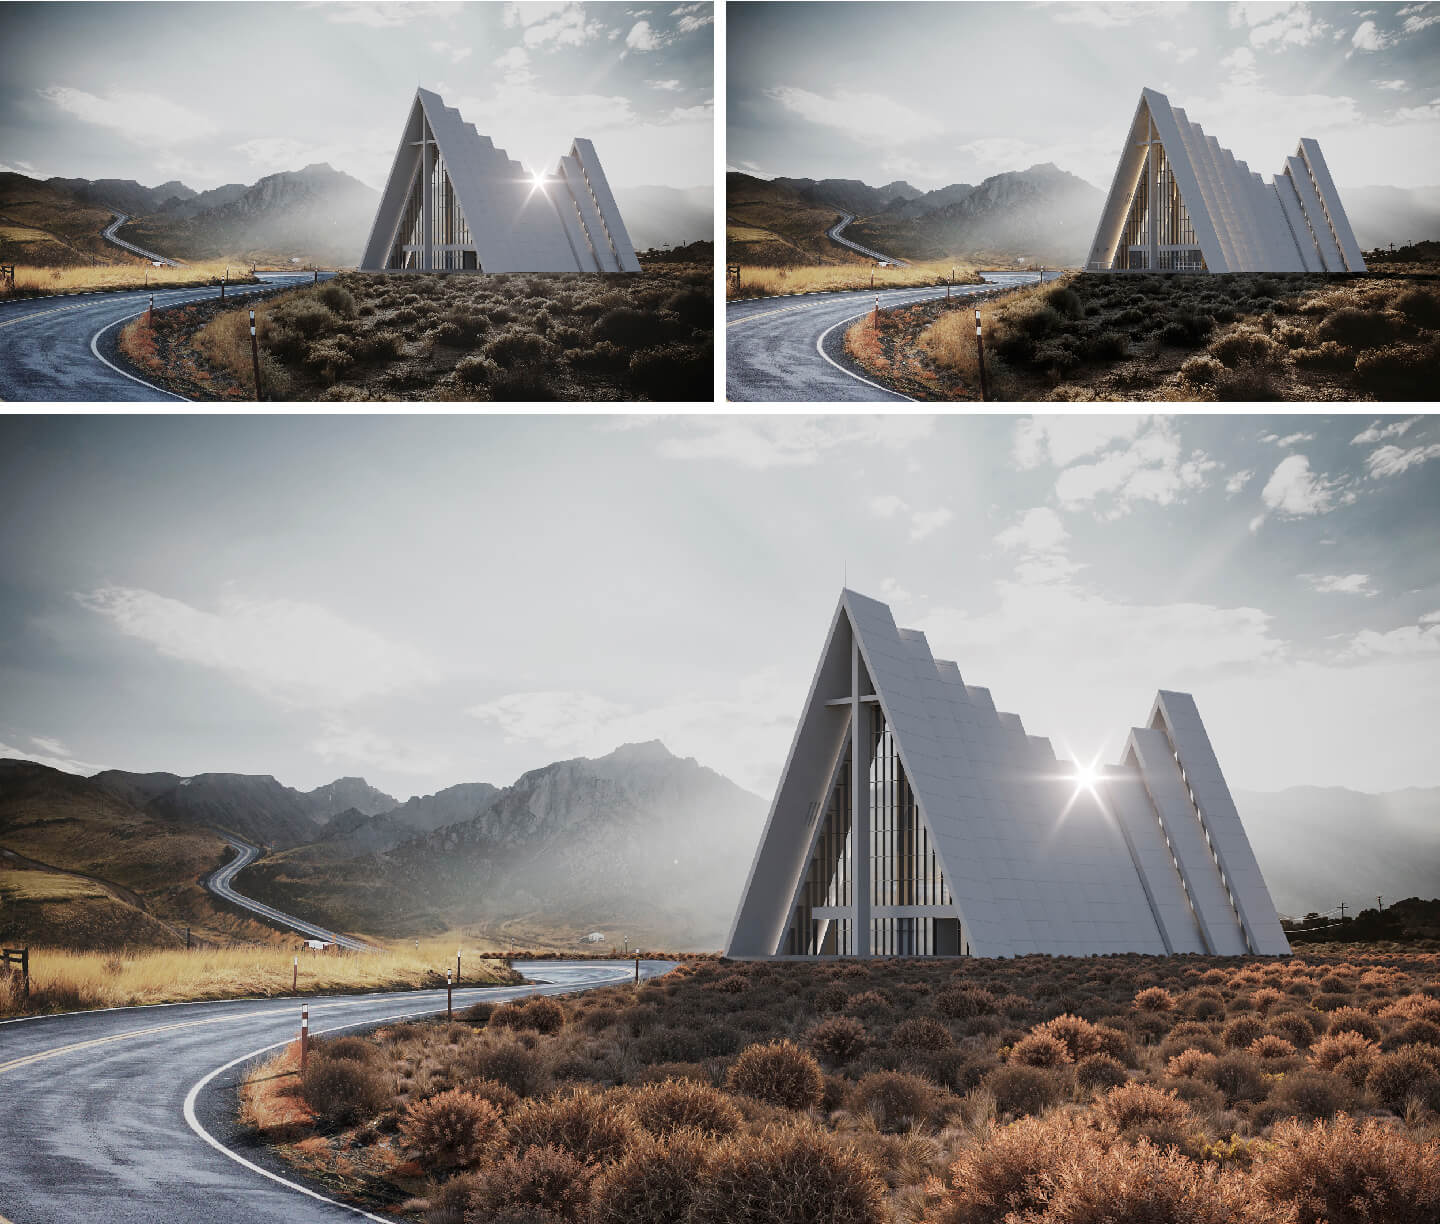
Once the background was selected, the 3D artist imported the photo into 3ds Max to preview how the future architectural design visualization would look. Right away, he was captivated by the result and decided to infuse the still image with a sense of movement. After all, even a subtle dynamic element can make a static scene feel alive.
To achieve this, Andrii envisioned a winding road with a car driving through the landscape. He searched for a photo showing a road in the correct perspective and seamlessly combined it with the background image in Photoshop. As a result, the composition gained a clear direction and energy, leading the viewer’s eye naturally toward the church.
Stage 3: Impeccable Light
Balancing Light Between CGI and Photography
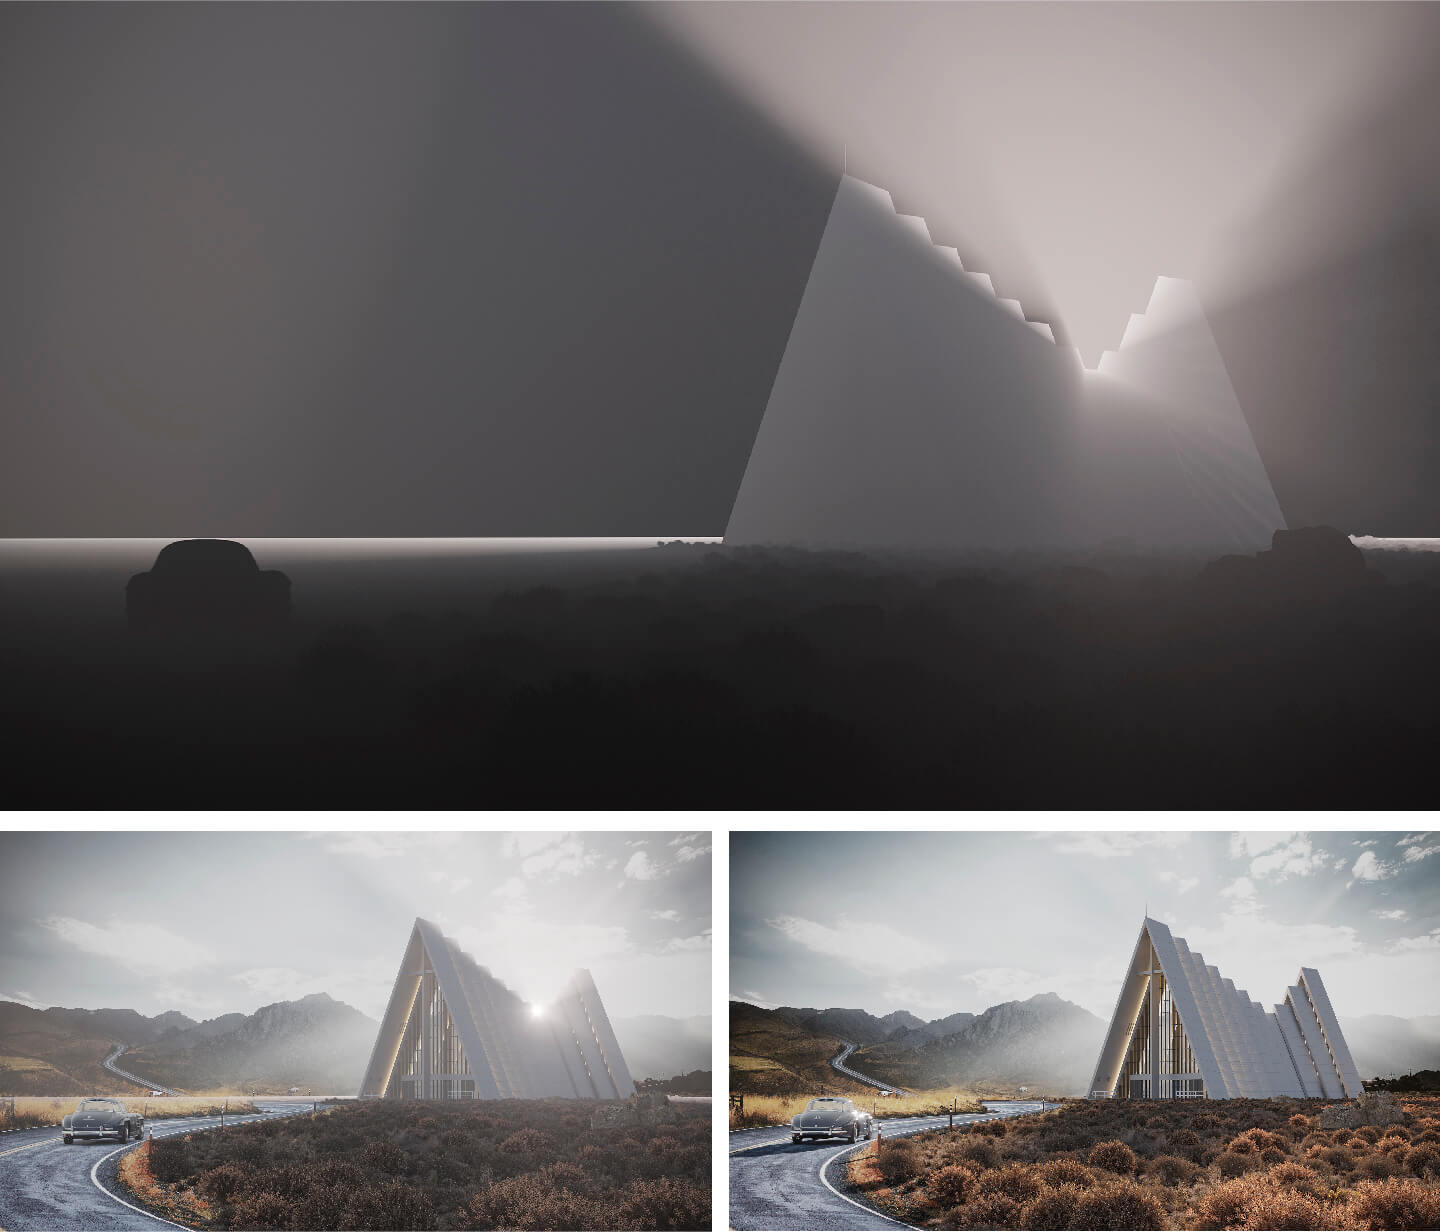
When the scene was built, it was finally time for rendering. However, there was one catch. While Andrii was pleased with the composition and how the architecture interacted with the picturesque landscape, he realized that the lighting didn’t work as expected.
Normally, before rendering a scene, a 3D artist sets up the lighting and checks how it enhances the image. In this case, though, the background wasn’t computer-generated — it was a photograph, which naturally came with its own light. As a result, the sun glares on the grass looked beautiful but conflicted with the shadows cast by the 3D model.
The virtual sun in the scene caused the church to project a massive shadow over the grass, yet the silvery glares from the photo remained visible. In reality, these two effects could never coexist, and the overall lighting appeared unnatural.
A Clever Fix: Merging CGI and Real Elements
To solve the problem, Andrii added CGI elements to the foreground. He digitally “planted” 3D models of shrubs that matched the vegetation in the photo and recolored them in Photoshop to ensure a perfect tone match. In addition, he placed a few stones for extra visual balance. Consequently, the scene not only looked more cohesive but also gained depth and realism.
Most importantly, this clever technique blurred the boundary between 3D visualization and photography, making the transition practically invisible.
Stage 4: Architectural Detailing
Once the environment was complete, Andrii moved on to refining the church model itself. He enhanced facade materials, added doors, a lightning rod, railings, and even a chandelier visible through the glass. These subtle details elevated the realism and narrative precision.
Stage 5: 3D Rendering
Creating Dual Lighting Scenarios
At this stage, many artists would stop — but Andrii decided to push further. To capture light beams shining through the fog, the sun had to be low, which created overly dark shadows. Therefore, he rendered two separate versions.
First, he produced a softer daylight render with fog. Then, he created a second version without fog but with the sun lower on the horizon. By merging both in post-production, he achieved that ethereal glow around the church.
Stage 6: Post-production and Final Polish
During post-production, Andrii combined the renders and adjusted the colors for a cinematic balance. He added figures of nuns and a passing car to subtly guide the viewer’s attention. The final result radiated both serenity and strength — a visual metaphor of faith and nature intertwined.
Final Rendering and Reflection
The completed visualization demonstrates how CGI and photography, when combined, can achieve spectacular storytelling power. Through photomatching, a 3D visualizer can build an entire believable world around architecture — full of life, mood, and emotion.
Want to present your design or concept with the same level of impact? Contact us for 3D rendering services. Fill in the form below, and get a 3D masterpiece fit for an art exhibition.
Want to learn how much your project costs? See how we evaluate 3D rendering projects

Irma Prus
Content Writer, Copywriter
Irma writes articles and marketing copy for ArchiCGI. Her dream is that more people discover the power of CGI for architecture. Irma is into neuromarketing, ruby chocolate and Doctor Who series.